This guide explains how you, as a store manager, can manually add or change a subscription in your WooCommerce store.
We recommend starting with the Subscriptions overview and Store Manager Guide if you have not yet read this important information.
Manually add a subscription
↑ Back to topYou may want to sell subscriptions over the phone but still manage them in your WooCommerce store. Or as friends and family hear about the super cool products available in your store, you may want to provide them with a free subscription.
Woo Subscriptions makes this possible!
To manually add a subscription:
- Go to WooCommerce > Subscriptions.
- Click the Add Subscription button.
- Add a customer to the subscription. More info below in Add a Subscriber section below.
- Add a billing schedule. More info below in Set a Billing Schedule section below.
- Add products, shipping costs, and fees to the subscription, following the process described in the Add Line Items section below.
- Add taxes, following the process described in the Add Recurring Taxes section below.
- Recalculate totals for the line items and taxes, following the process described in the Calculate Recurring Totals section below.
- Set the subscription status, following the process described in the Set Subscription Status section below.
- Under Subscription actions, click Update to start the Subscription.
- Under Subscription actions, select “Create pending parent order”. This will create a pending parent order associated with the subscription.
- Go to the pending parent order, and you can email the invoice to the customer by selecting “Email invoice to customer” under Order actions.
This creates a subscription that can be paid by either a manual renewal payment or supported automatic renewal payment gateways for each billing cycle.
If a parent order was created, your customer can log into their account and pay for said order. They can do so from either the Orders section or when viewing the subscription under Subscriptions of the My Account area.
Once the pending parent order is paid, the subscription status will switch to “Active” and a new renewal order will be created when the next payment is due based on the billing schedule you set in step 4.
Depending on whether the payment gateway extension supports it or not, you can also link a subscription to a payment gateway for automatic recurring payments. To do that, follow the instructions in Charging Renewal Payments.

Add a subscriber
↑ Back to topEach subscription in your store needs to be associated with a WordPress user account for a customer. Therefore, a good first step when creating a subscription is to link the customer account to the subscription.
If the subscriber does not already have a user account with your WordPress site, you should add the user via the Users → Add New administration screen before proceeding.
To add the customer to a subscription:
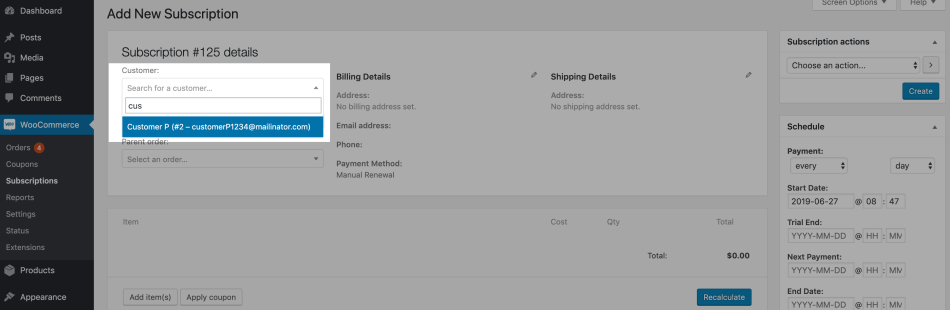
- Click the Customer select box under the subscription details meta box.
- Type the first few letters of the name or email for the customer.
- Wait for WooCommerce to find a set of matching accounts.
- Once a set of accounts is loaded, click the customer.
- Save the customer on the subscription immediately by clicking the Create button (optional).
Once you have added a customer to the subscription, enter the billing and shipping addresses to be used to manage recurring payments and shipments for the subscription. Existing addresses on the customer’s account can automatically be loaded into Billing Details or Shipping Details of the Subscription details meta box.
To add these details:
- Click the pencil icon next to Billing Details.
- Click Load Billing Details.
- Click the pencil icon next to Shipping Details to Load Shipping Details or Copy Billing Details.
You can also add or edit these addresses, if necessary.
Set a billing schedule
↑ Back to topThe essence of a subscription is its billing schedule. This schedule includes dates for important events, such as:
- Date that the subscription’s trial will end (if any)
- End date of subscription itself (if it expires automatically)
- Recurring interval and period on which renewal orders are generated to capture recurring payments and manage shipping of items.
When manually adding or editing a subscription, the billing schedule set on any subscription products added as line items to the subscription will not automatically be used as the billing schedule for that subscription. Instead, you have complete freedom to set the upcoming dates and recurrence for the line items of that subscription.
To set a billing schedule on a subscription:
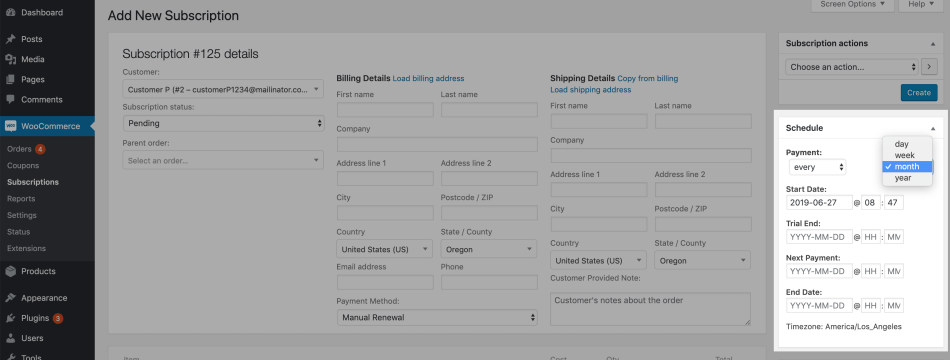
- Click the first select box in the Recurring section of the Schedule meta box and set the billing interval for the subscription. By default, this is set to every, which means once per day, week, month or year, a renewal order is generated.
- Click the second select box in the Recurring section of the Schedule meta box and set the billing period for the subscription.
- Click the Start Date text box and enter a date or use the calendar to choose a date. The start date must be in the past.
- Click the Trial End Date text box, and enter a date or use the calendar to choose a date (optional).
- Click the Next Payment Date text box, and enter a date or use the calendar to choose a date.
- Click the End Date text box, and enter a date or use the calendar to choose a date (optional).
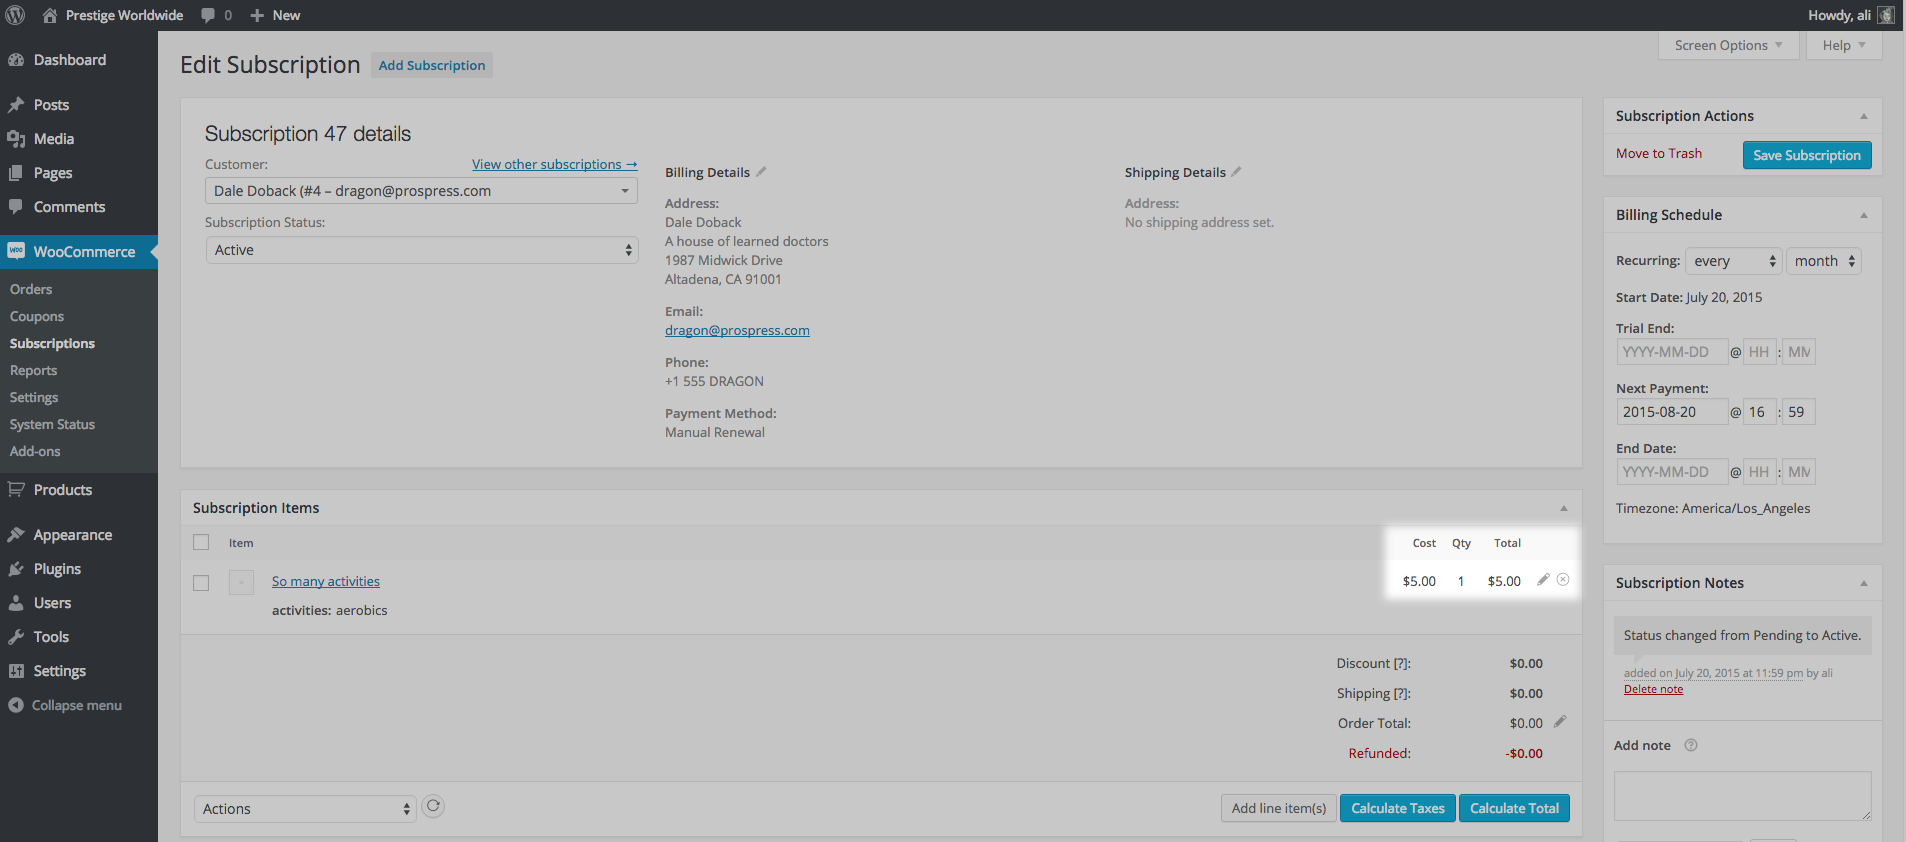
Add line items: Products, fees and shipping
↑ Back to topNormally, a subscription provides the customer with access to a certain product or products on a recurring basis. That subscription may also have a shipping cost and/or a fee associated with it. These are all called line items on the subscription.
To add a product line item to a subscription:
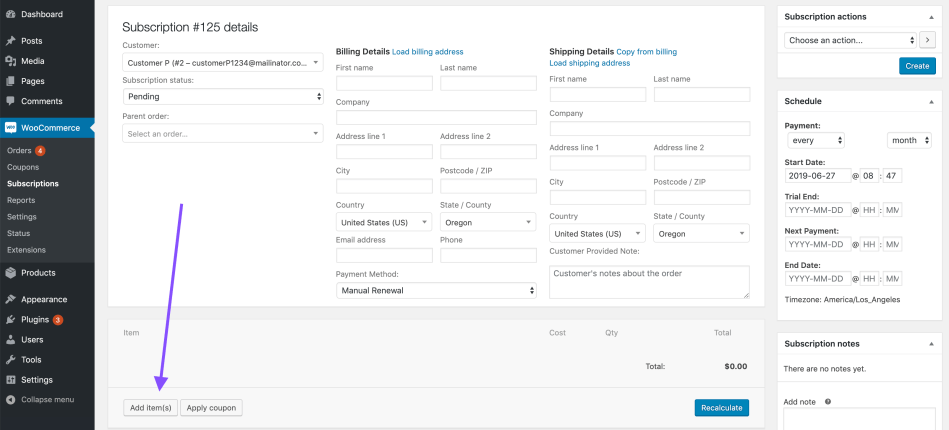
- Click the Add item(s) button in the items meta box.
- Click the Add product(s) button.
- Click in the text box displaying the placeholder: Search for a product…
- Type the first few letters of the product’s name.
- Wait for WooCommerce to find a set of matching products.
- Click the name of the product you wish to add when it loads.
- Repeat steps 4-6 if you wish to add more products (optional).
- Click Add. The chosen product(s) is/are displayed as line items in the items meta box.
- Save.
Add a shipping line item
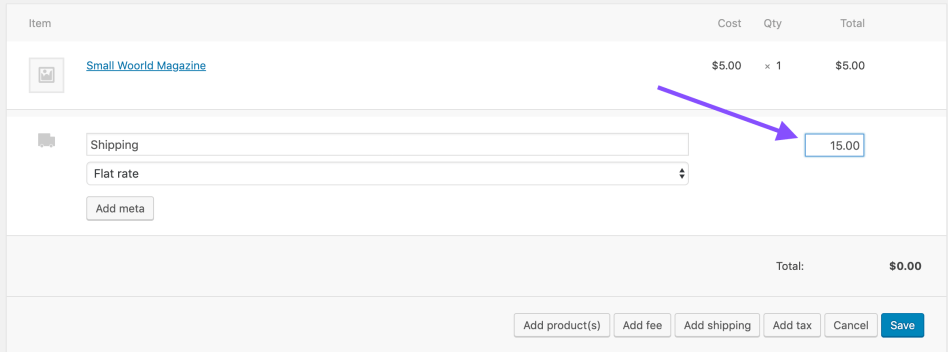
To add a shipping line item to a subscription:
- Click the Add item(s) button in the items meta box.
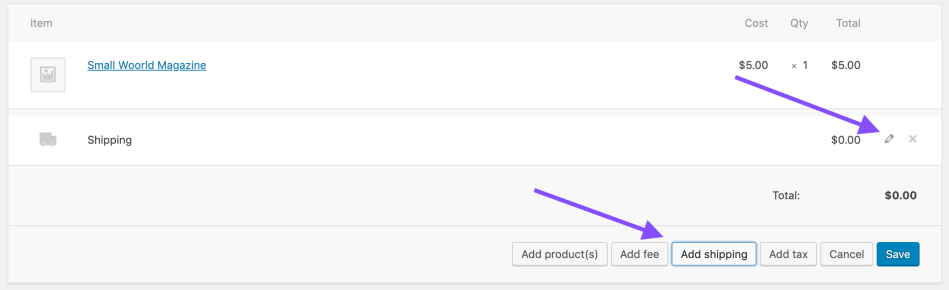
- Click the Add shipping button. A generic Shipping line item is displayed as a line item in the items meta box.
- Click the pencil icon next to the shipping line item.
- Click in the text box displaying the placeholder: Shipping Name.
- Enter a label for the shipping line item to display to customers viewing the subscription and associated orders.
- Click the select box next to the Shipping Name text box.
- Select a Shipping Method you want to use to determine the cost and taxes of this shipping line item, if any (learn more about shipping methods in the shipping methods guide).
- Click in the text box under the Total column with the placeholder: 0
- Enter the amount you want to charge customers for shipping on each renewal.
- Save.

Add a fee line item
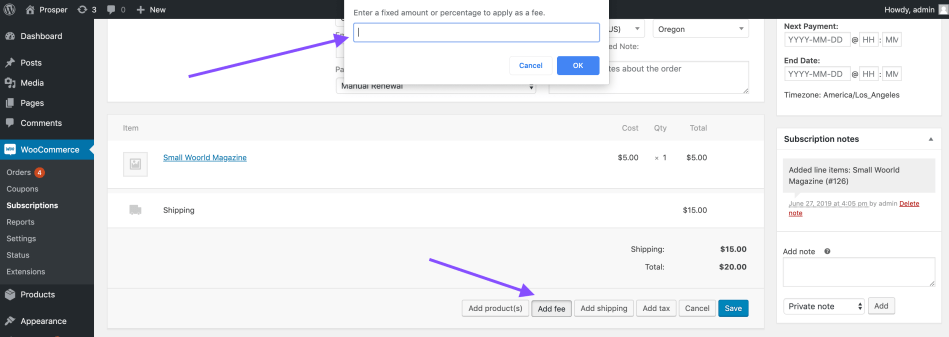
To add a fee line item to a subscription:
- Click the Add item(s) button in the items meta box.
- Click the Add fee button. A popup will ask for a fee price or percentage you want to charge customers for this fee on each renewal.
- Click OK. A generic Fee line item is displayed as a line item in the items meta box.
- Click the pencil icon next to the fee line item. (optional)
- Click in the text box displaying the placeholder: Fee Name. (optional)
- Enter a label for the fee line item to display to customers viewing the subscription and associated orders. (optional)
- Save.
Add recurring taxes
↑ Back to topIf you want each renewal payment to include taxes, you must add a tax rate or rates to the subscription. Before adding a tax rate to the subscription, you need to set up tax rates in WooCommerce.
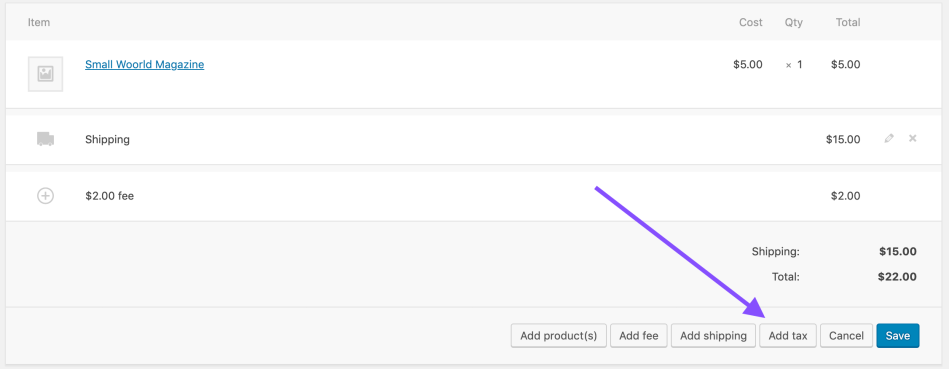
After you have set up tax rates and a product has been added and saved, to add a tax rate to a subscription:
- Click the Add item(s) button in the items meta box.
- Click the Add Tax button.
- Click the radio button next to the tax rate you wish to add.
- Click Add.
- Click Recalculate.
- Repeat for each tax rate you want applied to the subscription.
A new tax column is displayed next to the Total column for each line item. Tax values for each line item are initially displayed as a dash (–).
Note: They can also be set manually by editing each line item and clicking the pencil icon on that row.
Calculate recurring totals
↑ Back to topAfter adding line items and/or taxes you want to include on the subscription, WooCommerce can then calculate taxes for each line item and the total amount to be charged for each renewal.
To calculate taxes and totals, click the Recalculate button on the items meta box.

Set subscription status
↑ Back to topBy default, new subscriptions have the Pending status. This means no future renewals are processed, and the customer will not receive special access to any products.
However, once the subscription has a customer, billing schedule and line items, and recurring totals have been calculated, you can change the subscription’s status to Active.
To change a subscription’s status:
- Click the Subscription Status select box in the Subscription details meta box.
- Click the status you want to give the subscription.
- Save Subscription.
Once a subscription is active, the customer added to the subscription is given the default subscriber role. The next payment date is also scheduled in Subscriptions.

Set up automatic payments
↑ Back to topBy default, manually added subscriptions use the Manual Renewal payment method.
However, if a payment gateway extension active on the store supports administrator payment method changes, store managers can choose to change the payment method on subscriptions without customer involvement.
To change a subscription’s payment method:
- Go to the WooCommerce > Subscriptions administration screen.
- Click the ID of the subscription you want to change to open the Edit Subscriptions screen.
- Click the pencil icon next to the Billing Details section.
- Go to the dropdown menu under Billing Details that allows you to change Payment Method.
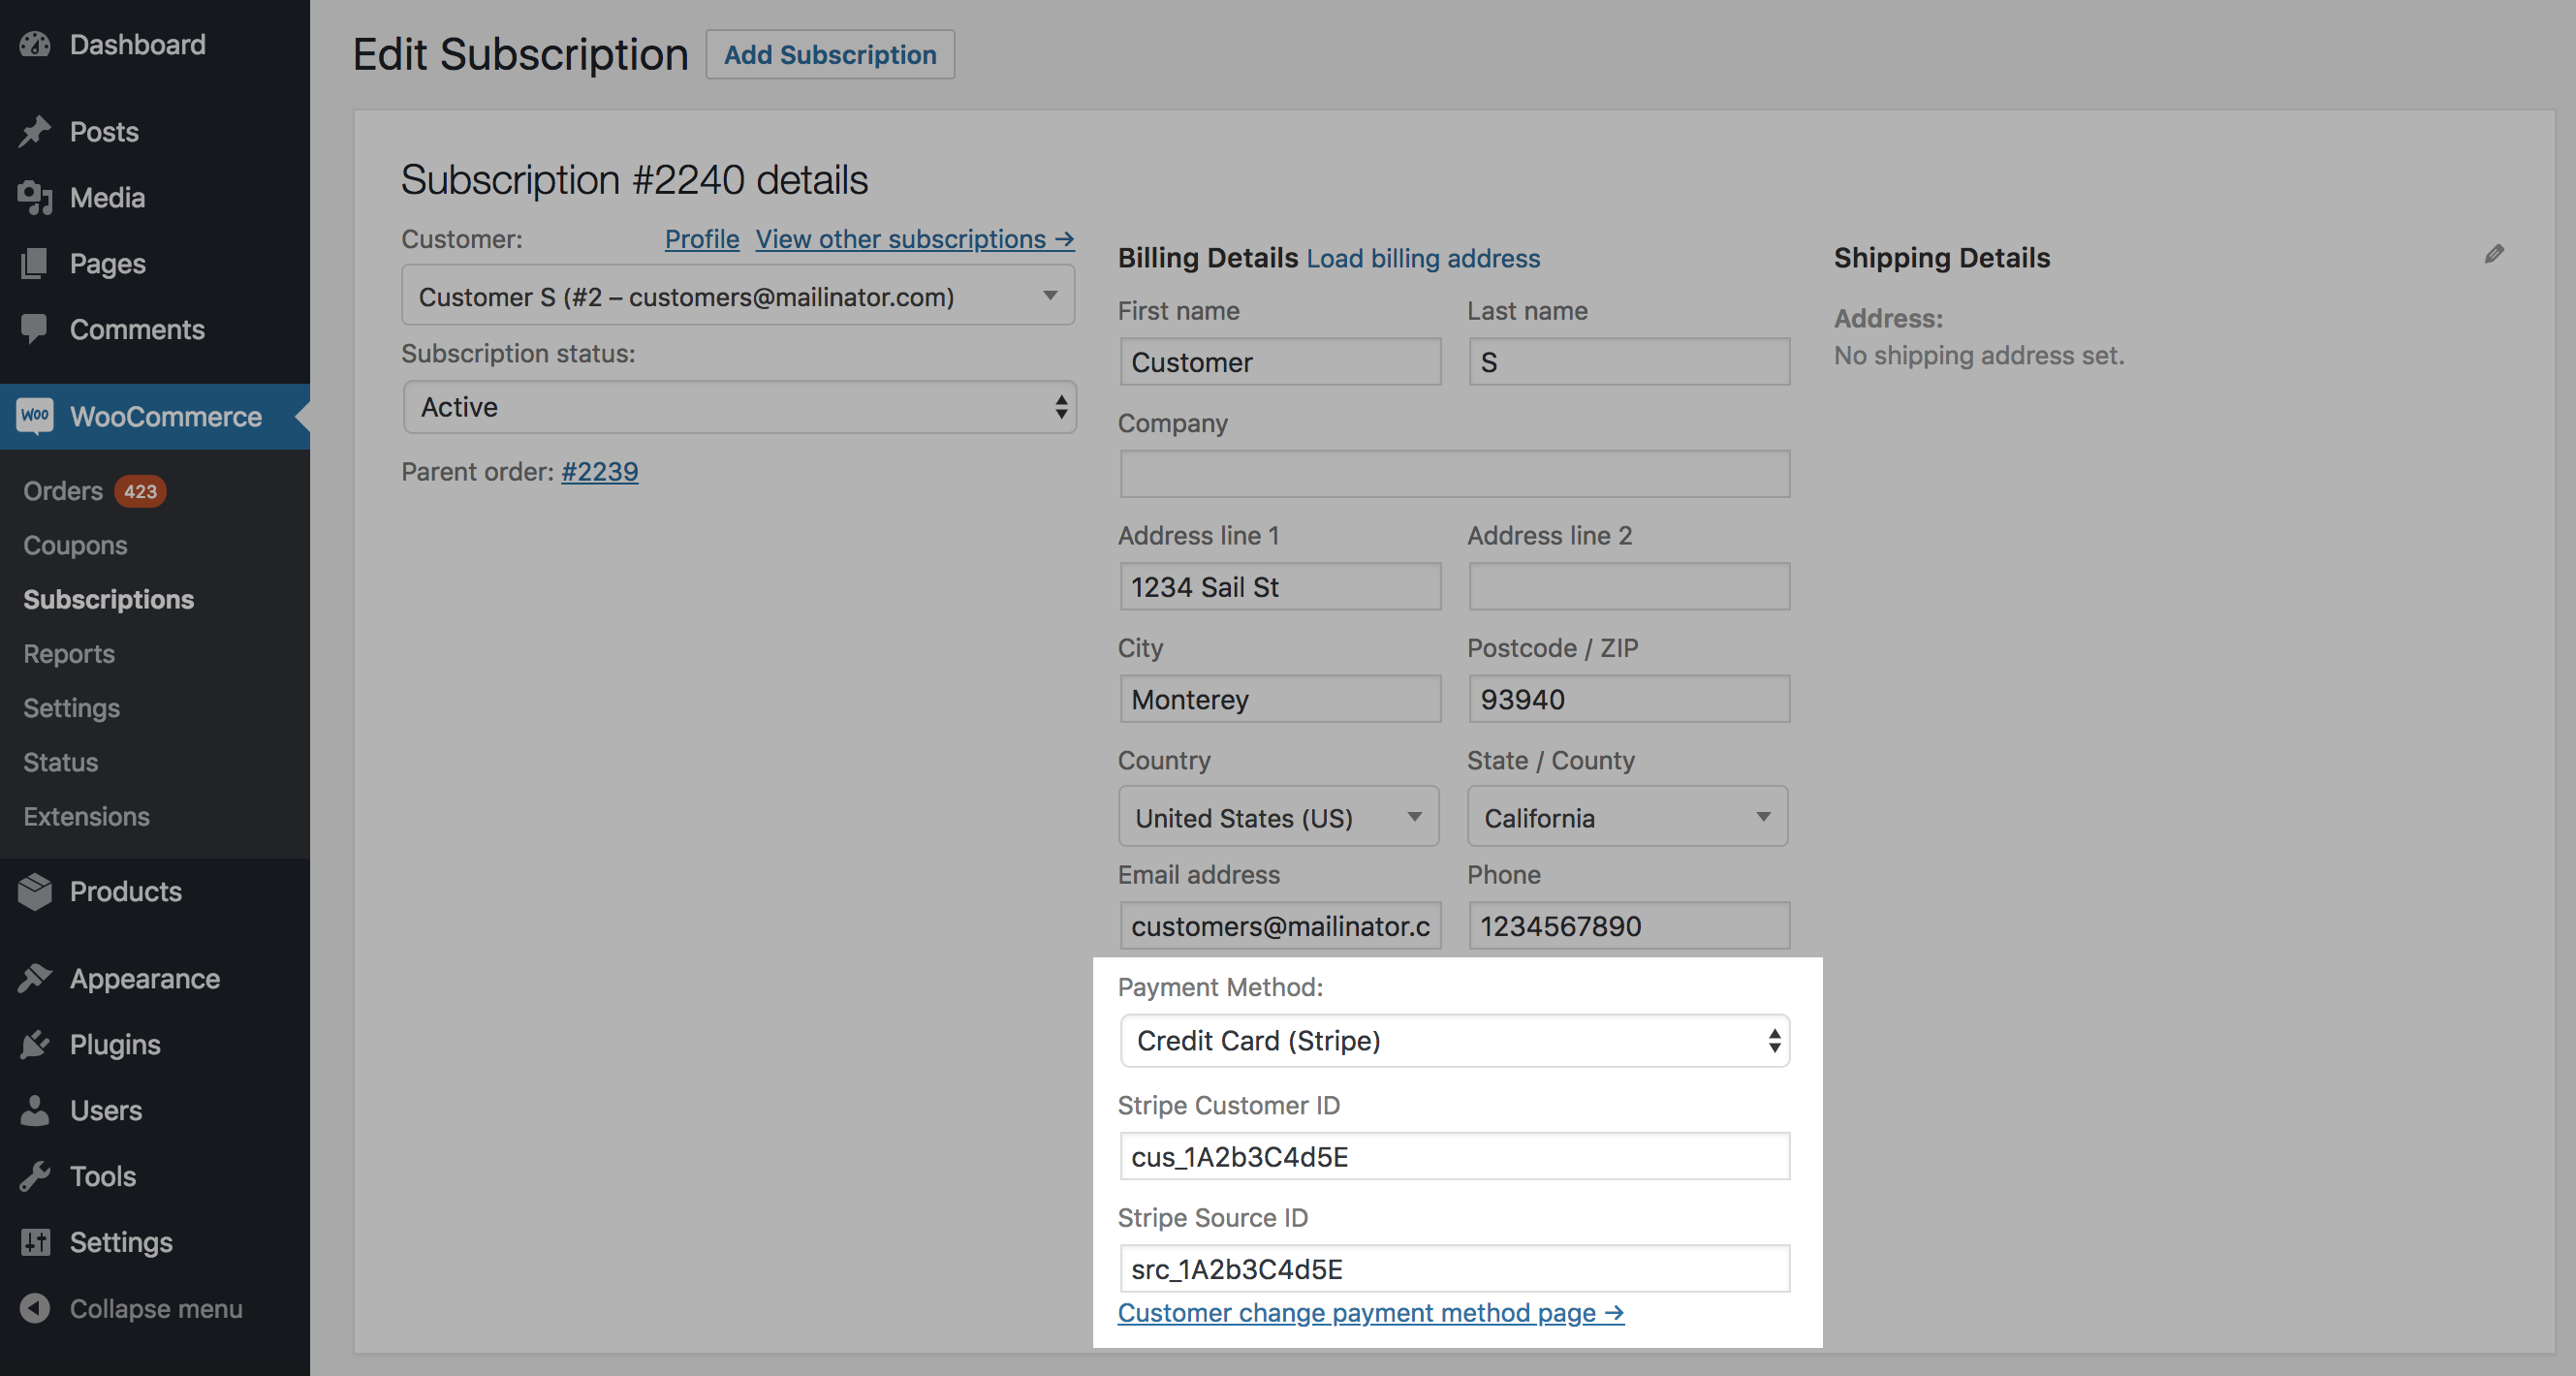
This feature can also be used to migrate a customer from one payment method to another, for example from PayPal to Stripe.
However, to change the subscription to a new payment method, you need the ability to get meta data required for that payment method. The meta data required varies by gateway and is usually a type of customer or credit card token with the payment gateway.
For example, the Stripe Source ID shown in the above screenshot is a special card token provided by Stripe, not a credit card number. This number is created when the customer enters credit card information in checkout and is available to you as the store manager via the Stripe dashboard. Note: The Stripe Source ID, token beginning with src_, was previously called the Stripe Card ID, token beginning with card_. The old tokens will still work in this field. Other valid tokens are card_, and pm_ . However, src_ should be preferred.
Adding a manual subscription with automatic renewals is not possible with PayPal Standard unless PayPal Reference Transactions is set up.
Manually importing a subscription
↑ Back to topTo import a subscription created with another subscription management system, add the subscription as outlined above. If you want to charge automatic payments, follow the instructions on charging renewal payments.
There is one gotcha with importing the subscription: if the subscription uses PayPal Standard or another payment gateway which does not support changing recurring amounts or dates, be sure to set the billing schedule and totals before changing the subscription’s status from Pending to Active. Once you activate the subscription, the billing schedule and dates will not be editable and you would need to delete the subscription and start again.
Modifying an existing subscription
↑ Back to topSome payment gateways make it possible to change the billing schedule and recurring totals charged in future payments, after a subscription is created with your store.
To find and edit a subscription from anywhere in the WordPress dashboard:
- Go to WooCommerce > Subscriptions.
- Locate the subscription you wish to edit.
- Click the subscription’s number to enter the edit subscription screen.
To edit the connected subscription from a parent or renewal order:
- Scroll down to the Related Orders metabox.
- Locate the row which says ‘Subscription’ in the ‘Relationship’ column.
- Click the subscription’s number to enter the edit subscription screen.
Unlike editing orders, line items on a subscription can be edited no matter what status the subscription is in.
Change billing schedule
↑ Back to topTo manually change a subscription’s end date, next payment date, trial end date or recurring schedule:
- Go to WooCommerce > Subscriptions.
- Click the ID of the subscription you want to change to open the Edit Subscriptions screen.
- Modify the dates and schedule, as required. If you need instructions for this process, see the section on how to Set the Billing Schedule.
- Update.

Change recurring totals
↑ Back to topTo manually change a subscription’s recurring amount:
- Go to WooCommerce > Subscriptions.
- Click the ID of the subscription you want to change to open the Edit Subscriptions screen.
- If you want to change an existing product, shipping or fee line’s total:
- Select the pencil icon next to the line item you want to change
- Change the amount
- Save
- If you want to add a new tax, follow the instructions in guide to add taxes.
- Click Calculate taxes.
- Click Calculate totals.
- Update.
Payment gateway support for modifications
↑ Back to topFor subscriptions using the manual renewal method, you can change line items, totals or billing schedule. For subscriptions using a payment method that supports automatic renewals, some or none of the subscription’s billing schedule and recurring totals may be editable.
Subscription Payment Methods & Gateways provides a table showing features supported by each payment gateway extension.
Create a pending order
↑ Back to topIn Subscriptions versions prior to version 2.0, a store manager needed to create an order to create a subscription. This was necessary as there was no Add Subscription administration interface and because a subscription existed only as part of an order.
As of Subscriptions version 2.0, a subscription can exist independently of an order.
Because of this, the process for manually creating a subscription has been separated completely from the Edit Order screen. This provides maximum flexibility to create a subscription because you can now create an order and include subscription products line items on that order without also creating a subscription, or create a subscription with no initial payment.
However, some stores used the system in version 1.5 to create a pending order that had to be paid by the customer to activate the subscription.
To create an invoice for a customer that they can use to start a subscription with automatic payments in Subscriptions 2.0:
- Create a new subscription following the instructions above (its status can remain pending or be changed to active as required).
- Click the select box in the Subscriptions Actions meta box.
- Select Create Pending Renewal Order.
- Save Subscription.
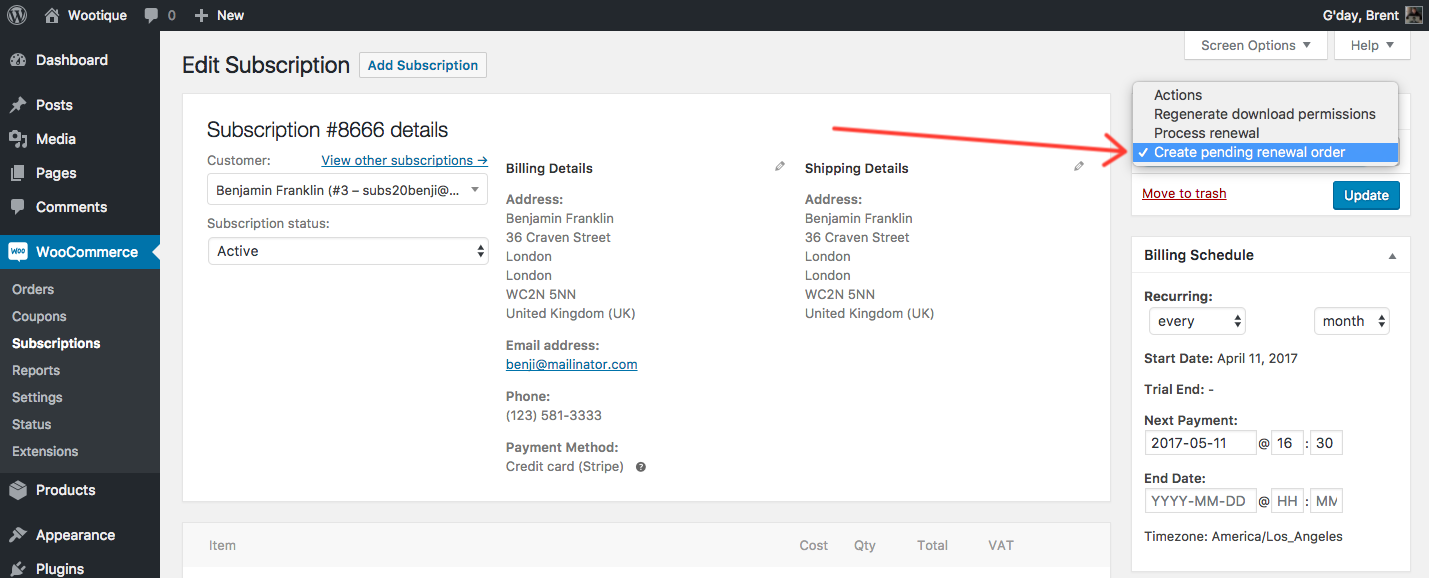
This:
- Creates a new order with pending status
- Places the subscription on-hold
You can then use this new order to control activation of the subscription. For example, you could email the order to the customer using the Order’s actions and then when the customer pays for the subscription renewal order, the subscription is activated. You can also change status of the order to processing or completed to log a payment in your store’s records that may have been paid by cheque or over the phone.
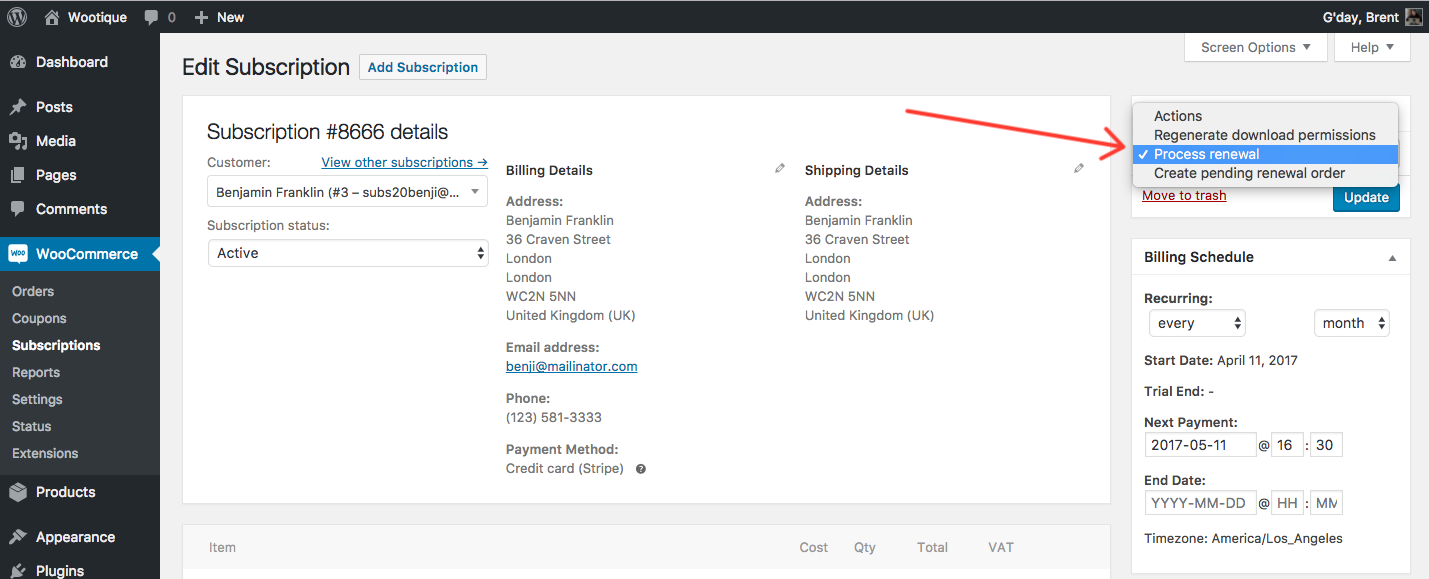
Process a renewal for an active subscription
↑ Back to topIf a renewal payment fails and you want to retry the payment, a customer wants an additional shipment immediately, or for some other reason you want to manually trigger a renewal payment, you can use the Process Renewal action on the Edit Subscription to do this.
To process a renewal for a customer:
- Go to WooCommerce > Edit Subscription for the subscription.
- Click the select box in the Subscriptions Actions meta box.
- Click Process Renewal.
- Save Subscription.
Process Renewal is only displayed if:
- Subscription has a status of active
- Subscription uses a payment method that supports payment date changes
Processing a renewal runs the subscription through the entire renewal process, including charging the customer’s credit card and emailing the customer if the renewal order email is enabled and the subscription is using automatic payments.
FAQ
↑ Back to topCan I bulk edit recurring totals for subscriptions?
↑ Back to topThere is no feature to bulk edit the recurring totals for existing subscriptions. Instead, we recommend using AutomateWoo workflows to bulk update subscription prices.
If you would like a native feature to be able to bulk edit recurring totals for your subscriptions within Woo Subscriptions, please vote on the open feature request.