PayPal Pro is no longer available for download via the WooCommerce Marketplace, but will continue to be supported for existing merchants. Please note that for some cases, support might be limited and you might be asked to upgrade to PayPal’s latest, most complete payment processing solution which you can download here.
If you are already using PayPal Pro, we strongly recommend upgrading to PayPal for the best experience and future feature upgrades.
While the new PayPal payment solution doesn’t support PayPal Pro and PayPal Pro PayFlow at this time, it includes options for PayPal, Pay Later, credit and debit card processing, and local payment methods.
If you need support with PayPal Pro, this is provided by the team at WooCommerce.com, you can get in touch with a Happiness Engineer via the Help Desk, choosing PayPal Pro from the “I need help with” dropdown if you have already purchased this product.
PayPal Pro for WooCommerce allows you to take credit card details directly on your checkout page.
The PayPal Pro extension gives you access to two gateways: PayPal Pro (website payments pro) and PayPal Pro PayFlow. Both allow you to authorize and capture.
| Gateway | Supported Countries | Supported Cards |
|---|---|---|
| PayPal Pro | US, UK, Canada |
|
| PayPal Pro PayFlow | US, Australia | Visa, MasterCard, Discover, American Express |
For more info, see: PayPal Product Availability by Country.
Important
↑ Back to top- PayPal Pro is only available to holders of a PayPal Pro Business account.
- An SSL certificate is required. Info on free SSL certificates at: SSL and HTTPS.
- Authorizations are guaranteed for up to 3 days, though the capture of authorizations can be attempted for up to 29 days.
- You cannot accept payments from customers in Russia if your Payflow Pro account is tied to a Website Payments Pro account.
If you’re in the United States and concerned about PCI compliance, read: PCI-DSS Compliance and WooCommerce.
Installation
↑ Back to top- Download the .zip file from your WooCommerce account.
- Go to: WordPress Admin > Plugins > Add New to upload the file you downloaded with Choose File.
- Activate the extension.
Setting Up PayPal Pro
PayPal Pro requires that you have a PayPal Pro business account. You can sign up for one on PayPal’s website. Just know this has a monthly fee associated with it. Once your business account is ready we can set up the payment method.
- Go to: WooCommerce > Settings > Payments.
- Select Manage next to PayPal Pro.
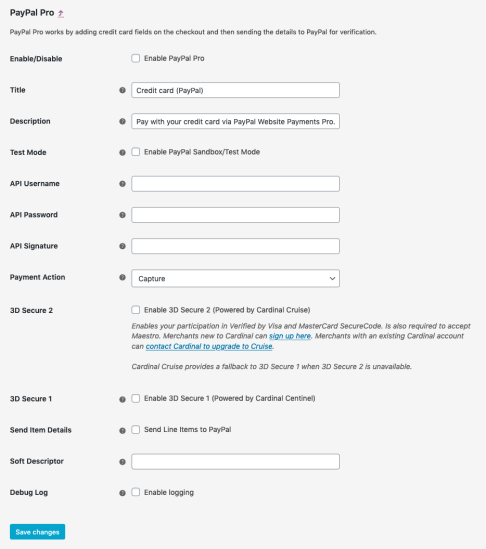
- Configure your settings:
- Enable/Disable – Enable to use. Disable to turn off.
- Title – Enter a title to be shown during checkout
- Description – Enter a description shown to users
- Test Mode – Enable PayPal Sandbox for testing. Remember to disable when ready to go live
- API Username – PayPal Pro API username obtained from PayPal
- API Password – PayPal Pro API password obtained from PayPal
- API Signature – PayPal Pro API signature obtained from PayPal
- Payment Action – Choose to capture funds immediately or only obtain authorization
- 3D Secure 2 – Enable or disable 3D Secure 2 (UK only; see below)
- 3D Secure 1 – Enable or disable legacy 3D Secure integration (UK only; see below)
- Send Item Details – Checkbox should be ticked. Disable if you experience rounding errors.
- Soft Descriptor – Optional description shown in user’s account statement, e.g., your site/store name. Limit of 23 characters
- Debug Log – Tick checkbox to enable/disable for troubleshooting purposes
- Save.
Getting Your PayPal API Credentials
↑ Back to top- Log into your PayPal account on PayPal.com, hover over the gear icon and select Account Settings.
- From the Account Access section select Update next to API Access.
- Find the NVP/SOAP API Integration (Classic) and select Manage API credentials.
- Select “Show” next to API Username, API Password, and Signature.
- Copy and paste each of those into their corresponding field under WooCommerce > Settings > Payments > PayPal Pro.
3-D Secure
↑ Back to topIn the UK, 3-D Secure is required to accept Maestro credit cards and can also help prevent chargebacks. To learn more, see PayPal UK Security.
The 3-D Secure 2 integration is now closed for new registrations. Please consider using the new PayPal Payments extension.
The 3D Secure 2 functionality is powered by Cardinal Cruise, and requires requesting and providing an additional set of credentials:

This will trigger modal authentication (if and when required by the customer’s bank) without leaving the Checkout screen.
To test 3-D Secure with PayPal sandbox, use a credit card from one of your test sandbox buyer accounts and then, depending on the outcome you wish to simulate, choose the expiry date during checkout.
For example, if you use a PayPal sandbox card number 45678xxxxxxx0002 but the Expiry Date 01/2013, you will generate the Fully Authenticated Test case with 3D Secure, and still reach the PayPal gateway for the authorization.
Setting up PayPal Pro PayFlow
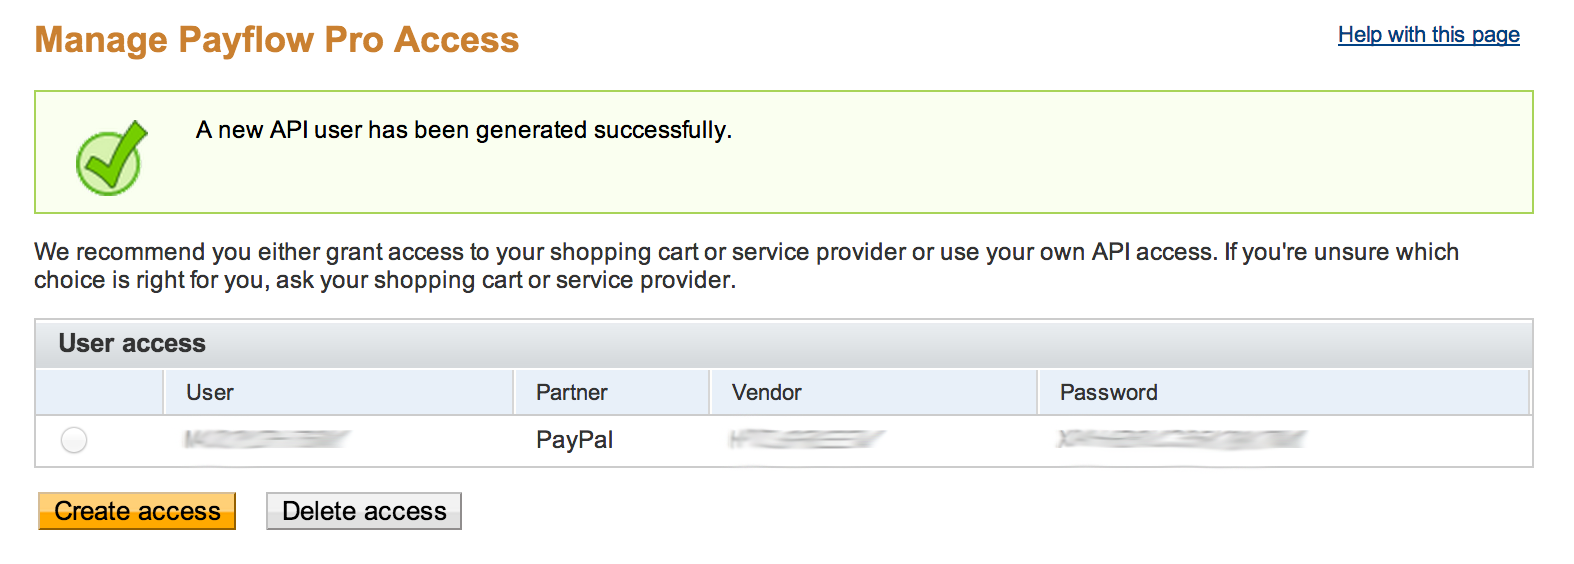
Obtain Credentials for PayPal PayFlow
↑ Back to topPayPal Pro PayFlow requires that have a PayPal Pro business account. You can sign up for one at the PayPal website. Be aware that you incur a monthly fee.
- Go to: www.paypal.com/webapps/mpp/payflow-payment-gateway
- To generate an API user, start at Profile > Request API credentials > Set up Payflow Pro API access > Create Access.
Setup and Configuration
↑ Back to top- Go to: WooCommerce > Settings > Payments.
- Select PayPal Pro PayFlow. This takes you to the Settings screen.
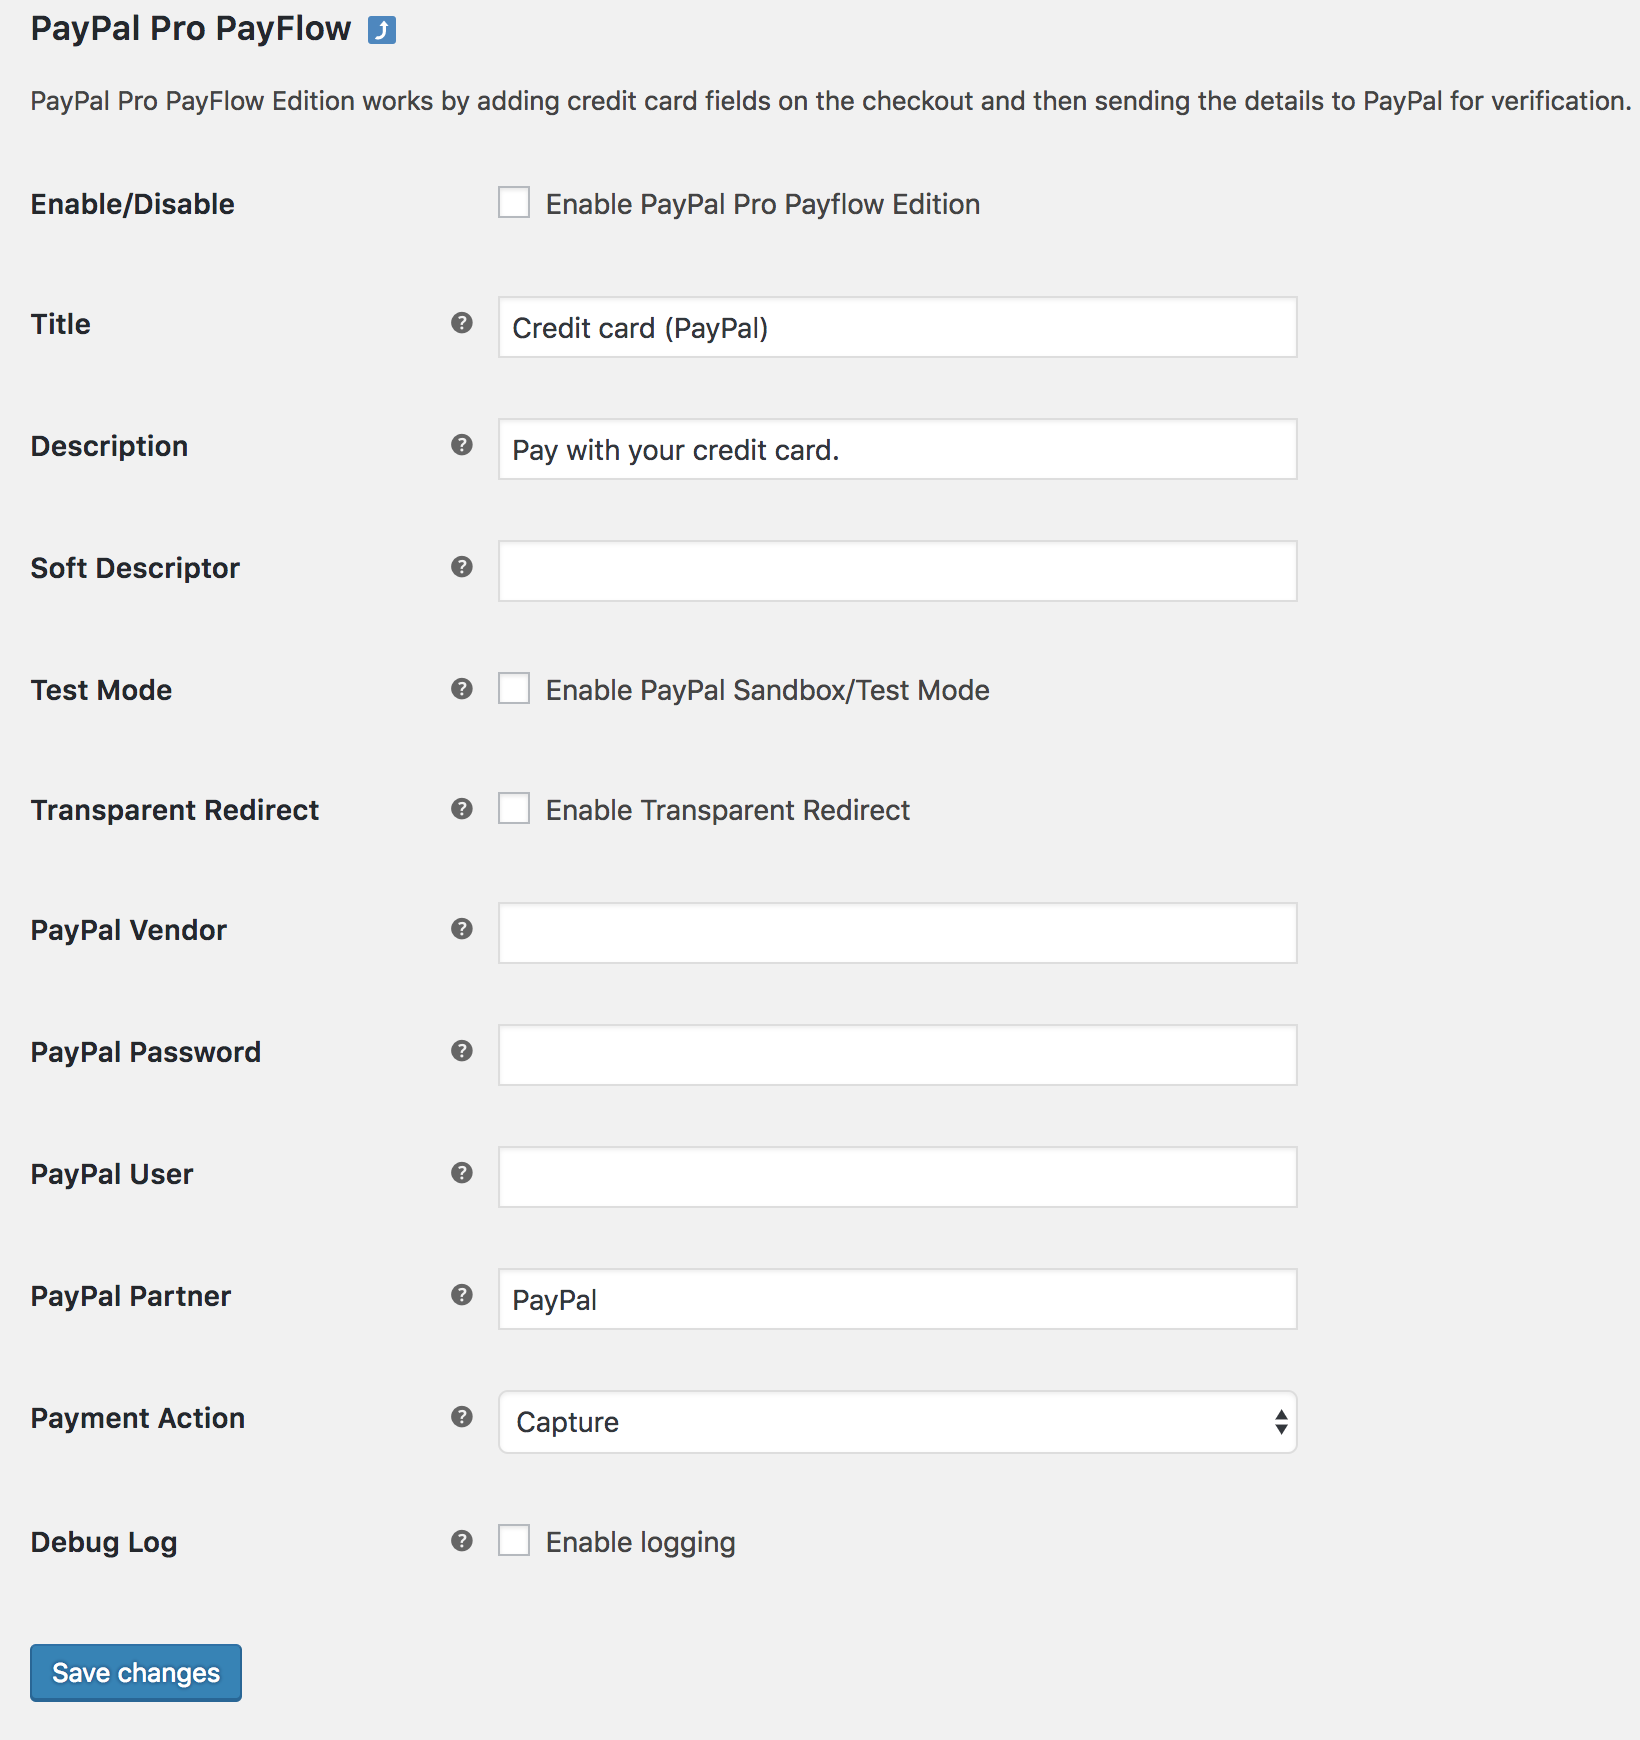
- Configure your settings.
- Enable/Disable – Enable to use. Disable to turn off.
- Title -Enter a title to be shown during checkout
- Description -Enter a description shown to users
- Soft Descriptor – Optional description shown in the user’s account statement, e.g., your site/store name. Limit of 23 characters
- Test Mode – Enable PayPal Sandbox for testing. Remember to untick the box to go live.
- Transparent Redirect – Shows the form on its own and sends direct to PayPal, which is more secure and PCI compliant friendly. ‘Enable Secure Token’ must be activated on your PayFlow account
- PayPal Vendor – Vendor created when you Set up Payflow Pro API access
- PayPal Password – Password created when you set up Payflow Pro API access
- PayPal User – User created when you set up Payflow Pro API access
- PayPal Partner – PayPal or the value created when you set up Payflow Pro API access
- Payment Action – Choose to capture payment immediately or only obtain authorization
- Debug Log – Tick checkbox to enable/disable for troubleshooting purposes. Otherwise, leave disabled.
- Save.
Testing with the Sandbox (not live)
↑ Back to topTo test PayPal Pro in Sandbox mode:
- Use a Developer account to log in to the PayPal Developer website.
- Select Dashboard > Sandbox > Accounts.
- Select the -facilitator address, choose Profile > API Credentials, and copy the credentials.
- Enable Sandbox mode and enter the API credentials at WooCommerce > Settings > Checkout > PayPal Pro.
You can also use the buyer account in Sandbox, and use test credit cards during checkout. You cannot use live API details with Sandbox.
FAQs
↑ Back to topCan I use PayPal Pro in Australia?
↑ Back to topPayPal Pro in Australia is not the same as PayPal Pro in the US, Canada and the UK, so this extension will not work with a PayPal Pro Australia account. However, you can set up a PayFlow account in Australia, and PayPal will link that with your PayPal account and you can use that with this extension.
Can I change the credit card icons?
↑ Back to topThe icon used is filterable by adding code to your theme functions.php file. Replace the image URL as follows.
For PayPal Pro:
For PayPal Pro Payflow:
Ensure to link your icon via https to keep the connection secure.
How do I enable address verification?
↑ Back to topAddress verification is done on the PayPal side. If address verification fails, the order is put On Hold.
Is this compatible with WooCommerce Subscriptions?
↑ Back to topNo, PayPal Pro does not support recurring billing currently.
What is the transaction ID?
↑ Back to topPayPal Pro generates unique transaction IDs for the authorization and the capture. This means that while the Authorization ID is made available as soon as you authorize, the Capture ID is not available until the funds are captured.
Receiving “PayPal Express Checkout is not setup on this account”?
↑ Back to topConsider changing the privilege role for your PayPal user from API_FULL_TRANSACTIONS to ADMIN_TRANSACTIONS.
- Log in to your PayPal Manager account.
- Enter your Partner, Merchant Login and Password information, then click Log In.
- Click Account Administration.
- Under Manage Users you can then edit privilege levels.
For more information on predefined roles, see About User Privilege Levels.
Questions and Support
↑ Back to topSomething missing from this documentation? Do you still have questions and need assistance?
- Have a question before you buy this extension? Please fill out this pre-sales form – please include the name of this extension in your query.
- Already purchased and need some assistance? Get in touch with a Happiness Engineer via the WooCommerce.com Support page and choose this extension name from the “I need help with” dropdown