Note: Compare Products Pro has been retired but will still work for existing owners. Products Compare is its replacement.
Compare Products Pro uses your existing WooCommerce product categories and product attributes to create a comparison for every product on your site.
These features can then be configured to be compared – side by side, feature by feature and price by price in a single, on-page pop-up screen.
Products in the pop-up screen can be added to the shopping cart – if the product has that capability – and a hard copy printed, if desired.
Installation
↑ Back to top- Download the .zip file from your WooCommerce.com account.
- Go to: WordPress Admin > Plugins > Add New to upload the file you downloaded.
- Activate the extension.
Admin Settings
↑ Back to top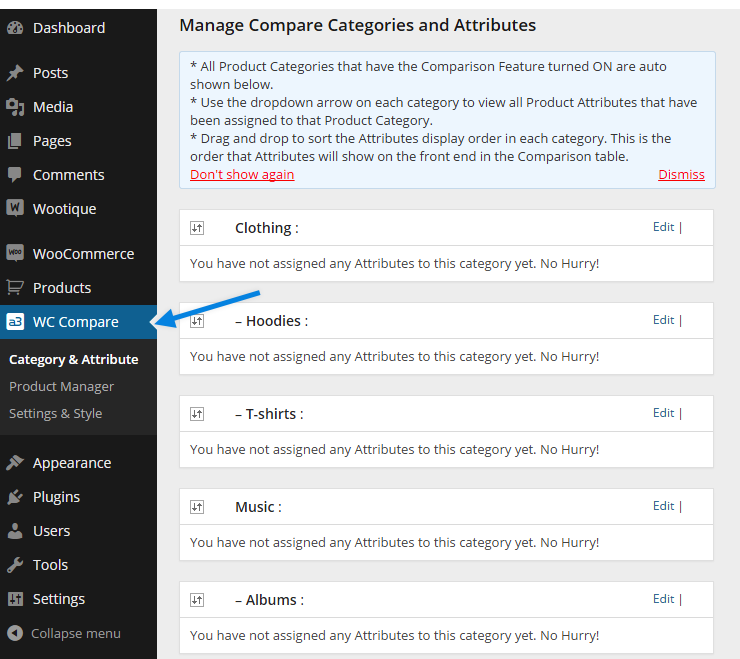
Image Legend
To access the Compare Products Pro settings, go to: WordPress Admin > WC Compare. It opens three tabs:
1. Settings – Frontend settings for the extension.
2. Features – Manage Categories and Features.
3. Products – Compare Products Express Manager.
Content Created On Install
↑ Back to top- Creates all of your existing Product Categories and Sub Categories as => Compare Categories
- Creates all of your existing Product Attributes as => Comparable product features
- Creates all of your existing Product Attribute Terms as => Comparable product feature field data

Image Legend:
1. To see the Compare Categories and Features that have been auto created go to wp_admin > Woocommerce > Product Comparison
2. Click on the Features tab
3. All of your Product Categories and Sub Categories have been auto created as Compare Categories. They show as floating bars that can be dragged and dropped into any order.
4. All of your sites Product Attributes have been auto created as Compare Features and show in the ‘Un-Assigned’ Features table that sits under the Compare categories at the bottom of the features tab page. Edit each Feature and assigned it to one or more Compare categories. Each Product Attributes Terms are auto created as the Compare Features Input Field data for you in the Check box multi select format. You will see this when you edit each Compare Feature – See Features tab section for more detail.
Compare Products gives you the total flexibility to create your own custom Compare categories, features and feature values completely independent of your WooCommerce Product Categories and Attributes and the Attributes Terms.
Smart Sync
↑ Back to top- After activation Compare Listens to your Product Categories and Sub categories and whenever a new Product Category or Sub Category is created, then Compare auto creates a => Compare Category of the same name if none already exists.
- Compare listens to your Product Attributes and whenever a new Product Attribute is created, then Compare auto creates a => Compare Feature of the same name if none already exist.
Sidebar Widget
↑ Back to top Compare Sidebar Widget
Compare Basket features:
After a product is added to the Compare basket.
- Widget is auto added to your sidebar when the extension is activated.
- Shows the number of items in the Compare basket.
- Shows each Product by title
- Title is a click-able link back to the products page.
- Each product has an X aligned to the right of the product that allows the user to remove it from the Compare basket.
- A ‘Clear All’ link shows at the bottom left which allow users to empty the basket in a single click.
- Compare button which is aligned to the bottom right shows.
- Widget auto adopts your themes style, except for the Compare Button that must be manually styles – see Settings Tab.
- Products are added to the widget by Ajax. This means the page does not re-load each time a product is added or removed from the Compare basket.
- When products are removed from the pop-up screen selection they are auto removed from the basket.
- Basket holds users current selection until user closes the site in their browser.

Image Legend:
1. WooCommerce Compare Products Widget.
2. Drag and drop the widget into any Sidebar Widgeted area to create your Compare basket that products are added to. Add a Widget title and save .
3. The Compare Basket in sidebar. Shows the title you added, the products added count and until products are added a message saying there are no products in the basket to compare.
Compare Pop-up Window
↑ Back to top- We do not want the user to be taken away from the product page they are on.
- The pop-up window allows us to display an unlimited number of products side-by-side whereas a web page limits it to about 3 products.
- The pop-up window features adds to your sites wow factor for the users.

Image Legend:
1. Customize the pop-up with your own image / header logo.
2. Print hard copy capability.
3. X to remove unwanted products from the pop-up
4. Product image thumbnails shown scaled to size.
5. Note: Add To Cart functionality in the pop-up window is a PRO Version feature. Not available in the Lite version.
6. Comparable Products Features table.
7. Each Products Comparable Products Feature data fields in the table
8. Inner Container vertical scroll allows you to show long tables of compare Features and data
9. Inner Container horizontal scroll allows the user to add unlimited products to the Compare pop-up
Settings Tab
↑ Back to top
Image Legend:
1. Settings Tab
2. Compare Fly-out Window Setup
3. Product page Compare Buttons
4. Compare product page navigation tab.
Styling the Compare Pop-Up Window
↑ Back to top Tip: Keep the tall of your image as small as possible as it takes up valuable room in the pop-up screen.
Tip: Add an image that includes your contact details, phone, email for example. When the user prints the compare results they will see those at the top of the page.
Tip: Set the ‘Fly-Out Inner Container Height’ at least 50px less than the ‘Compare Fly-Out Height’. Doing this will ensure that the users can always see the inner container bottom horizontal scroll bar. If you don’t they will have to know to use the outer container vertical scroll bar to see it. If they don’t know that it is there they cannot horizontal scroll to see all of the products they are wanting to compare, if they have more than 3.
Compare Fly-Out Type – Set as Fancy Box by default as this is the WooCommerce default pop-up tool. Some themes (not WooThemes) use Lightbox by default. If your pop-up window won’t open change this setting to Lightbox otherwise leave it as the default Fancy box.
Compare Buttons / Text links
↑ Back to topStyling the Compare Buttons
↑ Back to topwrap input[type="submit"], #wrap input[type="button"] {
background: url('images/bg-button.png') no-repeat scroll right top transparent; border: 1px solid #153B94; border-radius: 5px 5px 5px 5px; box-shadow: 1px 1px 2px #333333; color: #FFFFFF; cursor: pointer; font-size: 12px; padding: 9px 27px 7px 10px; }
Once you have found that in themes style.css directory then add that style into your themes style.css under the class name
'bt_compare_this'which is for the Compare button on the product pages and class name
'compare_button_go'for the Compare button in the sidebar widget. This is how it would look using the example above as the style for the button.
input.bt_compare_this { background: url('images/bg-button.png') no-repeat scroll right top transparent; border: 1px solid #153B94; border-radius: 5px 5px 5px 5px; box-shadow: 1px 1px 2px #333333; color: #FFFFFF; cursor: pointer; font-size: 12px; padding: 9px 27px 7px 10px; }
This will then mean that style will apply for all input tag in div that has the class compare_button_container to change the sidebar widget button you do the same but use the class
'compare_button_go'
Product Page Compare navigation tab
↑ Back to top
Image Legend:
1. Create a Compare Product Features Tab on your products page. Post ion it where you want in relation to the existing tabs and give it a title.
2. Variable products show the name of each attribute with a table of features and values for each product variation that has the Compare feature activated.
3. Compare Features for this product. The plugin uses your Themes table styling.
4. Compare features values.
Features tab
↑ Back to top
Image Legend:
1. Features Tab
2. Add New – Click to create new Compare categories and Compare Features and you are taken to another page, still under the features tab to do that.
3. Add Compare Product Categories – Give you new category a name and click create.
4. Add Compare Product Features.
5. The Add Compare Product Features and edit Compare Product Features are exactly the same layout except edit has pre populated fields.
6. Feature Name – The extension does not allow you to create duplicate Category or Feature names.
7. Unit of Measurement – This prefix auto shows after the feature name in brackets ex Feature name – Height, unit of measurement cm shows as feature Field Height (cm)
8. Feature Input Type drop down. This feature is a real time saver. It allows you to select 6 different options for adding the Feature data. If Check box (multi select), radio Buttons (select one), Drop down single select or drop down multi select are chosen the a drop down appears below to pre – populate with the data options.
9. Enter each option on a single line. Using this feature saves having to re enter data again and again – for example if the feature was Colour you would select Check Box (multi select) and add every possible colour that your entire range of products come in. Then when assigning the Field data to any product you just check the ones that apply to that product.
10. Assign this feature to 1 or many Compare Product Categories. This means a Compare feature like colour only has to be created once and can be assigned to any number of Compare categories.
11. Click the Save button to update the Compare Feature the page reloads and takes you back to the main Features admin page.
12. All newly created Features are auto added to the Compare categories they were assigned to.
13. Show / Hide feature on each Compare category floating place holder. Closed is the default setting. Click the arrow and the list of Compare features assigned to that category with appear. Click it again and they fold up into the Category floating placeholder.
14. Search Features – makes finding Product Features quick and easy.
15. Each Compare category Floating place holder displays the Compare category name.
16. Compare Features list within the Compare category. Drag and drop to change the order that the features appear in. This is the order that the Compare features show in the pop-up window for all products assigned to a category. The order is important to delivering user meaningful results in the compare window so we have made it very easy firstly see the order and secondly to move features with the category with this feature.
17. Edit | Remove – Clicking the edit button on any feature opens the Feature edit page. Clicking Remove removes the Feature from this Compare category.
Products tab
↑ Back to topCompare Products Express Manager
↑ Back to top
Image Legend:
1. Products tab – When the Compare Products tab is opened it automatically fetches all active products and Variations direct from the WooCommerce products database for easy on page management of the Compare feature.
2. By default the Express manager only shows parent products when activated to speed up initial loading. Click the Show Variations check box to reveal all product variations.
3. Product variations show as indented in the rows under the parent product.
4. Product Categories are displayed for easy reference.
5. The Compare category that the products is assigned to is displayed for easy reference.
6. See at a glance if the Compare feature is activated or deactivated for any product and its variations.
7. Edit – Click the edit link and the Compare feature manager for that product or variation opens in a pop-up screen.
8. Pop-up Express manager window.
9. Activate / Deactivate the Compare feature for this product. Activate – Compare Button shows on the product on the front end – Deactivate and the button is hidden.
10. Select a Compare category from the drop down to assign this product to.
11. As soon as a Compare category is selected in the drop down that Categories Compare Features show below it on the pop-up window.
12. Setting Feature fields as Check boxes, radio buttons or drop downs makes adding the Feature field data much faster.
13. The extension by default creates all Feature Fields created from a Product Attributes terms as multi select check boxes.
14. Once all Feature Fields data has been added clicking the Update button closes the pop-up window with the Products Express manager page auto updated.
Compare Variations
↑ Back to top
Image Legend:
1. Variations tab on products edit page.
2. Price – If you are activating the Compare Products Feature on a variation and you want the Price to show in the Compare pop-up you must add the variation price here.
3. Compare Feature for this variation. Activate > Assign this variation to a Compare category from the drop down and then the Feature fields for that Compare category will show.
If activating Compare feature on variations you must activate the Compare feature on the parent product. You do not need to add any Field data for the parent product because it is the variations that will be compared not the parent.