The Authorize.Net DPM payment gateway allows you to accept major credit cards, monitor and control transactions, and receive payments quickly. A payment form to your checkout process pay page is posted directly to secure Authorize.net servers, so no complex PCI requirement are involved and no SSL certificate is required, although SSL is still recommended for reasons of trust and security.
Note: We unified all Authorize.Net payment gateways and recommend the new and improved WooCommerce Authorize.Net plugin for the best experience. If you already purchased Authorize.Net DPM, see our FAQ on upgrading your product for free.
Installation
↑ Back to top- Download the .zip file from your WooCommerce account.
- Go to: WordPress Admin > Plugins > Add New and Upload Plugin with the file you downloaded with Choose File.
- Install Now and Activate the extension.
Requirements
↑ Back to top- An active Authorize.Net gateway account
- US and/or Canada locale — Authorize.Net DPM is currently only available in the US and Canada
Sign up with Authorize.Net
↑ Back to top- Go to Authorize.net.
- Sign up for an account at: Online Payment Services Application. Or click Log In if you already have an account.
- Select the Account Menu.

- Select Settings.
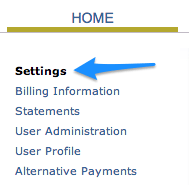
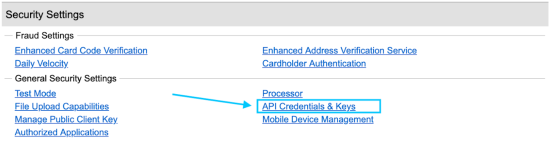
- Select API Credentials & Keys in the General Security Settings section.
- Find your API Login ID on this page.
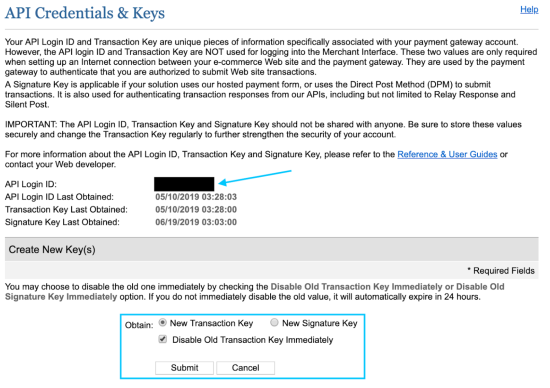
- Create a new Transaction Key by selecting the New Transaction Key radio button, tick the Disable Old Transaction Key Immediately checkbox and Submit. Your new Transaction Key is displayed on the next page. Use the Copy to Clipboard button to copy it to your clipboard. You will not be able to retrieve this key again. You may wish to save it somewhere safe like your password manager.
- Create a new Signature Key by selecting the New Signature Key radio button, tick the Disable Old Signature Key checkbox (if applicable), and Submit. Your new Signature Key is displayed on the next page. Use Copy to Clipboard and paste into your install and save somewhere safe, such as your password manager. You will not be able to retrieve this key again; Authorize.Net will require you to generate a new one.
Setup and Configuration
↑ Back to top
- Go to WooCommerce > Settings > Payments. Note: ‘Payments’ was formerly called ‘Checkout’ prior to WooCommerce 3.4.
- Use the toggle under Enabled to select Authorize.net DPM.
- Select Set Up. You are taken to Authorize.net DPM settings.

- Configure your settings:
- Enable/Disable – Enable or disable the payment method.
- Title – Enter a title shown to users in checkout.
- Description – Enter a description shown when a user selects this gateway.
- API Login ID – Enter the API Login ID obtained from the your Authorize.net account API Credentials & Keys settings.
- Transaction key – Enter the Transaction Key obtained from your Authorize.net account API Credentials & Keys settings.
- Signature Key – Enter the Signature Key obtained from your Authorize.net API Credentials & Keys settings.
- Sandbox Account – Enable for testing only. A developer/test account from Authorize.net is required. In test mode, test credit card details are filled out on the payment form. Remember to untick the box to return to Live mode.
- Logging – Useful for troubleshooting.
- Authorize Only – Tick the checkbox if you wish to obtain authorization only and not capture funds immediately.
- Save changes.
Refunds
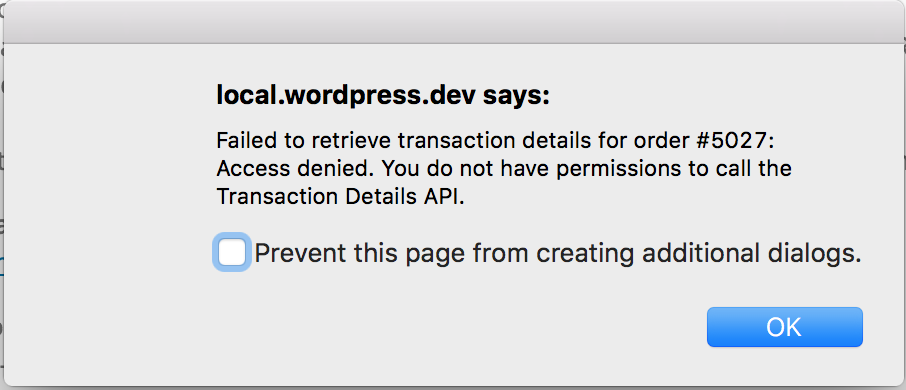
↑ Back to top- Log into your Authorize.net account at: account.authorize.net
Go to: Transaction Details API under Security Settings.
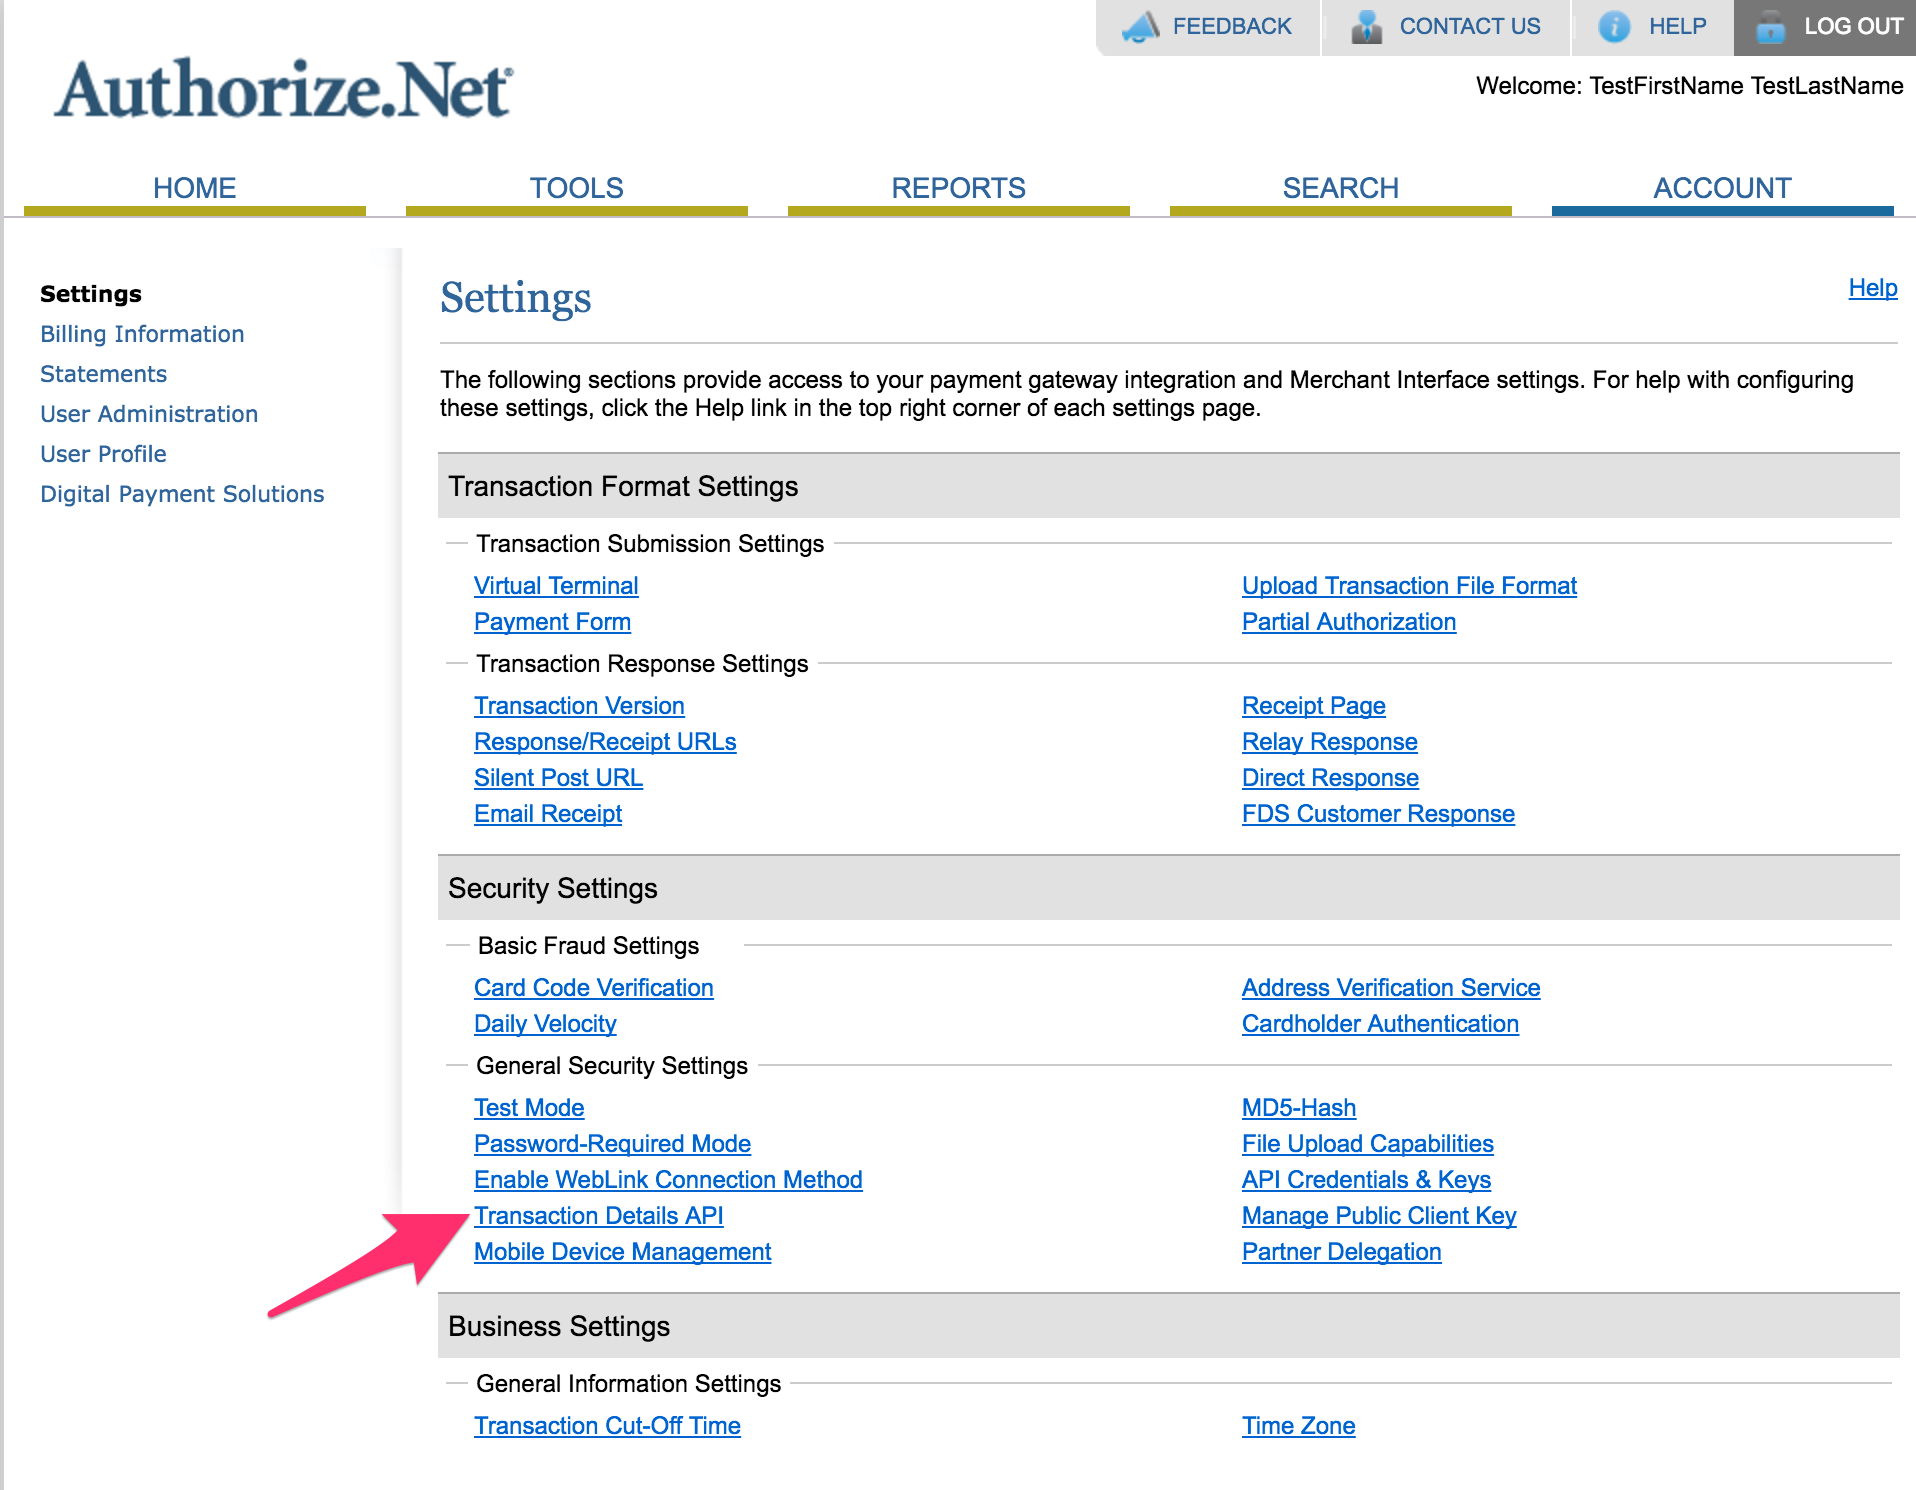
- Select Enable Transaction Details API.
 The API is used to retrieve details on transactions, and must be enabled to issue refunds.
Failing to do this will result in an error.
The API is used to retrieve details on transactions, and must be enabled to issue refunds.
Failing to do this will result in an error.
Troubleshooting
↑ Back to topThe gateway does not redirect correctly during or after payment
↑ Back to topError: This transaction cannot be accepted
↑ Back to topError code 14
↑ Back to topError code 97
↑ Back to topResponse code 265. This transaction cannot be accepted.
↑ Back to topTransaction Result: The specified security code was invalid.
↑ Back to topFrequently Asked Questions
↑ Back to topI already purchased Authorize.Net AIM/DPM/SIM. What happens now?
↑ Back to top- If you have one of the Authorize.Net products and an active/unexpired subscription with us, you were gifted with a free subscription to the new Authorize.Net payment gateway up until the renewal date. More details at: Upgrading from another Authorize.Net plugin and FAQs.
- If you have the former (“legacy”) payment gateway installed and your subscription has expired, your gateway will still work and documentation remains online for reference.
- If you had a Lifetime license issued prior to August 1, 2015, you have been gifted a free one-year subscription that will renew annually. “Lifetime” is defined by lifetime of a product, not a purchaser/buyer’s lifetime. Because the unified Authorize.Net is a new product, it is not a continuation of the previous DPM product.
How do I upgrade and install the new version of Authorize.Net?
↑ Back to top Your Authorize.Net product should have an active subscription:
 3/ Follow our prompt to update.
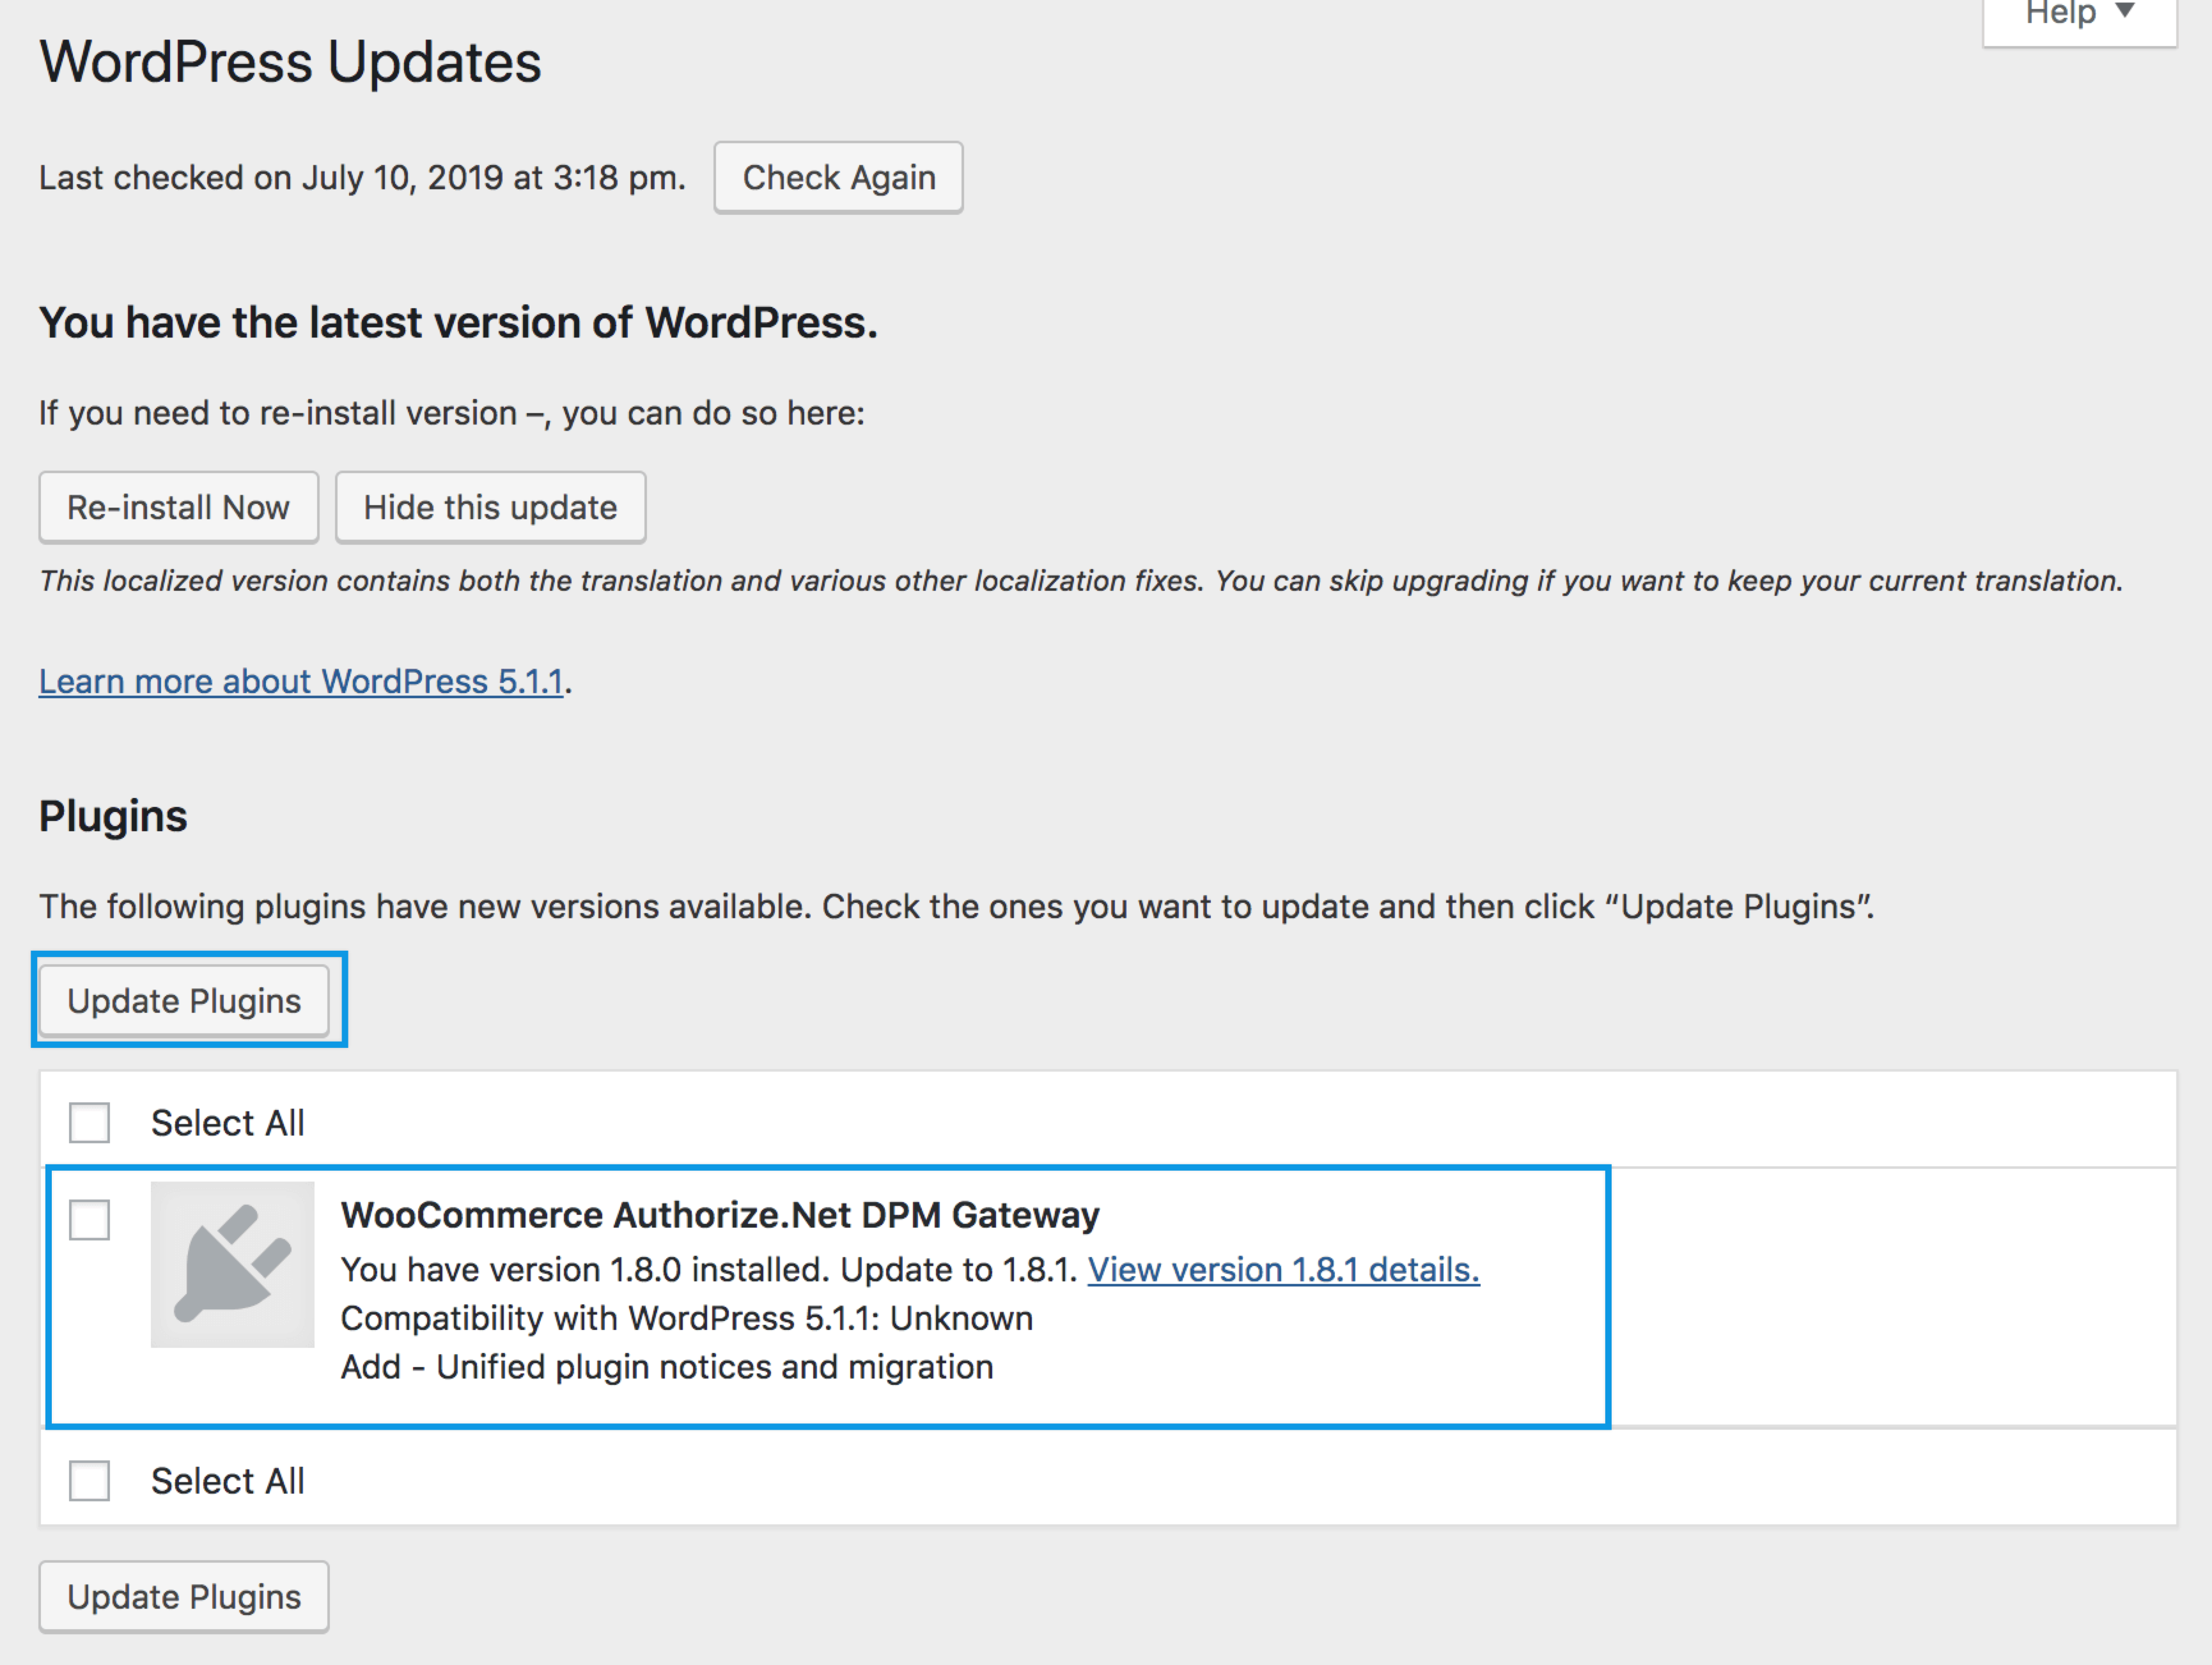
a) Go to Dashboard > Updates and Update Plugins.
3/ Follow our prompt to update.
a) Go to Dashboard > Updates and Update Plugins.
 or
b) Go to Plugins > Authorize.Net and Update Now.
or
b) Go to Plugins > Authorize.Net and Update Now.
 or
c) WooCommerce > Extensions > WooCommerce.com and Update.
or
c) WooCommerce > Extensions > WooCommerce.com and Update.
 A message then appears at the top of your screen that Action is required.
 4/ Select Click here to install.
A message confirms that migration to the new Authorize.Net was successful, and your previous Authorize.Net product has been deactivated.
4/ Select Click here to install.
A message confirms that migration to the new Authorize.Net was successful, and your previous Authorize.Net product has been deactivated.
 Settings from your original plugin have been transferred – no reconfiguration required – and your payment gateway is activated and ready to receive payments.
More info on the new Authorize.Net plugin can be found at: Authorize.Net documentation and Upgrade FAQs.
Settings from your original plugin have been transferred – no reconfiguration required – and your payment gateway is activated and ready to receive payments.
More info on the new Authorize.Net plugin can be found at: Authorize.Net documentation and Upgrade FAQs.