The Amazon S3 Storage for WooCommerce extension by Kestrel enables you to serve digital products through your Amazon AWS S3 service.
Using Amazon S3 storage to serve your digital products give you room for better scalability, offers more reliability, especially when serving big files, and greater download speeds for your customers.
Requirements
↑ Back to top- WooCommerce 3.7+
- PHP 5.6+
- An Amazon AWS account.
Installation
↑ Back to top- Upload the ‘woocommerce-amazon-s3-storage’ folder to your ‘plugins’ directory.
- Activate ‘WooCommerce Amazon S3 Storage’ through the ‘Plugins’ menu in your WordPress admin area.
- Configure the plugin settings.
Configuration
↑ Back to top- Go to aws.amazon.com and sign up for an account there.
- Go to console.aws.amazon.com. Select “Your Name” at the top right corner and then My Security Credentials.
- Go to Access keys (access key ID and secret access key) and click Create New Access Key.
- Copy the Access Key ID and Secret Access Key and keep them, you will use them below.
- Go to the WooCommerce > Amazon S3 Storage menu in your WordPress admin area.
- Paste the Access Key ID and Secret Access Key into the fields.
You will find the “URL Valid Period” in these settings as well. If you use the “Redirect only” method for downloadable products, please enter a value in this field if you want to keep your files hidden from other people. This entry will limit the number of minutes the download links will be valid.

Another important setting is the “Force redirect method“, which defines the download method for S3 files exclusively. Details are explained here.
Finally, the Bucket Name and S3 Region settings allow you to define the default values for the bucket name and the S3 region, respectively. Setting up these values will simplify the shortcode usage when creating downloadable products.
Uploading Files to Amazon Web Services
↑ Back to topTo be able to use Amazon S3 to serve your files, you will need to upload your files to the Amazon S3 service.
- Go to console.aws.amazon.com
- Select S3 under Services > Storage.
Create an S3 bucket for file storage
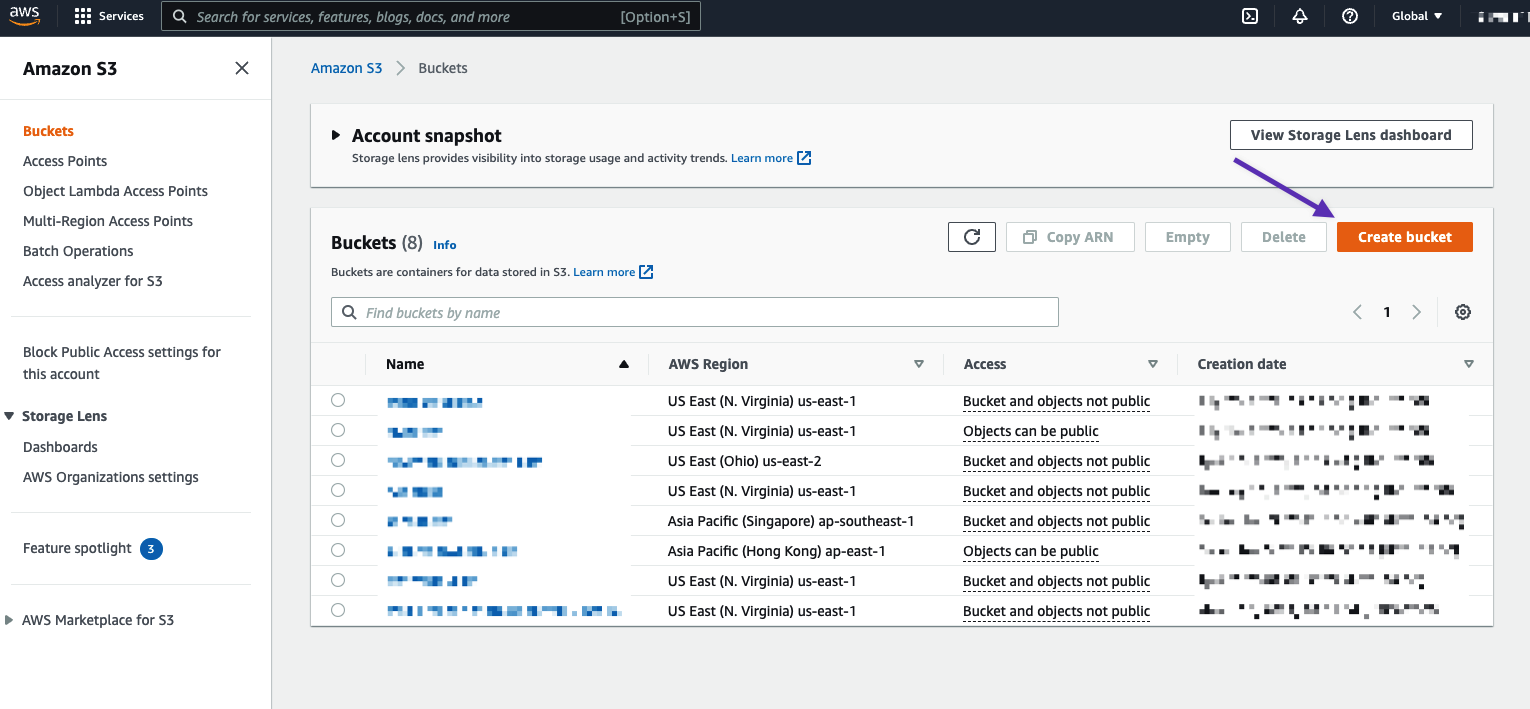
↑ Back to top- If it’s your first time using Amazon S3, you will need to create a bucket. A bucket is a unique identifier and can be set to a specific region. This allows for better latencies, lessens costs, and even addresses regulatory requirements.
- To create a bucket, click the “+ Create Bucket” button at the top left. Give your bucket a name and select the region you would like the bucket to be hosted in. For naming guidelines, please see the Rules for Bucket Naming in the Amazon Simple Storage Service Developer Guide.
3. On the Create Bucket page’s first section, configure your bucket.
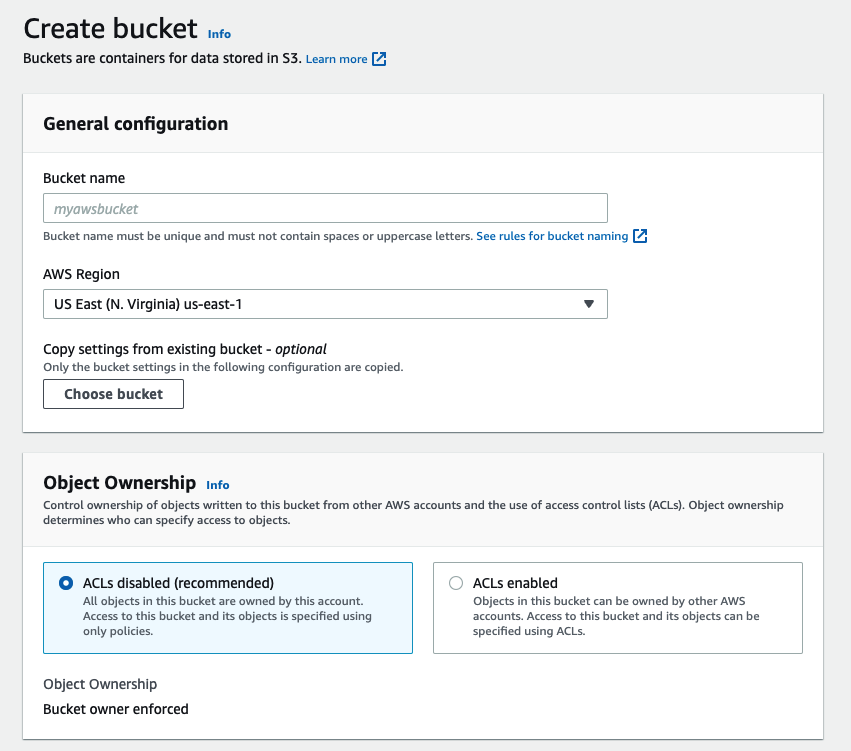
4. In the next section, Block Public Access settings for this bucket, you can keep the default options as it’s possible to edit the permissions later.

5. The default options in the following sections are also sufficient for most cases. When you’re done, click Create Bucket pictured at the bottom right. When done you will be taken back to your list of buckets.

6. To upload files, click on Buckets in the left-hand side menu and click on your bucket’s name. Once you’re inside that bucket, click Upload.

7. Drag-and-drop to queue your files. Under Additional upload options file-specific settings can be configured. When youre done, click Upload.

Set file permissions
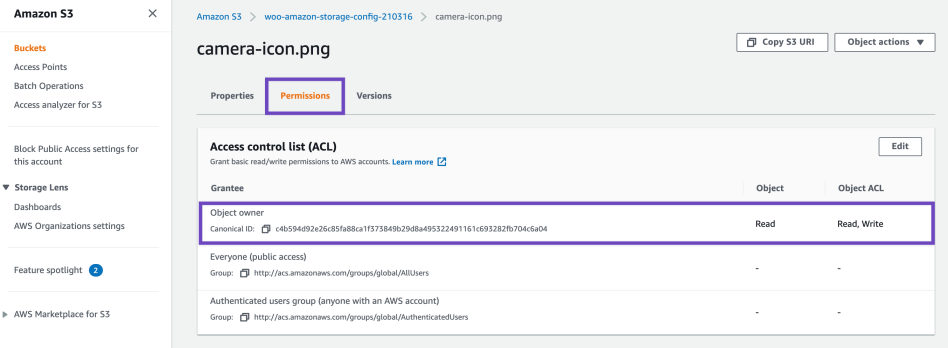
↑ Back to topDefault file permissions are set to private, but can be changed by clicking on the file name, and adjusting the privacy settings by adding or removing privileges under the Permissions tab.
Please make sure that the object permission is set to Read. Otherwise, your files won’t be viewable or downloadable and will throw Access Denied error.
Configure Digital Products
↑ Back to topTo create a digital product with downloadable files stored in the Amazon S3 service, create a new product (or edit an already existing one) and mark the option “Downloadable” in the Product data metabox.
By doing this, the “Downloadable files” table will appear in the “General” settings tab.

Use this table to define the downloadable files of the product. Each row must refer to a single file. If you want to combine multiple files in a single row, please, create a zip file with all of them first.
You can create a digital product with a mix of files stored locally and in S3. This is especially useful when migrating your files to S3 progressively.
Add S3 file
↑ Back to topThe downloadable files stored in Amazon S3 must include the [amazon_s3] shortcode in the File URL field. You can create the shortcode manually by following these instructions, but we recommend using the wizard:
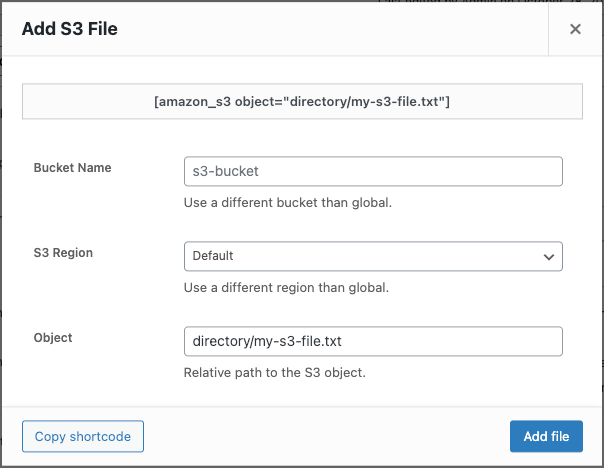
Click on the “Add S3 file” button to open the modal window and fill in the form fields to configure the shortcode.
Only the “Object” field is required. If you have already defined a “Bucket Name” and the “S3 Region” in the global settings, the process will be more straightforward because you won’t need to define these parameters. Anyway, you can use different values than global.
While typing, you can see in real-time the shortcode that will be used as the file URL. You can copy the string into the clipboard anytime by clicking on the “Copy shortcode” button. This functionality will be helpful in case you want to generate a shortcode string to use anywhere in your store or replace the URL of a file stored locally.
Once you set up the shortcode parameters, click on the “Add file” button to add a new row to the “Downloadable files” table with the shortcode string and the file name generated from the submitted form fields.
Edit S3 file
↑ Back to topIf you need to edit an S3 file, click on the “Choose file” button to open the shortcode modal again. The shortcode parameters will be populated from the shortcode string.
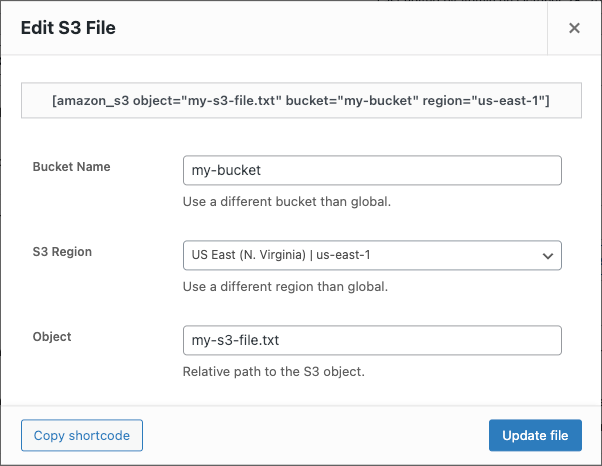
Set up the shortcode parameters and click on the “Update file” button to apply the changes to the current downloadable file.
Note: The extension detects when a downloadable file is stored in S3 or locally by parsing the file URL field and adapts the behavior of the “Choose file” button on the fly. That means if the file URL field starts with the string [amazon_s3, the shortcode modal will be opened. Otherwise, the WordPress Media modal will appear instead.
Amazon S3 Shortcode
↑ Back to topThis shortcode generates unique URLs to download files from the Amazon S3 Storage. You can use it in the file URLs of your downloadable products or anywhere on your WordPress site as an HTML link.
Its parameters are the following:
- object: Relative path to the file in your S3, omitting the bucket route.
- bucket: The bucket name.
- region: The AWS region code where the bucket was created.
Note: We recommend you use basic Latin characters and avoid points, spaces, dashes, etc. in bucket names and object names.
Full example:
[amazon_s3 object=path/filename.ext bucket=my-bucket region=us-east-1]
Only the object parameter is required. The bucket and region can be omitted as long as you enter a default value in the global settings.
[amazon_s3 object=path/filename.ext]
If you want to use a different bucket than the global one, just include the bucket parameter:
[amazon_s3 object=path/filename.ext bucket=another-bucket]
If you don’t include the region parameter, our extension will try to fetch this info by asking AWS where the bucket with the specified name is located. This is possible because bucket names must be unique across all AWS accounts in all the AWS Regions within a partition.
Note: This request is only performed when not using the default bucket. Otherwise, the default region will be used.
If your bucket name collides with another one in a different region partition, please, provide the region parameter in the shortcode to disambiguate the bucket location.
If you want to generate a URL for a file in a different bucket and region, provide these two parameters to the shortcode.
[amazon_s3 object=path/filename.ext bucket=another-bucket region=eu-west-1]
The complete list of AWS regions can be found here.
Finally, to generate download URLs in different locations of your WordPress site, just add an HTML link as follows:
<a href="[amazon_s3 object=my-file.jpg]">Download File From Amazon</a>
Files download
↑ Back to topIn this section, we explain the behavior of our extension when downloading S3 files:
Download method
↑ Back to topWooCommerce uses the “Force downloads” as the default option for the “File download method” setting. This is the recommended method for files located in your WooCommerce store because it doesn’t expose the URL of your downloadable files.
However, the downloads of external files like S3 work better with the method “Redirect only“, especially on media files. Avoiding interruptions in the download and not consuming the bandwidth of your hosting plan.
You can find more about the different download methods here.
To benefit from the two methods, and don’t compromise the security of the downloadable files served from your store, we added the setting “Force redirect download“, which only affects the S3 files. This way, you can use the “Redirect only” method when downloading S3 files while keeping the method defined in the “File download method” setting for the other files.
Tip: Our recommendation is to use the “Force downloads” method as the pre-defined option, and enable the “Force redirect method” setting for S3 files only if necessary.
Note: If you wonder if the “Redirect only” method is insecure, please, check this FAQ.
File names
↑ Back to topWhen you have your store set to make use of ‘Force Download’ and make use of the private URL functionality of the Amazon S3 plugin your files will be the filename of the URL that gets generated, to get around this you need to set your store to make use of ‘Redirect’ for downloads and optionally just add some metadata to the file on Amazon S3 to make it a specific filename than the one you uploaded it as. By default, your file will be downloaded with the name you uploaded it as.
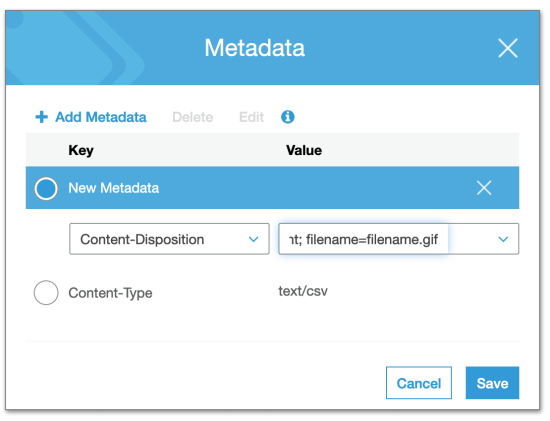
To change the metadata, go to your AWS console, locate the file and then click on it. Select “Properties”. In the next tab, choose Meta Data > + Add Metadata, select “Content-Disposition” from the drop-down, and in the value drop-down enter the following: ‘attachment; filename=filename.gif‘. Be sure to change filename.gif to the filename the file must be saved as.
Audio files playing and not downloading
↑ Back to topThis can be resolved in the same way as the Downloads with funny names issue.
1/ Login to the S3 console, select an object
2/ Select the Properties button (if the properties window at the bottom isn’t already visible).
3/ Select the Metadata tab.
4/ Select the Add Metadata button.
5/ Select Content-Disposition in the drop down.
6/ Enter the Value: attachment.
7/ Save.
FAQ
↑ Back to topWhat happens if I change the bucket’s name?
↑ Back to topIf you need to change the bucket’s name, which is usually done if downloads do not complete, links to downloadable files within emails will no longer work, while links from the My Account page are updated.
Does this extension support Amazon S3 Accelerate?
↑ Back to topCurrently, Amazon S3 Accelerate is not supported by our extension. This request should get added to the ideas board so we can gauge the interest in this feature and decide whether it’s something we would like to implement. If you want to see this, please add it to the Ideas Board, which is where developers go to look for future plugin features and improvements.
Why my shortcode doesn’t work?
↑ Back to topIf you have spaces in the filenames, please make sure that the spaces are replaced with the + chart. Otherwise, the shortcode will not work.
For example, if you had a bucket called MyExampleBucket and a file in that called My File With Spaces.txt you would be able to create links to that file with the following shortcode:
[amazon_s3 bucket=MyExampleBucket object=My+File+With+Spaces.txt]
Is the “Redirect only” download method insecure?
↑ Back to topThe “Redirect only” option of the “File download method” setting is considered insecure because it exposes the URL of your downloadable files. That could be a problem for files directly served from your WordPress site, but it isn’t the case for files served from your S3 bucket because the exposed URL is generated on the fly every time the customer clicks on the download link. Besides, the URL is signed and expires after a specific time, 1 minute by default.
If your store contains non-S3 downloadable files, we recommend keeping the option “Force download” and enabling the setting “Allow using redirect mode (insecure) as a last resort“.
Troubleshooting
↑ Back to topFile not found
↑ Back to topIf you receive this message when trying to download an S3 file, follow these instructions:
- The access to the file hasn’t been revoked from the edit-order screen.
- Validate the shortcode parameters are correct and don’t include any special characters like space, &, or parenthesis.
- The route to the S3 file (
objectparameter) doesn’t include the bucket host, just the relative path. E.g.:/directory/filename.ext. - The bucket host is included in the list of Approved Download Directories. For example:
https://bucket-name.s3.region-code.amazonaws.com/(*).
Note: Depending on the S3 Region, the region code can be omitted from the host. For example: https://bucket-name.s3.amazonaws.com/ .
Finally, if you use the option “Force downloads” or “X-Accel-Redirect/X-Sendfile” as the downloadable method. Enable the option “Allow using redirect mode (insecure) as a last resort” too. More info here.
Downloads not completing
↑ Back to topIf you have issues with downloads being slow or it not completing for your customers, then go to “WooCommerce > Settings > Products > Downloadable Products” and enable the Allow using redirect mode (insecure) as a last resort setting.
Questions & Support
↑ Back to topHave a question before you buy? Please fill out this pre-sales form.
Already purchased and need some assistance? Get in touch with a Happiness Engineer via the Help Desk.