Overview
↑ Back to topThis is not an integration with QuickBooks POS services or payments via QuickBooks, but is rather an eCommerce payment integration using Intuit’s payment processing capabilities. If you’re looking for a QuickBooks POS integration, please suggest or vote for it through the Feature Request Portal.
As of WooCommerce 8.3, Cart and Checkout blocks are available as the default experience. WooCommerce Intuit Payment Gateway is now compatible with those blocks!
Requirements
↑ Back to top- A QuickBooks Online account setup to support Intuit Payments
- PHP 5.6+ (You can see this under WooCommerce > Status)
- An SSL certificate
Installation
↑ Back to top- Ensure your store meets the plugin requirements.
- Download the extension from your WooCommerce dashboard.
- Go to Plugins > Add New > Upload and select the ZIP file you just downloaded.
- Click Install Now and then Activate.
- Click Configure and read the next section to learn how to setup and configure the plugin.
Migrating to OAuth 2.0
↑ Back to top-
- Follow Intuit’s instructions for migrating to OAuth 2.0.
- Once migrated, copy your Client ID and Client Secret keys. You’ll need these to update the plugin settings.
-
- Go to the plugin settings and change the OAuth Version setting to “2.0”.
- Update the Client ID and Client Secret fields with your copied keys.
- Click Save Changes, then Connect with Quickbooks to connect the plugin to Intuit using the OAuth 2.0 keys.
 How do I know what OAuth version I’m currently using and whether I need to migrate?
There are a few ways to tell!
How do I know what OAuth version I’m currently using and whether I need to migrate?
There are a few ways to tell!
-
- Do you see an admin notice in WordPress telling you to migrate? If so, you’re currently using the OAuth version 1.0.

- Check the credentials listed in your plugin settings. If your OAuth Version field is set to “1.0”, you’ll need to migrate.
Getting Started
↑ Back to topCreate Your Intuit App
↑ Back to top-
- Login into the Intuit Developer site.
- Click Dashboard > Create an app.


-
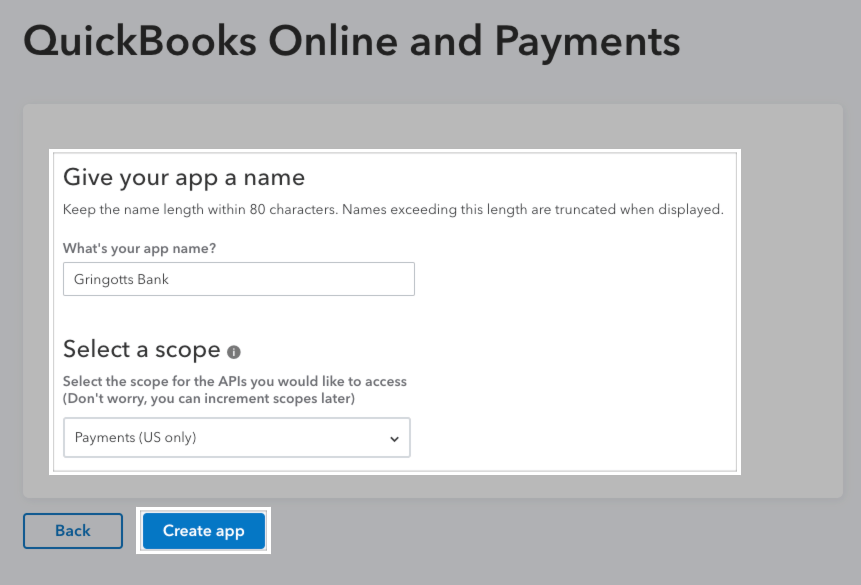
- Enter a name for your app, select “Payments (US only)” for the scope, and click Create app.
-
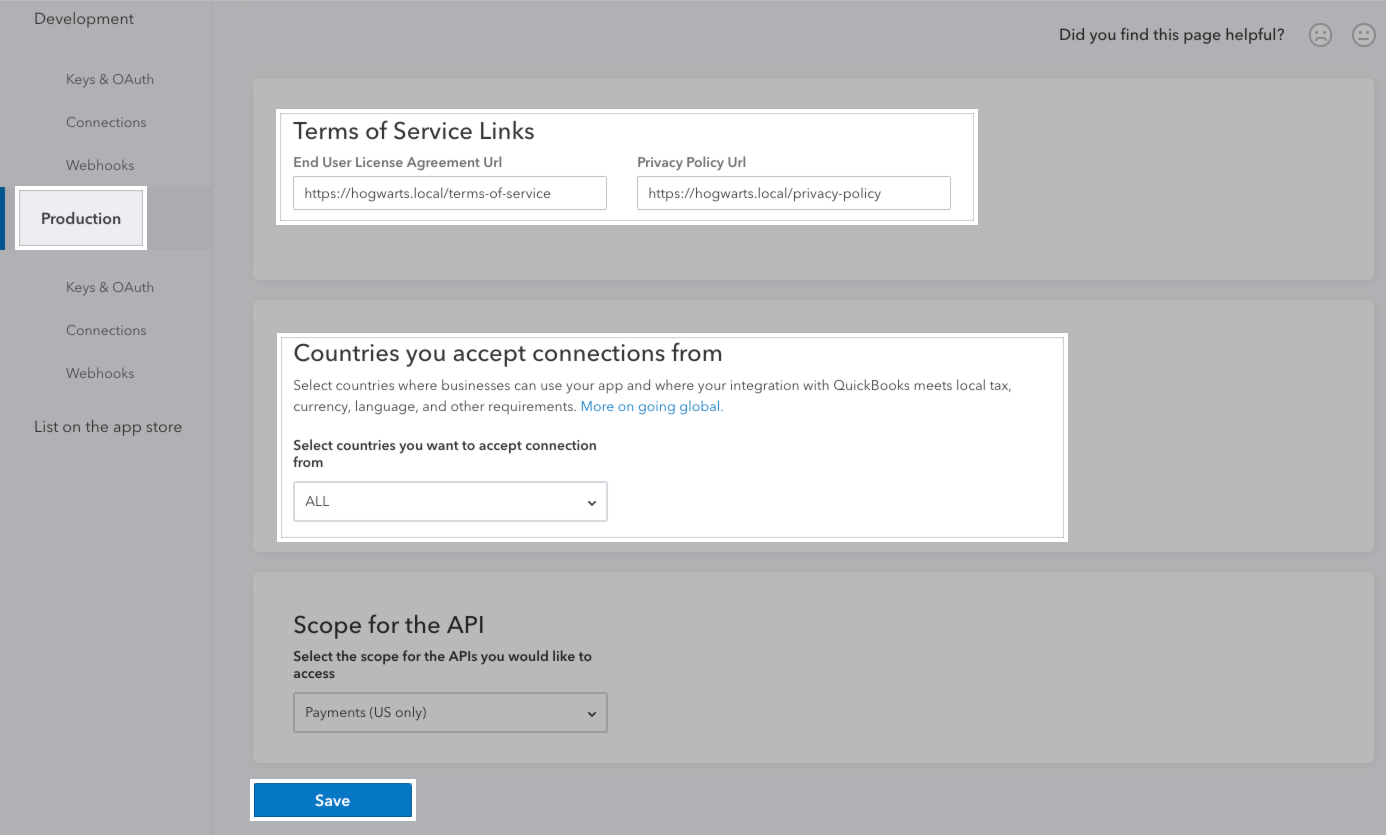
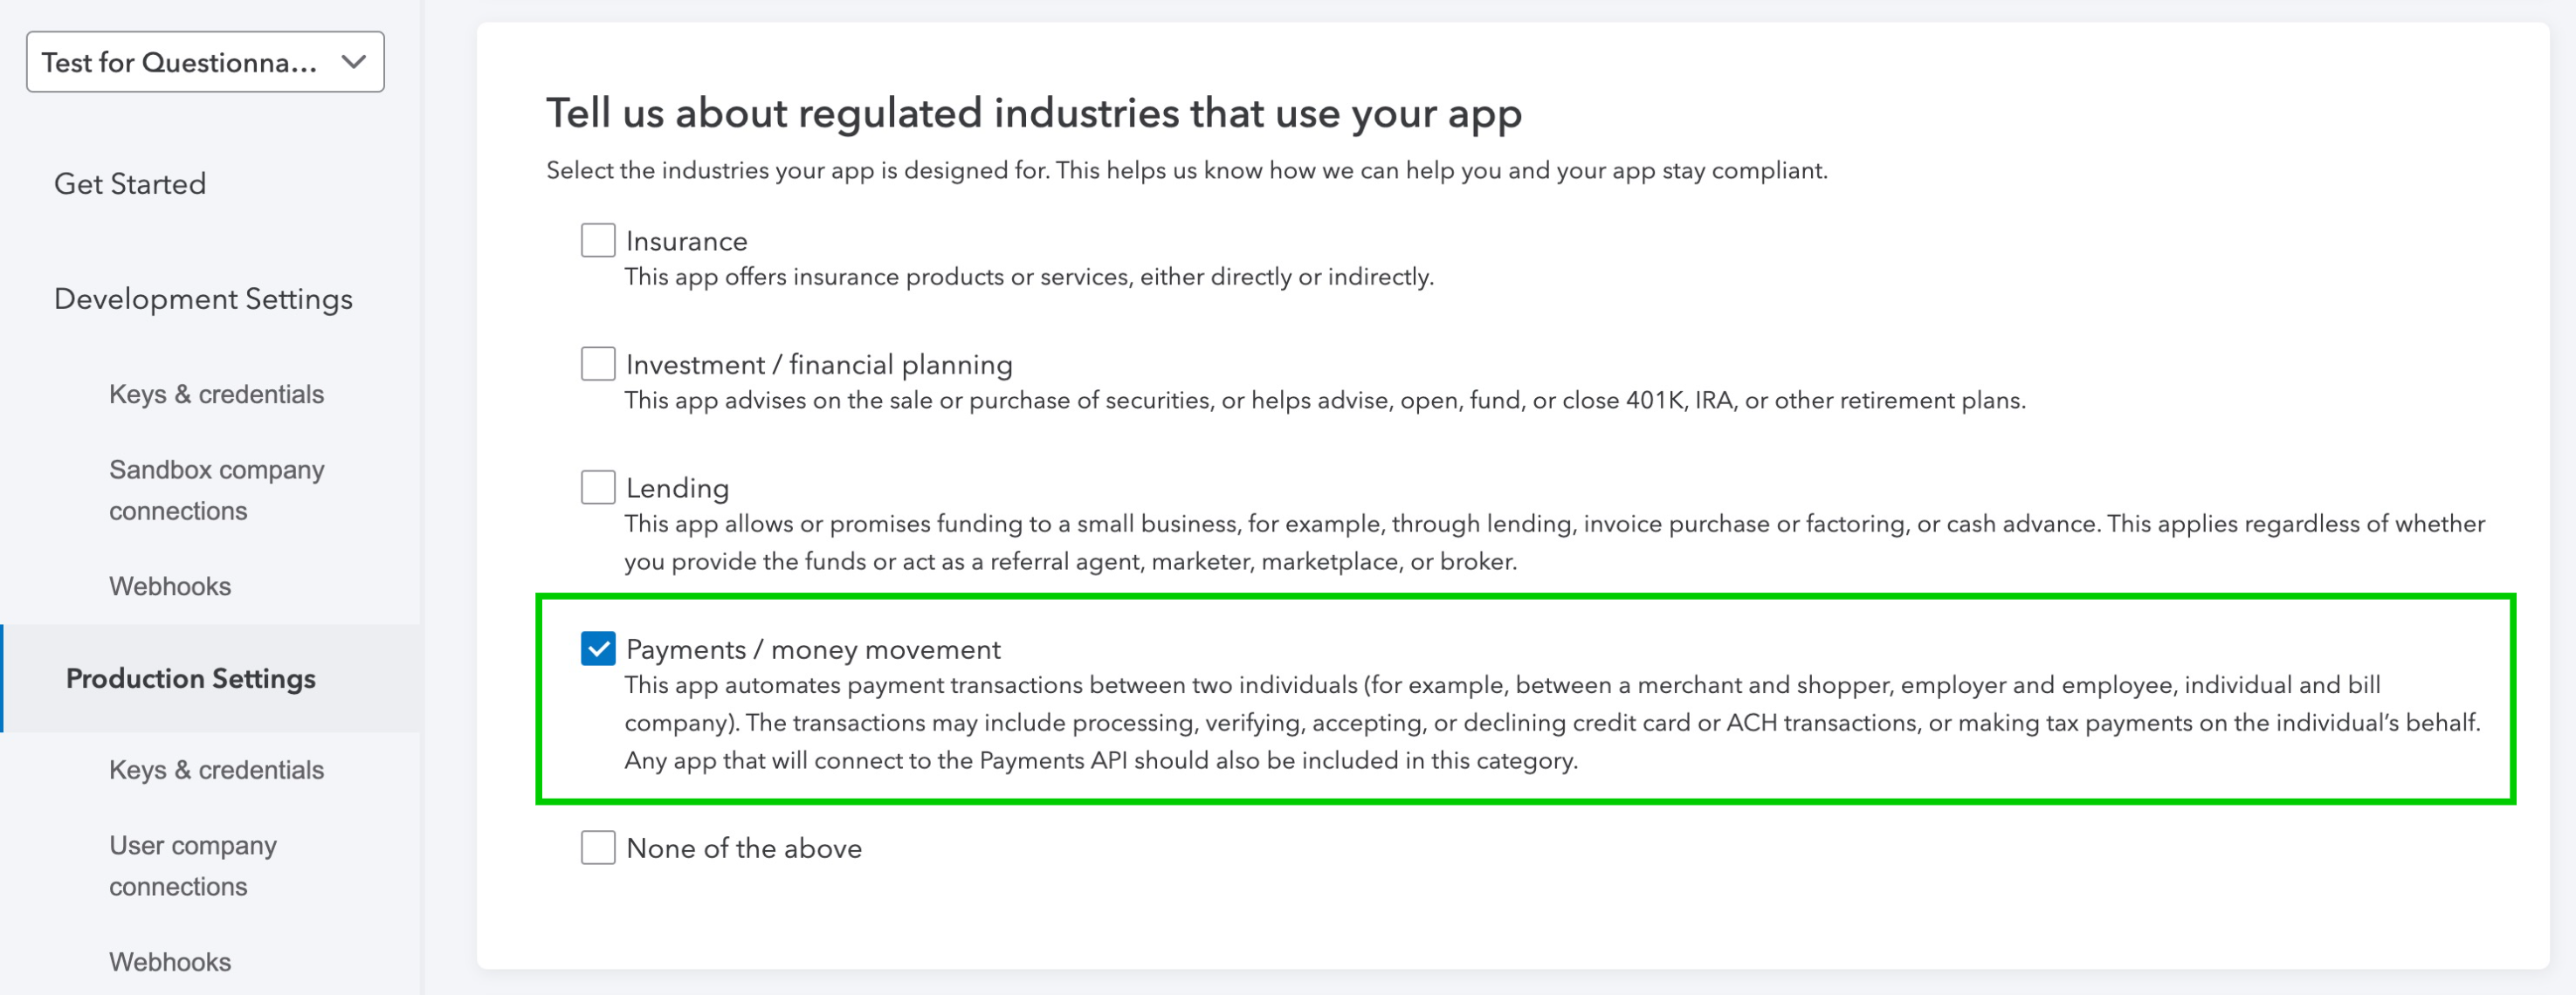
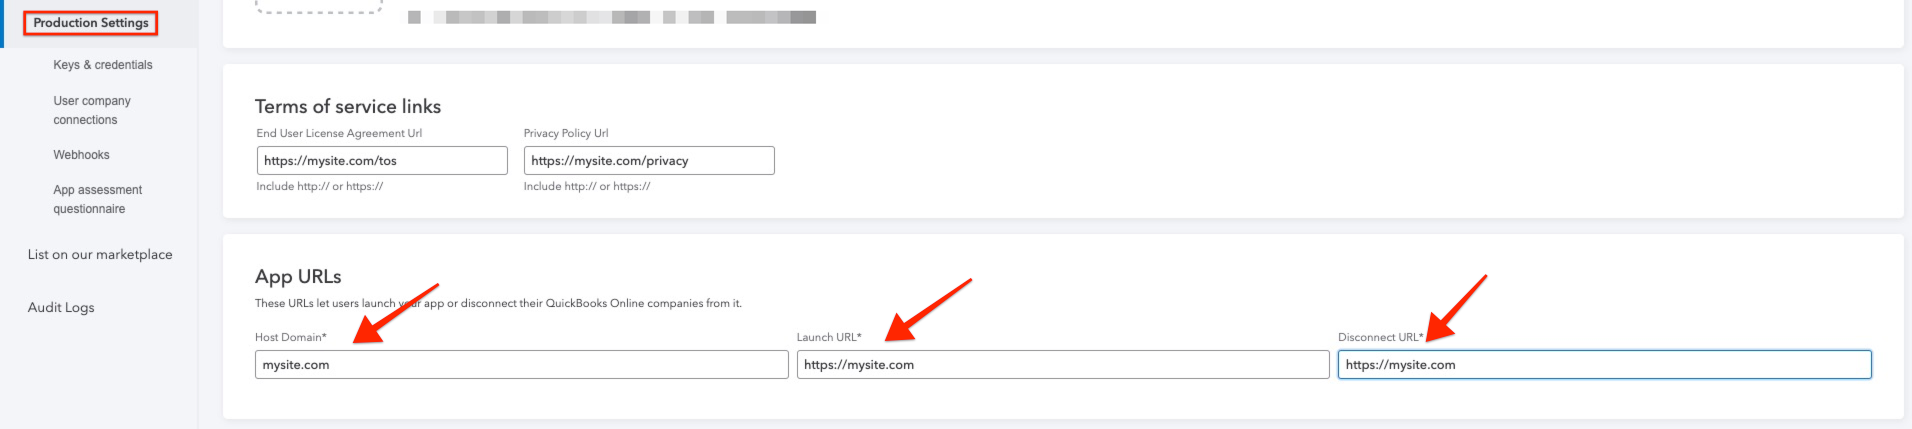
- On the Production tab, update the Terms of Service Links for your site and the Countries you accept connections from setting, if necessary. You’ll also need to select Payments / money movement in the ‘Tell us about regulated industries that use your app’ section. Click Save.
-
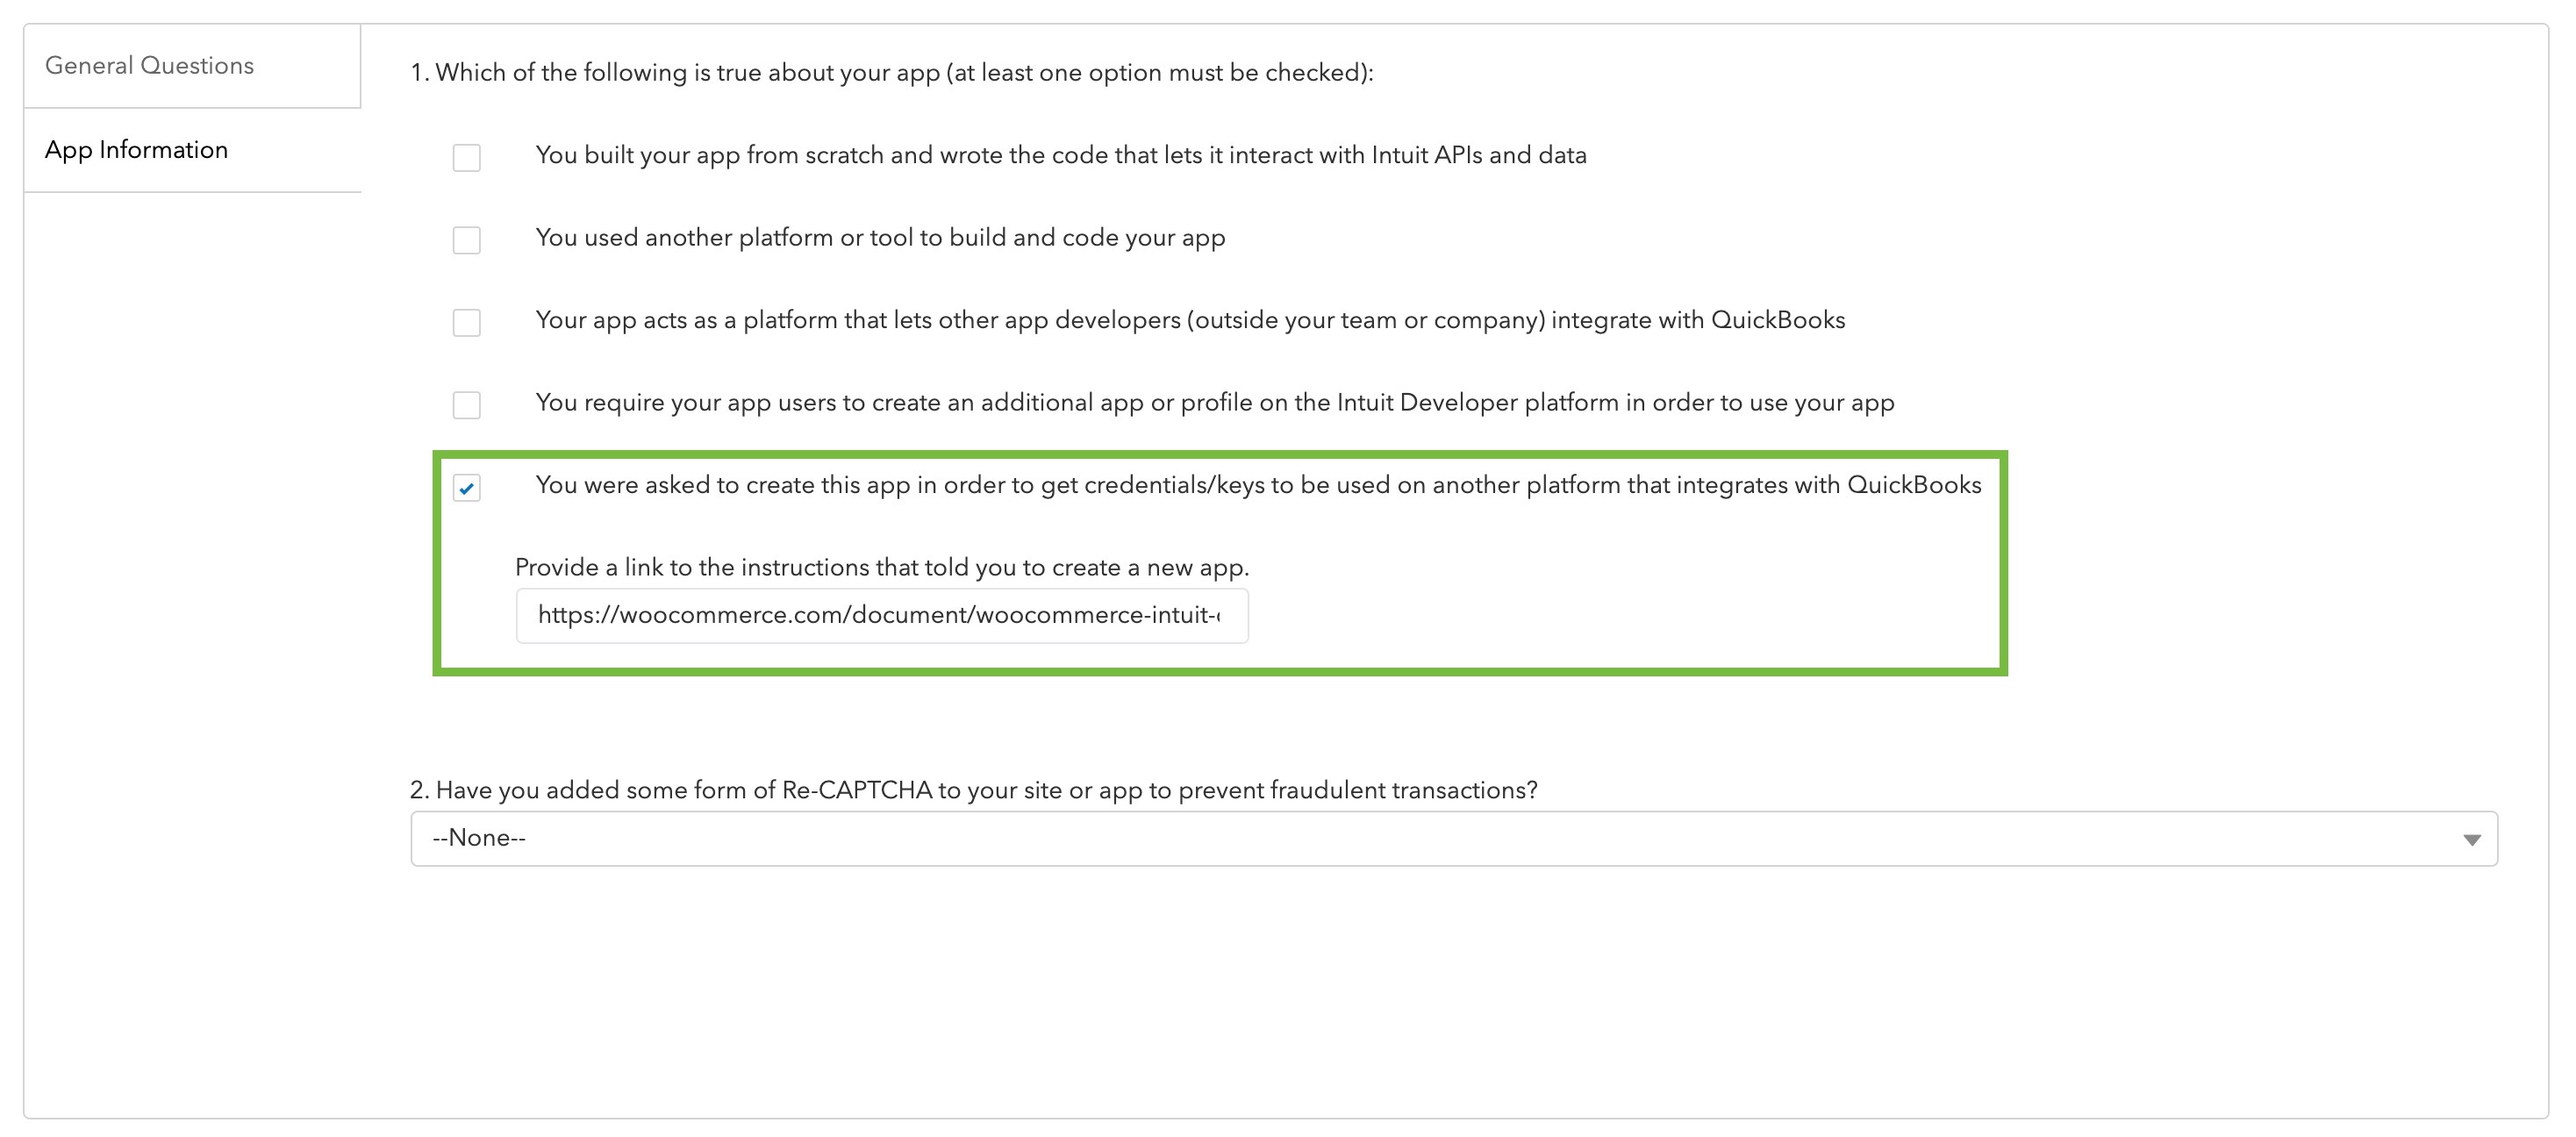
- Go to the App Assessment Questionnaire tab. Fill out the General Questions tab. On the App Information tab, select the last checkbox for question #1. You’ll also need to answer Yes to question #2 and install a reCaptcha plugin on your site. Click the Submit button.
-
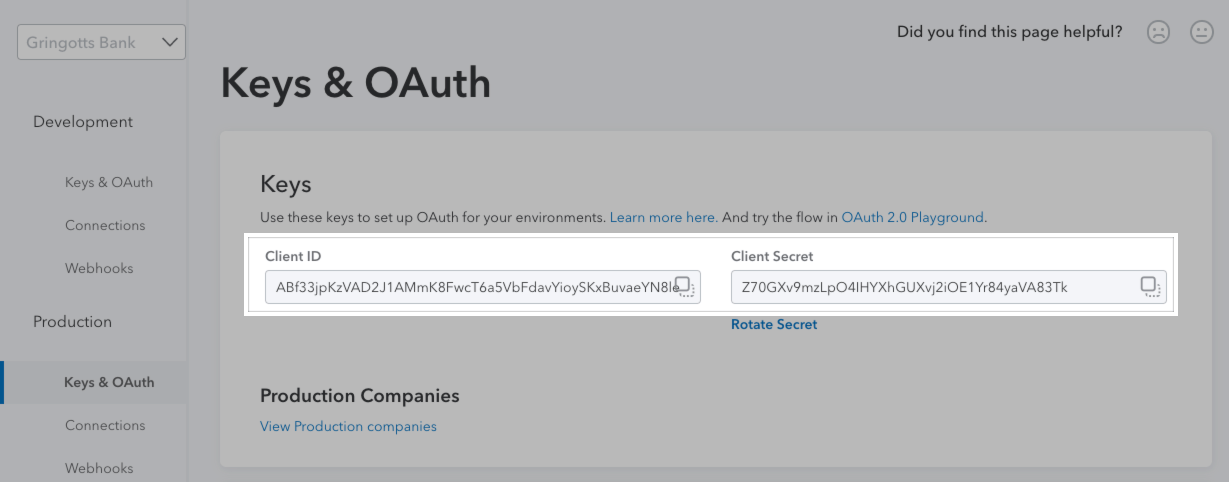
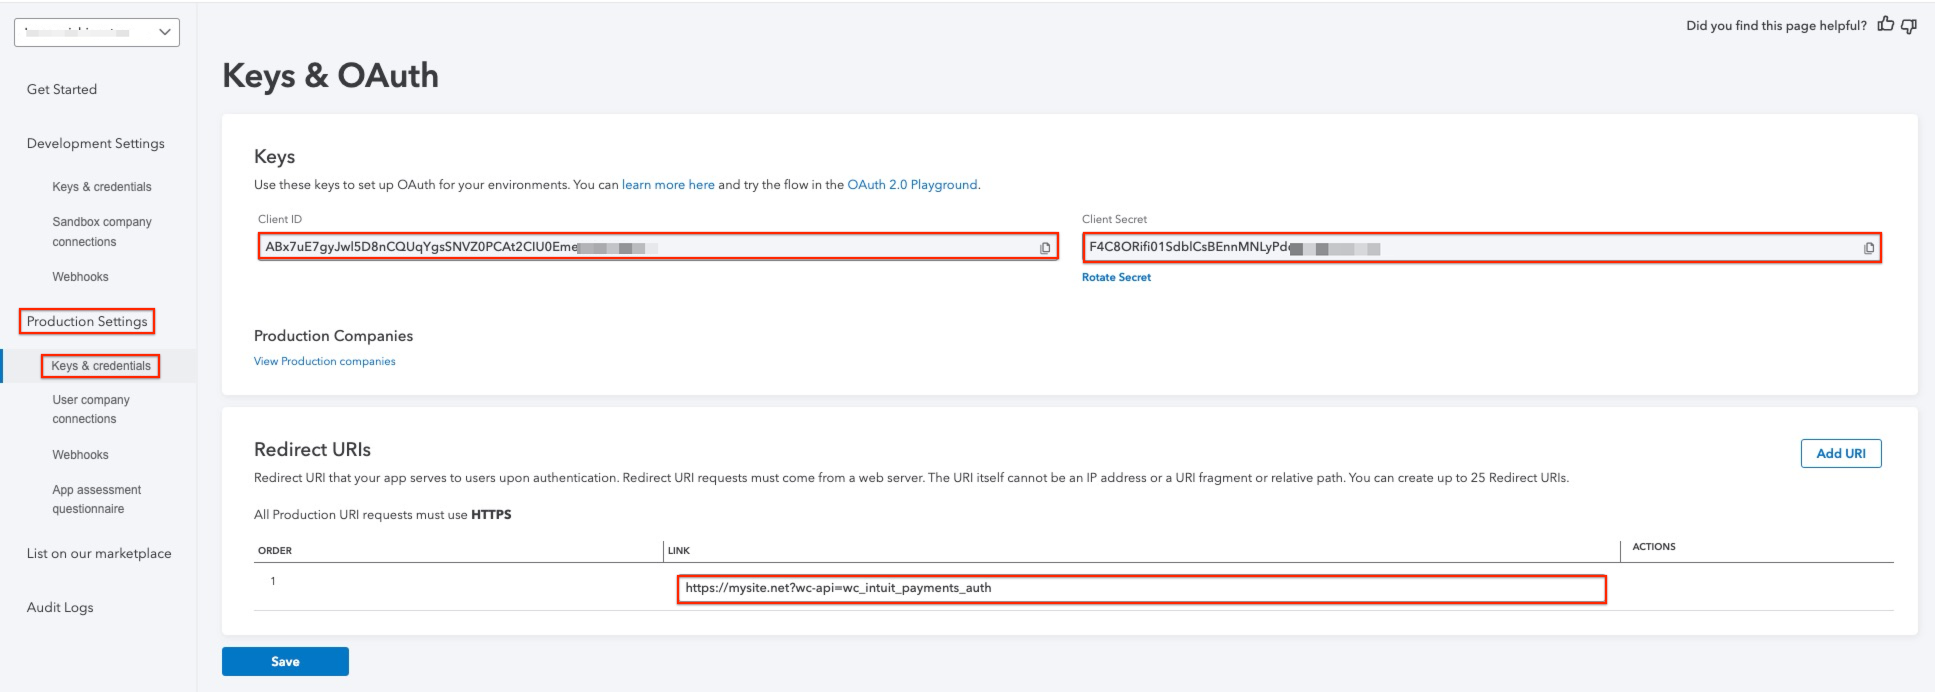
- Once Intuit approves the App Questionnaire, go to the Keys & credentials on the Production Settings tab. Copy the Client ID and Client Secret to enter in the plugin settings.
-
- Update the Redirect URIs field with the URI provided in the plugin settings. This will take the following format (replace “EXAMPLE.com” with your store’s URL):
https://EXAMPLE.com?wc-api=wc_intuit_payments_auth
- Click on the Production Settings link to update the App URLs fields. You can use the homepage or shop domain for your Launch URL and Disconnect URL – these fields are required but don’t require a special URL.
- Update the Redirect URIs field with the URI provided in the plugin settings. This will take the following format (replace “EXAMPLE.com” with your store’s URL):
- Click Save.
You do not need to do anything else with this app! It doesn’t need to be submitted or reviewed since it’s only for your store’s usage.
Connect to Intuit
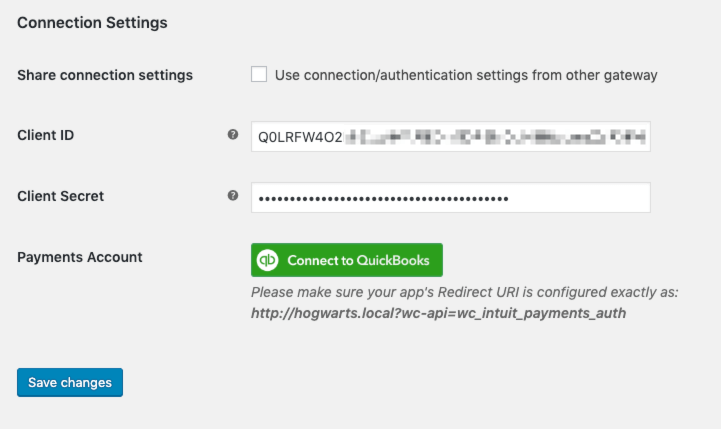
↑ Back to top- Enter your Client ID and Client Secret in the plugin settings.
- Click Save changes.
- Click Connect to QuickBooks.
- In the popup window, enter your Intuit credentials to connect your account.
 All done! Now you can configure the other plugin settings and process payments.
Credit Card Settings
↑ Back to top- Enable / Disable: Allow customers to use this gateway to checkout.
- Title: The text shown for the payment during checkout and on the Order Received page.
- Description: The text shown under the gateway’s title during checkout. Limited HTML is allowed.
- Card Verification (CSC): Require customers to enter their card security codes when checking out.
- Saved Card Verification: Require customers to enter their card security codes when using a saved payment method at checkout.
- Transaction Type: Controls how transactions are submitted to Intuit Payments. Select “Charge” to automatically capture payments. If you select “Authorization”, you must manually capture and settle payments in your Intuit Payments control panel or on the WooCommerce orders screen after the transaction has been submitted. This defaults to “Charge”.
- Charge Virtual-Only Orders: If Transaction Type is set to “Authorization”, enable this to automatically capture charges for orders with only virtual products. For downloadable products, this will grant downloads access right away.
- Capture Paid Orders: If Transaction Type is set to “Authorization”, enable this to automatically capture charges when orders move to a paid status.
- Accepted Card Logos: Determines which card logos are displayed during checkout. This has no impact on which cards are accepted by your merchant account.
- Tokenization: Let customers save their payment methods for future use at checkout. This is required for Subscriptions or Pre-Orders.
- Detailed Decline Messages: Display detailed messages to customers to provide reasoning for declines instead of a generic error message when possible. Click here to read more about detailed decline messages.
- Debug Mode: Enable when you’re having issues processing transactions. You can choose to log API requests directly on the checkout page, save them to the WooCommerce > Status > Logs page, or both. As a best practice, please do not enable this setting unless you’re having issues with the plugin.
- Environment: Switch between “Test” and “Production” credentials. You can find your test credentials in your Intuit app on the Keys > Development > Keys & OAuth tab.
- Share connection settings: If using the credit card and eCheck gateways, select this setting to share credentials between the gateways so you don’t have to enter them twice. You must enter the credentials in the eCheck settings if this is enabled here.
- OAuth Version: The OAuth version associated with your Intuit app. If you’re currently using 1.0, please follow these steps to migrate to OAuth 2.0, since support for OAuth 1.0 has been deprecated.
- Client ID: Follow the steps above to find your Client ID.
- Client Secret: Follow the steps above to find your Client Secret.
- Payments Account: Once you’ve entered your Client ID and Client Secret, you can connect to QuickBooks here. Once connected, you can Reconnect or Disconnect from QuickBooks here.
eCheck Settings
↑ Back to top- Enable / Disable: Allow customers to use this gateway to checkout.
- Title: The text shown for the payment during checkout and on the Order Received page.
- Description: The text shown under the gateway’s title during checkout. Limited HTML is allowed.
- Tokenization: Let customers save their payment methods for future use at checkout. This is required for Subscriptions or Pre-Orders.
- Debug Mode: Enable when you’re having issues processing transactions. You can choose to log API requests directly on the checkout page, save them to the WooCommerce > Status > Logs page, or both. As a best practice, please do not enable this setting unless you’re having issues with the plugin.
- Environment: Switch between “Test” and “Production” credentials. You can find your test credentials in your Intuit app on the Keys > Development > Keys & OAuth tab.
- Share connection settings: If using the eCheck and credit card gateways, select this setting to share credentials between the gateways so you don’t have to enter them twice. You must enter the credentials in the credit card settings if this is enabled here.
- Client ID: Follow the steps above to find your Client ID.
- Client Secret: Follow the steps above to find your Client Secret.
- Payments Account: Once you’ve entered your Client ID and Client Secret, you can connect to QuickBooks here. Once connected, you can Reconnect or Disconnect from QuickBooks here.
Managing Orders
↑ Back to topCapture Charges
↑ Back to topAutomatic Refunds
↑ Back to topVoid Transactions
↑ Back to top- If your Transaction Type setting is set to “Authorization”, you can void when the transaction has been authorized but not yet captured.
- If your Transaction Type setting is set to “Charge”, you can void before the transaction is settled (i.e. funds haven’t been transferred from the customer’s account to your Intuit account).
Gateway Features
↑ Back to topSaving Payment Methods
↑ Back to topNotes:
- Please confirm that tokenization is available for your Intuit account with your representative (for both credit cards and eChecks, if you intend to use both). There may be a service charge to enable this.
- Credit card information isn’t stored on your site’s server, but is tokenized and stored on Intuit’s servers. This reduces your site’s PCI compliance burden.
- When using WooCommerce Subscriptions, customers cannot delete payment methods associated with active subscriptions. Click here to read more about saving payment methods with Subscriptions.
Enhanced Checkout Form
↑ Back to top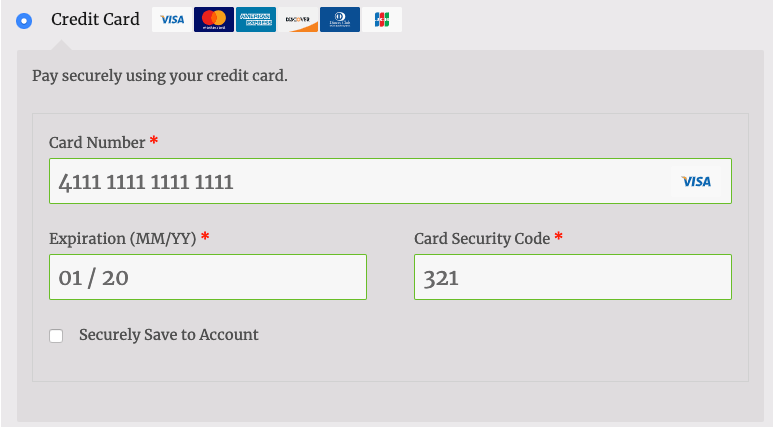
Note: Your checkout form’s appearance may vary based on your site’s theme.
Frequently Asked Questions
↑ Back to topQ: Does this gateway support legacy QuickBooks Merchant Services (QBMS) accounts? A: Existing installations of this plugin can be used with legacy QBMS accounts. However, we cannot support merchants using this account, so merchants must be using Intuit Payments to receive active support. New installations will use Intuit Payments by default.
Q: Why do I get errors while using the test/production environment? A: Please check your plugin settings to ensure you’re using production keys in the “Production” environment and test keys in the “Test” environment. You can find both sets of keys in your Intuit developer app.
Q: Will this plugin send purchase details to my Quick Books Online account? A: This plugin only serves as a payment gateway integration with Intuit’s payment processing services, so it cannot send transaction details to your Quick Books Online account.
Q: Do I have to refresh my connection to my Intuit app manually? A: Nope! The plugin will do this for you automatically on a recurring basis.
Q: Is this plugin compatible with Intuit Pay? A: According to Intuit Pay Support, they do not currently support eCommerce integrations. This is planned for a future Intuit Pay system update, but there’s no firm ETA yet.
Q: Does this work with QuickBooks Payments? A: Yes and no. Unfortunately, Intuit names many of their products the same way. This plugin works with the eCommerce processing side of Intuit QuickBooks payments, which can be used with or without Quickbooks. Sometimes this is confused for another version of QuickBooks payments, which is done via QuickBooks online. This service will not work with our gateway integration to the best of our knowledge.
Q: Is this plugin compatible with AVS (Address Verification Service)? A: The short answer is no. Our plugin depends on the payment status sent by the payment processor to approve or reject transactions. The address verification, however, is handled as a different parameter (or part) of the response which can cause orders to be approved even if the AVS fails. Our team is in the process of reviewing possible changes, so don’t hesitate to reach out to us if you’d like more information.
Troubleshooting
↑ Back to topDifficulty Connecting to Intuit
↑ Back to top- Ensure your Redirect URI is properly configured in your Intuit app. You can find the correct Redirect URI for your store in the plugin settings.
- Ensure your OAuth version is properly configured in your plugin settings. Not sure which OAuth version you’re using? Click here for tips on determining which version you’re using.
“This app no longer meets our guidelines and standards.” Error
↑ Back to topProvided card type is invalid. Provided token is invalid.
↑ Back to topProvided card type is invalid. Provided token is invalid., there is likely a JavaScript conflict or error of some kind on your Checkout page, typically with your theme or another plugin. Often times, optimization plugins interfere with how JavaScript loads on your checkout page and cause this error. A few conflicting plugins to look for are:
- Autoptimize
- SG Optimizer
- Hummingbird Pro
Other Issues
↑ Back to top- Please ensure that your site meets the plugin requirements.
- Check the FAQs to see if they address your question.
- Confirm that your Client ID and Client Secret are entered correctly in your plugin settings.
- Confirm that your Redirect URI is populated correctly in your Intuit app. You can find your Redirect URI in the plugin settings.
- Confirm that your OAuth version is populated correctly in the plugin settings. Click here for tips on determining which OAuthversion you’re using.
- Enable Debug Mode in the plugin settings and review the error codes/messages provided by Intuit Payments. If the error points to an issue with the plugin, please submit a support ticket and include the logs to help us troubleshoot.