Note: This product is no longer sold on WooCommerce.com. This document was left available to you for help with configuration and troubleshooting, but is no longer updated.
The WooCommerce FreshBooks extension allows you to automatically create your customers in WooCommerce as Clients in FreshBooks, and to optionally create drafts or send invoices for orders. Payments can be synced between invoices and orders, and FreshBooks items can also be linked to WooCommerce products for better reporting.
By having all your data entered into FreshBooks automatically upon order, your customers will have immediate access to download PDF invoices, and you can even send invoices by “snail mail” automatically.
Not using FreshBooks yet? Sign up for a free trial to get started with easy invoicing! (Don’t forget to select FreshBooks Classic when signing up!)
Requirements
↑ Back to topIf you use the new FreshBooks (it looks different than our screenshots), please reach out to FreshBooks’s customer service to change your account. This is best to do as early as possible, so if you’re new to FreshBooks, please do this before configuring your account.
Installation
↑ Back to top- Download the extension from your dashboard
- Go to Plugins > Add New > Upload and select the ZIP file you just downloaded
- Click Install Now, and then Activate
- Go to WooCommerce > Settings > FreshBooks and read the next section to learn how to setup and configure the plugin.
Setup and Configuration
↑ Back to topSetup
↑ Back to top- Go to WooCommerce > Settings > FreshBooks to get to settings.
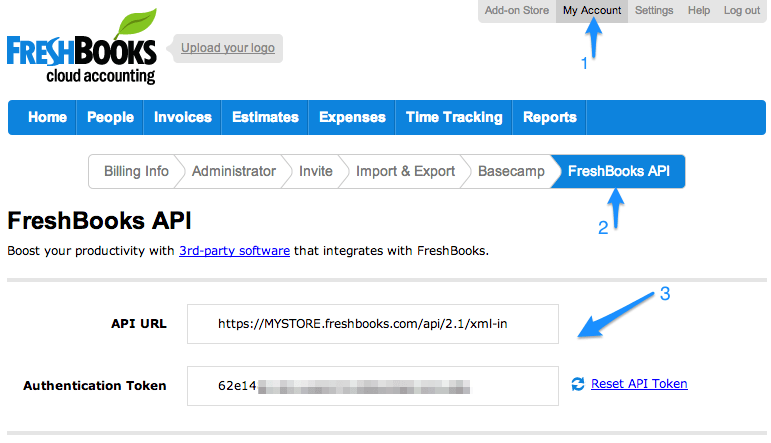
- Enter your API URL. You can get this information by logging in to FreshBooks and navigating to My Account > FreshBooks API.
- Enter your API token. You can get this information by logging in to FreshBooks and navigating to My Account > FreshBooks API.
Save this information to pull in your FreshBooks data and continue reading if you’d like to change the plugin configuration.
Extension Settings:
↑ Back to top
- API URL – This is the URL provided to you in your FreshBooks account. Follow the steps above to get this.
- Authentication Token – This is the token provided to you in your FreshBooks account. Follow the steps above to get this.
- Debug Mode – Enable this is you are experiencing issues. All debugging messages are cleaned of sensitive information before display, but as a best practice, please do not enable this unless you are having issues with the plugin.
- Default Client – Select a client to create all invoices under. If you want to create a new client for each customer, select “None”.
- Default Language – Choose the default language used for your invoices. Defaults to your site’s language.
- Send Invoices By – Select whether to send invoices via Email or Snail Mail. If you select “Snail Mail”, you must have enough stamps in your FreshBooks account.
- Use Order Number as Invoice Number – Enable this to use the WooCommerce order number as the invoice number. Disable to allow FreshBooks to auto-generate the invoice number.
- Invoice Number Prefix – Enter a prefix for the generated FreshBooks invoices, or leave blank if you don’t want to use a prefix. Please note that the total number of characters sent to FreshBooks (prefix + order number) cannot exceed 10 characters.
- Display Link in Recent Orders – Enable this to display a “View Invoice” action in the “My Orders” list for customers.
- Automatically Create Invoices – Enable this to automatically create invoices for new orders. If disabled, invoices must be created manually in FreshBooks.
- Automatically Send Invoices – Enable this to automatically send invoices after creation. Disable to leave created invoices as drafts.
- Automatically Apply Payments – Enable this to automatically apply invoice payments for orders that have received payment. Disable if you want to mark these manually in FreshBooks.
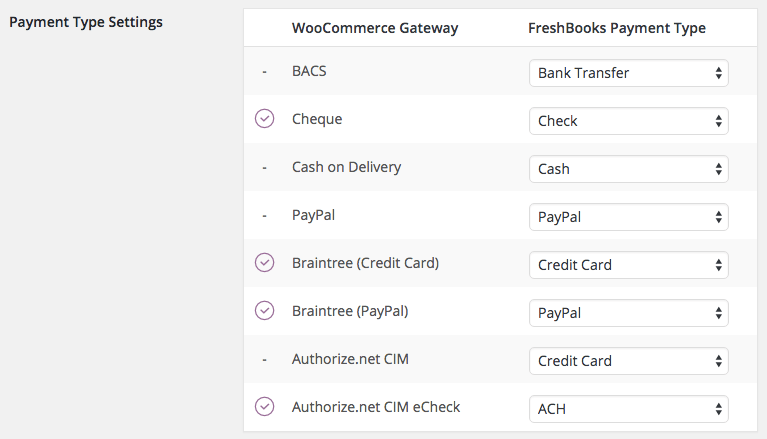
- Payment Type Settings – For each WooCommerce payment method, select how this should be recorded in FreshBooks as the payment type.
Usage
↑ Back to topTying FreshBooks Items to Products
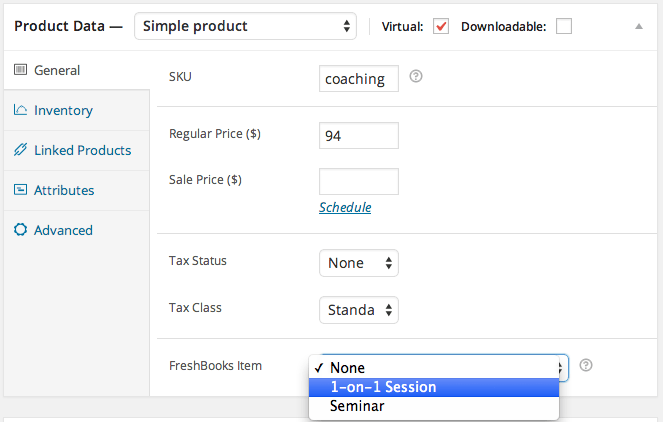
↑ Back to topIf you have items created in FreshBooks, you can tie them to your WooCommerce products. Each time that product is purchased, it will be documented in FreshBooks for better reporting on item sales.
Under a Product Data for the product you’d like to tie to you FreshBooks item, look at the bottom of the “General Tab”. A new “FreshBooks item” setting has been created. Select the FreshBooks item this product represents, then save your product. Any time this product is purchased, it will be recorded as a sale of that FreshBooks item.
Order and Invoice Numbers
↑ Back to topIf you’ve opted to have your WooCommerce order numbers reflected as FreshBooks invoice numbers, each invoice number will be the same as the corresponding WooCommerce order number (plus any prefixes you’ve added).
FreshBooks is also compatible with the Sequential Order Numbers Pro extension, so modified order numbers will also be reflected as FreshBooks invoice numbers. For example, let’s say that my Sequential Order Numbers Pro settings create order numbers that have prefixes and suffixes like this: WT-1001-{YY} where {YY} is the year. My FreshBooks invoices will use the same format. If you’ve added a prefix (for example, WOO-), then this prefix will be added into the invoice number: WOO-WT-1001-{YY}.
Syncing Orders and Invoices
↑ Back to topIf you’d like invoices to be created automatically, then each time an order is placed, a new invoice will be created (you can opt to create invoices manually instead). If you’ve set a default client (i.e., “WooCommerce Shop”), then all invoices will be assigned to that client. If you’ve selected no default client, each new customer will be created as a client in FreshBooks.
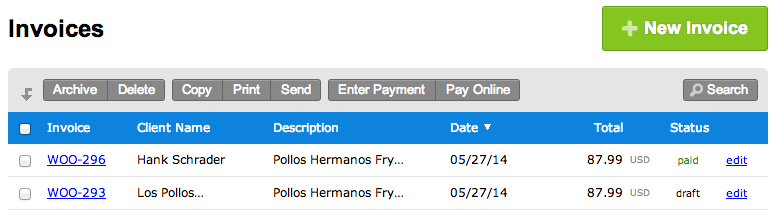
New orders can have invoices set as “Draft” or “Sent”. If you opt to immediately send invoices when orders are created, your order page will show that invoices have been sent to the customer:

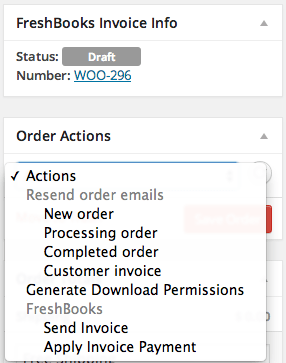
Invoices can also be saved as drafts when new orders are created:

If invoices have been created as drafts, you can send them via the Edit Order screen with the new FreshBooks order options:
Orders will also have a link to the corresponding invoices in FreshBooks for easy viewing and management.
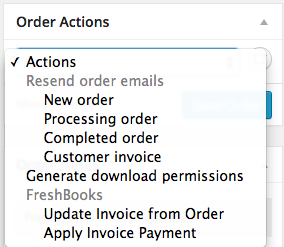
If you end up changing any order details, you can then send these changes back to the FreshBooks invoice to ensure that the order and invoice data is completely synchronized. Edit the order, and send the changes for the invoice:
You can also bulk send or create invoices from the Orders page by selecting the appropriate orders and using the bulk order actions:

Manually Invoicing Orders
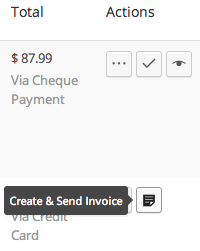
↑ Back to topOrders created before you installed the FreshBooks plugin can have invoices created as well. You can use the bulk options as illustrated above, or use the new “Create & Send Invoice” button that will be available for order that do not currently have an invoice. This is also a handy option for those of you that want to create invoices manually:
Syncing Payments
↑ Back to topYou can optionally sync payments for invoiced orders between FreshBooks and WooCommerce. If you enable the option to “Automatically Apply Payments” under the FreshBooks settings, any orders that have been paid via WooCommerce will be marked as “Paid Invoices”. Likewise, if you’ve sent an invoice to customers and they’ve paid the invoice via FreshBooks, the invoice will be marked as paid in WooCommerce:

Note that order status will not be changed via FreshBooks actions as it’s assumed that you’ll want complete control of order status management, and for the extension to respect several different use cases.
Other Info
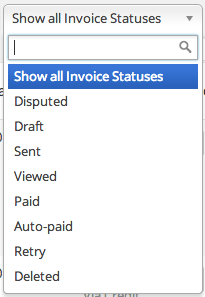
↑ Back to topAside from the very handy bulk invoice creation and payment application options, you can also filter orders by invoice status:
Taxes and Shipping
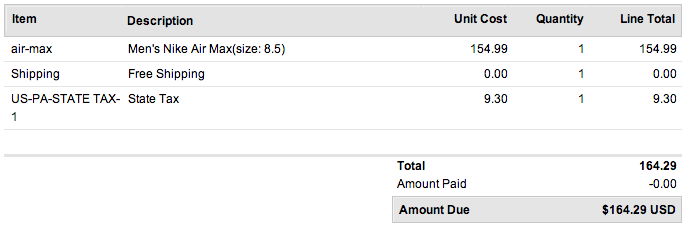
↑ Back to topAll taxes and shipping costs are added as line items to your invoices. All taxes will be displayed as individual line items with the appropriate tax codes, and shipping costs will also be added as a line item in your invoice:
Please note that some users want the tax to apply to existing line items rather than creating a new line item, as applying the tax to existing line items would allow the customer to generate reports on this information come tax time. However, this is not possible due to the differences in how FreshBooks and WooCommerce handle tax rates.
WooCommerce allows you to set up multiple tax rates, while FreshBooks only allows a maximum of 2 taxes per line item. Realistically, many WooCommerce stores will have more than 2 tax rates configured, and thus we can’t force them into line item taxes.
Based on a recommendation from the FreshBooks team, we tried to set the tax line item, then tell FreshBooks to use this as the tax total, mapping it to a rate. However, instead of accepting this total as the tax total for the rate, FreshBooks tries to apply the rate to this line item total. Example: WooCommerce says the 6% PS state tax was $3; instead of accepting this, FreshBooks applies 6% to $3, setting the tax as $0.18. It will not let the $3 override its internal calculation and become the tax total.
There’s no way for us to override this from the plugin side to force FreshBooks to recognize this as the right tax amount; until FreshBooks supports more than 2 rates per line item, the plugin will continue to handle taxes as individual line items to support the majority of WooCommerce stores.
Subscriptions Compatibility
↑ Back to topWooCommerce FreshBooks is compatible with WooCommerce Subscriptions — settings that apply to new orders will also apply to renewal orders as well. For example, if you create a draft invoice for each new order, then a draft invoice will be created for each renewal order as well.
Frequently Asked Questions
↑ Back to topQ: Can any product type be tied to FreshBooks items?
A: Currently FreshBooks supports tying most product types to FreshBooks items. You can sync simple, variable, subscription, and bookable products (via WooCommerce Bookings) with FreshBooks items. If you encounter a product type that does not allow FreshBook items, please get in touch with the support team to let us know! We’ll examine if compatibility can be added.
Troubleshooting
↑ Back to topFirst, if you see a notice / order note like this:
Invalid value for field 'number'. Exceeded maximum length of 10 for field 'number'.
This is due to the invoice number being sent to FreshBooks. The combination of the FreshBooks invoice number prefix and the order number cannot exceed 10 characters, so we recommend tweaking your configured FreshBooks prefix. If your order number itself exceeds 10 characters (or soon will), we recommend that you do not use the order number as the invoice number. The plugin will not cut any of this data off as it cannot automatically make the best decision for your store.
Having trouble with something else? Follow these steps to make sure everything is setup correctly before posting a support request:
- Check that your API URL and API Token are correct.
- Double-check that your API URL and API Token are correct 😉
- If you’re concerned about how the plugin handles tax rates, please read our tax rate overview.
- Enable debugging, then submit a support ticket for further help with the debug log attached.
Questions & Support
↑ Back to topHave a question before you buy? Please fill out this pre-sales form.
Already purchased and need some assistance? Get in touch with support via the help desk.