Overview
↑ Back to topChase Paymentech requires individual certification of merchants to obtain live merchant credentials. The plugin has a certification mode to assist merchants with this process. You can view a guide to certification here.
Accept payments from major credit cards on your WooCommerce website with Chase Paymentech. This integration uses a Chase hosted page page via iframe for maximum security – payments are routed directly through Chase’s secure servers rather than your own. This extension supports:
- WooCommerce Subscriptions
- WooCommerce Pre-Orders
- refunds and voids from the WooCommerce admin
- authorizing or authorizing + capturing charges
- capture charges individually or in bulk from the WooCommerce admin
- customer can securely save payment methods to their accounts during checkout and use them for future purchases
Chase Paymentech is only available for merchants in the US and payments must be processed in USD (international payments can be accepted in USD). An SSL certificate is also required to ensure your customer credit card details are safe.
As of WooCommerce 8.3, Cart and Checkout blocks are available as the default experience. WooCommerce Chase Paymentech is now compatible with those blocks!
Installation
↑ Back to top- Download the extension from your WooCommerce dashboard
- Go to Plugins > Add New > Upload and select the ZIP file you just downloaded
- Click Install Now, and then Activate
- Go to WooCommerce > Settings > Payment Gateways and read the next section to learn how to setup and configure the plugin.
Requirements
↑ Back to top- Chase Paymentech is available for merchants in the US who process payments in USD (a different API is used for CAD processing so this is not supported).
- You will need a Chase Paymentech merchant account, if you don’t already have one please sign up here for fastest service to indicate your store uses WooCommerce.
- Test credentials are provided by Technical.Implementations@Chase.com for initial configuration of the plugin.
- Completion of the Orbital Certification process using your test credentials as detailed in our certification guide, to receive your production credentials and begin accepting live payments.
- An SSL Certificate must be installed on your site, as required by Chase when taking payments with Chase Paymentech
- Quarterly PCI scans are required by Chase for merchants accepting credit cards through Chase Paymentech. There are several companies that provides this service (for instance, SecurityMetrics). Contact the Chase Paymentech Orbital Certification team for additional information on this requirement.
Setup and Configuration
↑ Back to topPlugin Setup
↑ Back to top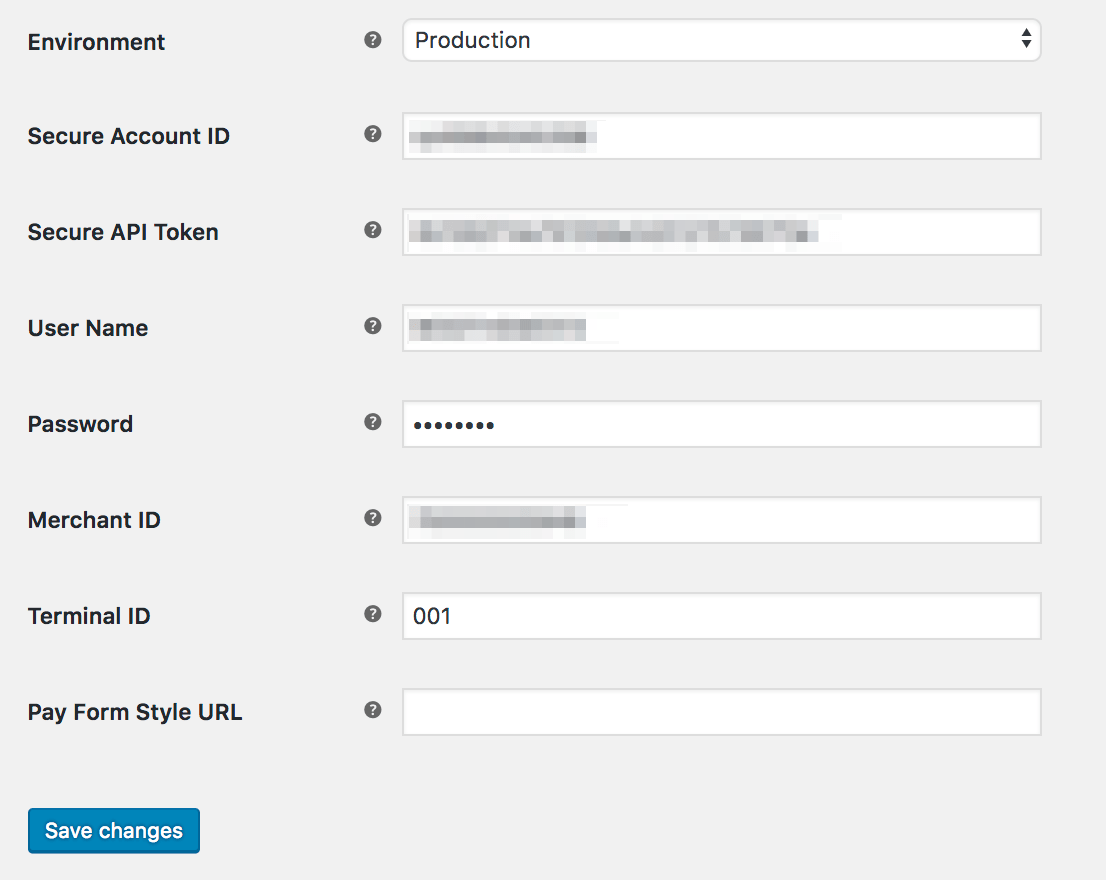
Chase Virtual Terminal Configuration
↑ Back to top

www. in your callback URL if your site uses this by default.
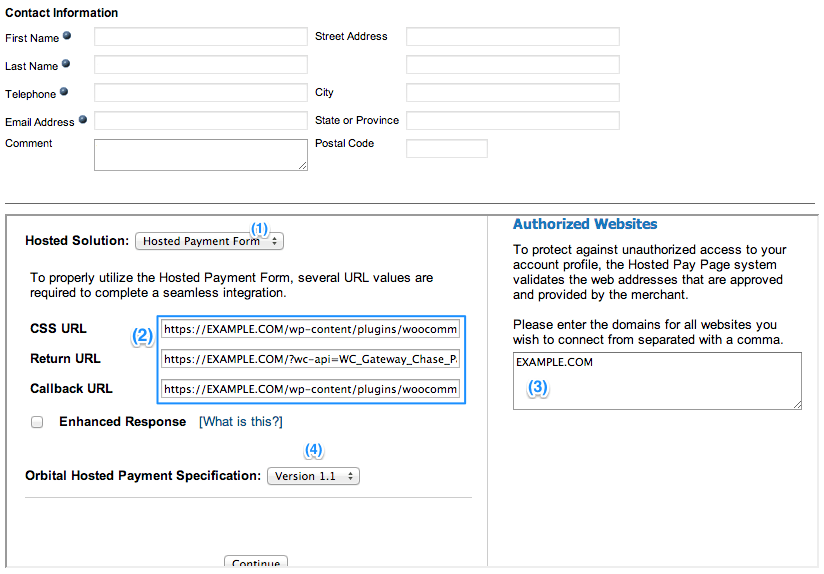
- Set “Hosted Solution” to Hosted Payment Form
- Enter the following URL values, but replace “EXAMPLE.COM” with your website URL instead:
- CSS URL: https://EXAMPLE.COM/wp-content/plugins/woocommerce-gateway-chase-paymentech/assets/css/frontend/pay-form.css (if using the default plugin pay page styles, otherwise this is the full URL for the pay form CSS)
- Return URL: https://EXAMPLE.COM/?wc-api=WC_Gateway_Chase_Paymentech
- Callback URL: https://EXAMPLE.COM/wp-content/plugins/woocommerce-gateway-chase-paymentech/assets/js/frontend/Callback.html
- Under “Authorized Websites”, you need to enter your server name/website URL. Replace EXAMPLE.COM in the image below with your website URL.
- Set “Orbital Hosted Payment Specification” to Version 1.1
- Click “Continue” to save the settings
Extension Settings:
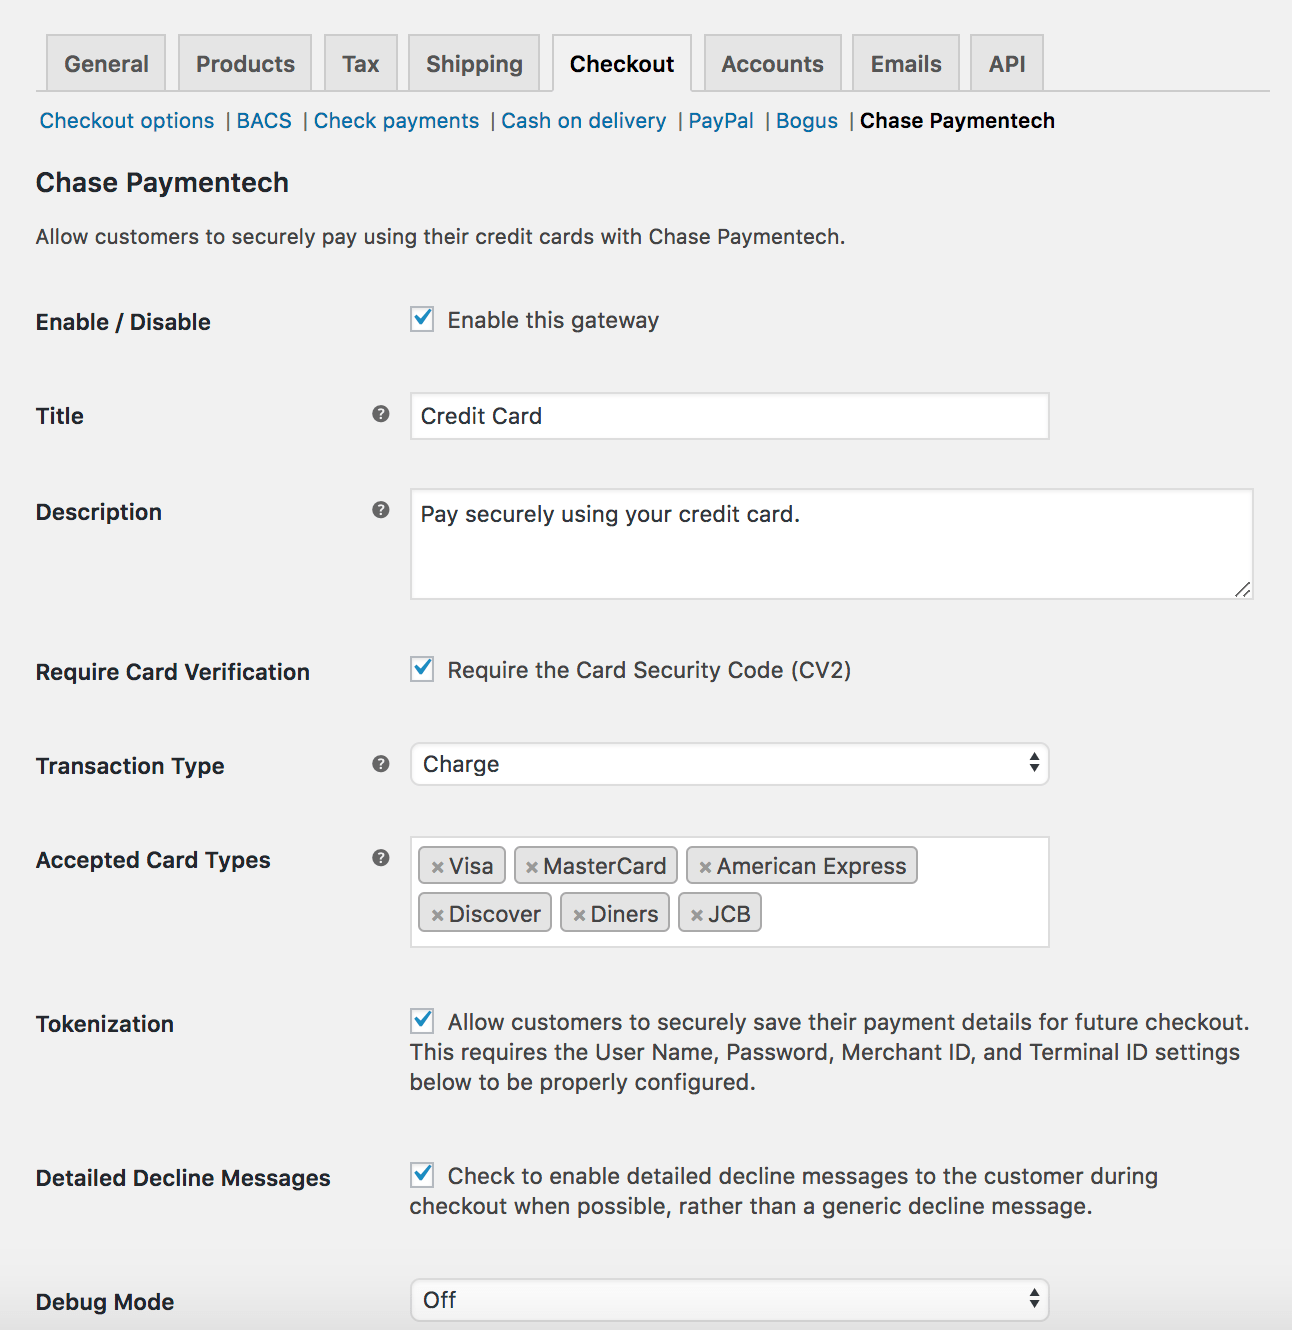
↑ Back to top- Enable / Disable – This will enable the gateway to be used by customers to checkout.
- Title – This is the text shown for the payment during checkout and on the Order Received page.
- Description – This is the text shown under the title during checkout. Limited HTML is allowed. If you enable test mode, this section will also display a “Testing” notice.
- Require Card Verification – Enabling this field will require the CV2 or CVV field for all new transactions. Enable this if you have configured your merchant settings to reject the transaction if the CSC / CV2 is not available.
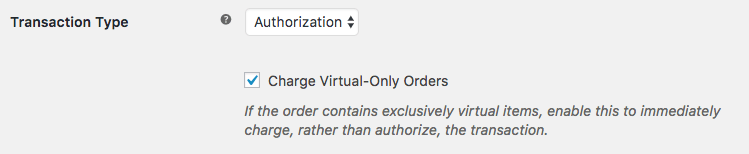
- Transaction Type – Select how transactions should be processed. “Charge” submits all transactions for settlement, while “Authorization” simply authorizes the order total for capture later.
- Charge Virtual-Only Orders – (Shown if Transaction Type is set to “Authorization”) Enable this to force charges on order containing only virtual items so they’re captured immediately instead of authorized (for example, to grant download access right away)
- Accepted Card Logos – This controls the accepted card logos that display during checkout and is purely cosmetic. Update this setting to reflect the cards your merchant account accepts.
- Tokenization – Allows customers to securely save their payment details for future checkout. This must be enabled for Subscriptions and Pre-Orders support. This will also require you to enter the User Name, Password, Merchant ID, and Terminal ID for your Chase Account, which must be requested from your Chase Representative.
- Debug Mode – Enable this is you are having issues correctly processing transactions. All debugging messages are cleaned of sensitive information before display, but as a best practice, please do not enable this unless you are having issues with the plugin.

- Environment – Enable Production (live) or Test mode for transactions. Please note that you’ll need to obtain test credentials from Chase if you plan to use the test environment, as production credentials will not work for the test environment.
- Secure Account ID – This information about your Chase account is provided only by Chase, and if you do not have this information, you’ll need to contact your Chase Representative to obtain it.
- Secure API Token – This information about your Chase account is provided only by Chase, and if you do not have this information, you’ll need to contact your Chase Representative to obtain it.
- User Name – (Optional) The connection User Name for API authentication, provided by Chase. This is only required if you want to allow card tokenization or capturing charges from WooCommerce.
- Password – (Optional) The connection password for API authentication, provided by Chase. This is only required if you want to allow card tokenization or capturing charges from WooCommerce.
- Merchant ID – (Optional) This is the merchant ID listed in your Chase Virtual Terminal account at the top of each page. This is only required if you want to allow card tokenization or capturing charges from WooCommerce.
- Terminal ID – (Optional) This is the terminal ID listed in your Chase Virtual Terminal account at the top of each page (usually between 001 and 999; it’s most likely 001). This is only required if you want to allow card tokenization or capturing charges from WooCommerce.
- Pay Form Style URL – Optional URL (full, not relative) to a CSS stylesheet to be used to style the pay form (see more). URL must be on the same server as your site, served over https. It must also match the CSS URL in your Chase account if not using the default stylesheet.
- Certification Mode – (Only shown when in “Test” environment) Enable this to enable the certification mode tool at checkout. This lets you quickly adjust cart value and gateway settings while checking out to assist in completing the Chase certification process.
Custom Styling
↑ Back to topwoocommerce-gateway-chase-paymentech/assets/css/frontend/pay-form.css — these styles should look work with the majority of WooCommerce themes. However, a custom css stylesheet can be used if you’d like to change the look and feel of the pay form.
To do so, create the custom stylesheet and place it somewhere on the shop’s server, for instance wp-content/themes/theme-name/css/chase-pay-form.css (though it can be placed anywhere on the server that will be accepting payments, so long as it’s available over HTTPS).
Once you’ve created the custom stylesheet, you must configure both the plugin setting Pay Form Style URL as well as the Chase Virtual Terminal CSS URL setting with the same value: the full URL for the custom stylesheet. For instance: https://EXAMPLE.COM/wp-content/themes/theme-name/css/chase-pay-form.css in this example.
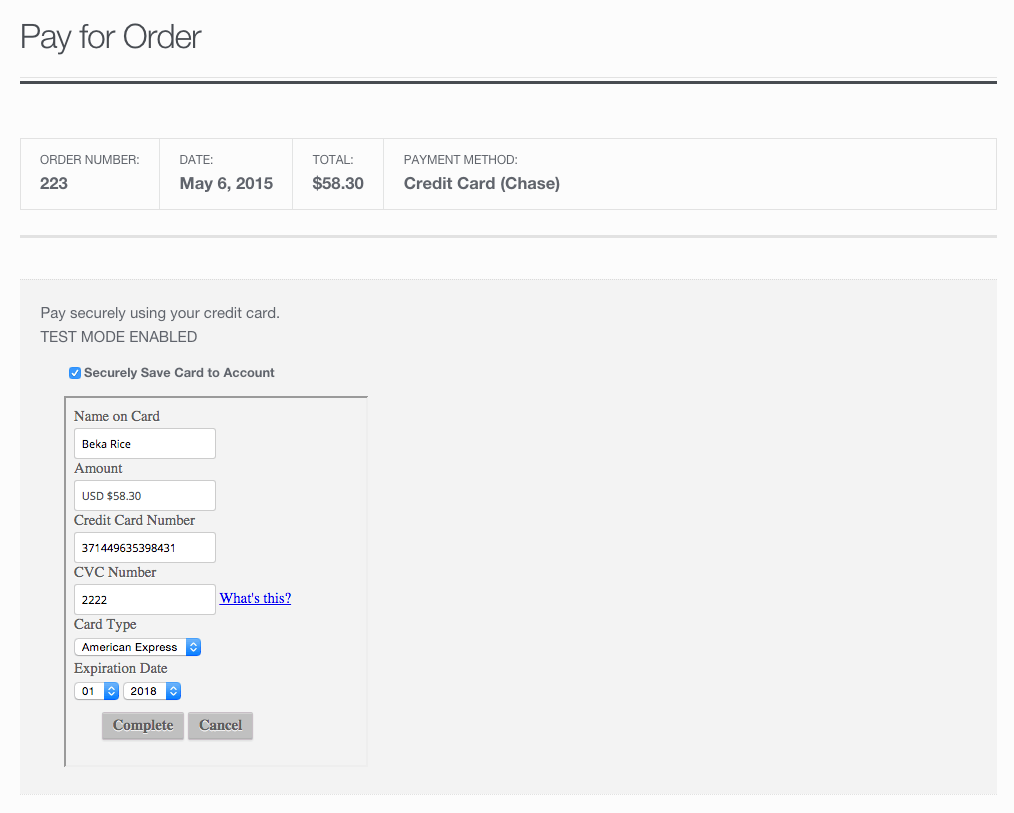
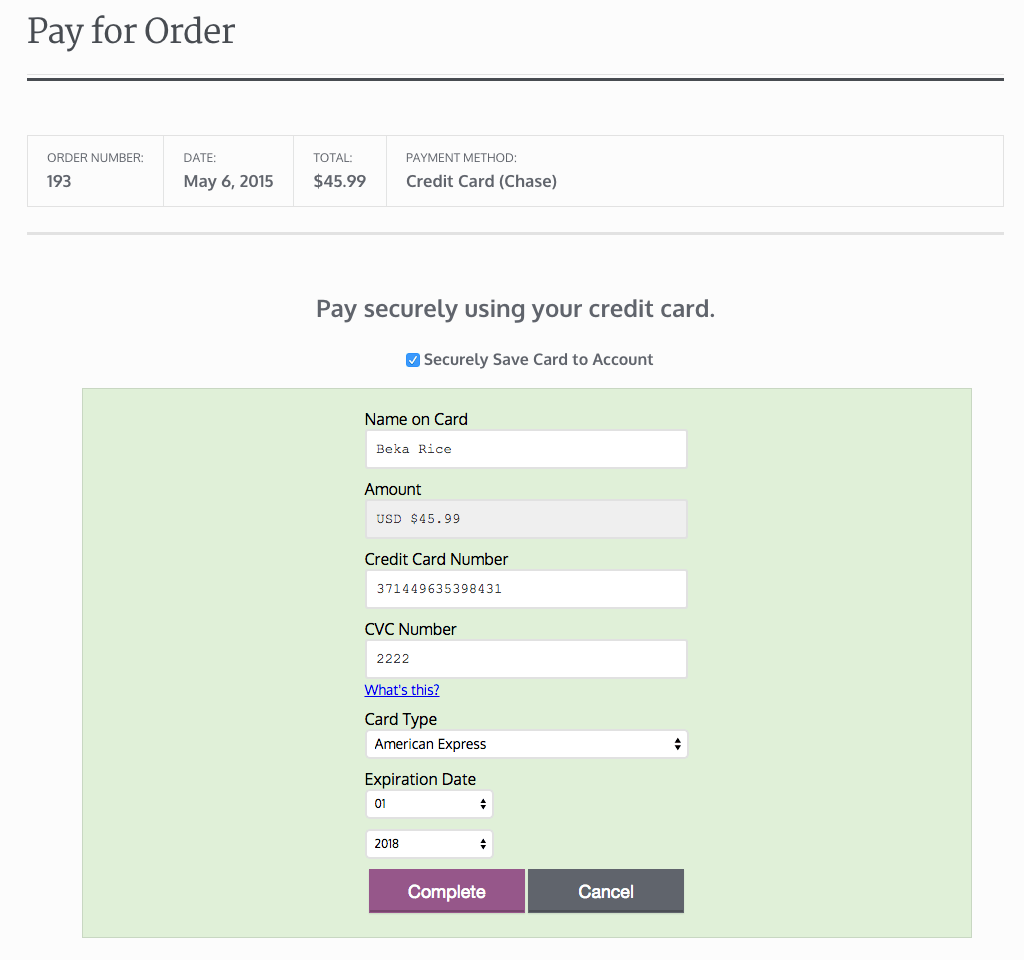
Here’s a side-by-side example of the default and updated pay form:
Merchant Usage
↑ Back to topCapture Charges from WooCommerce Order Admin
↑ Back to topAutomatic Refund Support
↑ Back to topVoid Transaction Support
↑ Back to topSaved Payment Methods
↑ Back to top

Checkout Flow
↑ Back to top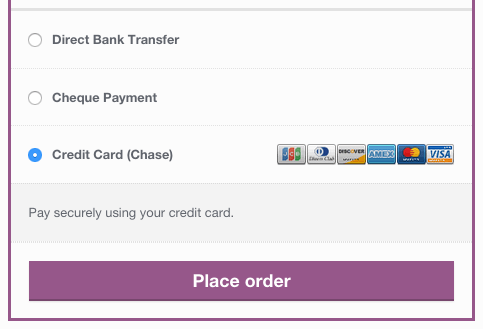
Other Information
↑ Back to topWooCommerce Subscriptions/Pre-Orders Support
↑ Back to topDetailed Decline Messages
↑ Back to topStoring Credit Cards
↑ Back to topTroubleshooting
↑ Back to topSpecific errors
↑ Back to top- A valid uID is required for this transaction – (Displayed where the payment form should be.) This occurs if the “Request UID Service” merchant account setting is enabled, but no Secure API Token is configured for the plugin. If you have enabled this setting in your Chase account, you must add a Secure API Token to the plugin settings.
- Authentication failure….processing stopped – This error is seen in the order notes or plugin debug log. This happens if the Secure API Token is populated but invalid. Your customer or test order will be redirected back to the pay page with gateway options and the generic error message. Please re-enter your Secure API token to resolve this.
Other errors
↑ Back to top- Check that your Secure Account ID, Chase credentials, and Merchant ID are correct.
- Double-check that all Chase credentials are correct 😉
- Do you see a “Store profile incomplete” error? This means that your Chase account isn’t fully configured. Please log into Virtual Terminal for your certification account, and confirming that it’s configured under Admin > Hosted Pay Page Admin, as described here.
- If this isn’t the error you see, enable debug mode to the checkout page and review the errors messages that Chase Paymentech is providing.
- Submit a support ticket, with the debug log as an attachment.
Frequently Asked Questions
↑ Back to topQ: I can’t find the information the plugin requires in the Chase admin. What do I do? A: You need to contact your Chase representative in order to ensure you’re using the Orbital Virtual Terminal and can use the Hosted Pay Page to process payments. Unfortunately, we have no way of accessing your Chase admin in order to help with this issue.
Q: Checkout fails with “An error occurred with your payment, please try again or try another payment method” and the debug log contains “Error Codes: 360 Gateway Code: (20412) Gateway Message: Precondition Failed: Security Information is missing”, what do I do? A: This indicates that Chase does not have your store’s IP address properly set. You’ll need to contact their support team to make sure they have the proper IP address for your store.
Q: I’m told the plugin is passing the wrong BIN number (000002). What can I do about this? A: We have a code snippet that will pass a BIN number of 000001. You can find it here. We’d recommend the free Code Snippets plugin to implement this.