WooCommerce Returns and Warranty is a powerful tool for managing, selling and processing warranties and handling return requests within your WooCommerce workflow. Returns are a necessary part of most businesses, and now they can be easily managed.
You can:
- Add a warranty to products
- Sell a (paid or free) warranty as an add-on
- Define the term/length of a warranty for each product
- Define cost of the warranty
- Have multiple terms and costs for warranties on a single product
- Give customers a way to request a warranty via form or within an order
- Manage the warranty and return in WooCommerce
Installation
↑ Back to top- Download the .zip file from your WooCommerce account.
- Go to: WordPress Admin > Plugins > Add New and Upload Plugin with the file you downloaded with Choose File.
- Install Now and Activate the extension.
- Go to Warranties > Settings
Setup and Configuration
↑ Back to topReturn processing can be a complex process, but WooCommerce Warranties give you the ability to manage these easily while adhering to your return process and standards.
The General Settings allow you to set up the basics of the return process for you and your customers. On this page you will find the following:
- Warranty Request Page: This is a page that you create that would house the form for your users to submit a warranty. Just simply select the page that includes the
[warranty_request]shortcode
- Initiate RMA from My Account Page: This option allows you to define whether you want the customer to be able to start a return from their account page. When turned on, your users will see the button on each
completedorder. If off, the option will not be shown anywhere in the user’s account. See further on for where to edit this text for the button.
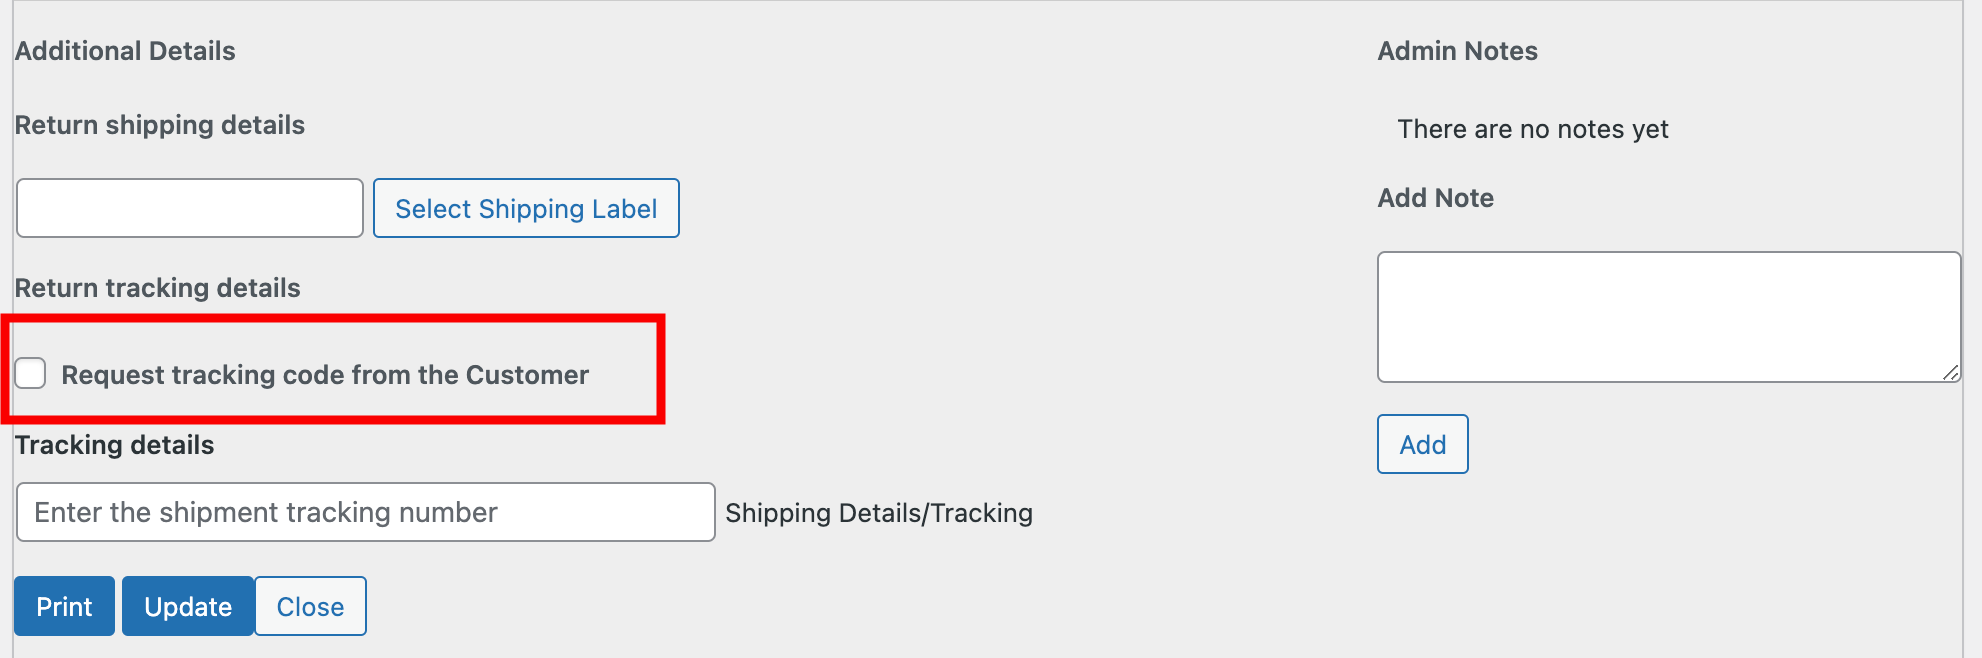
- Request Tracking Code: This option allows you to turn on or off the ability for your customer to provide a return tracking code to you for when they ship their items back to you. This could help you keep track of returns.

- Returned Status: When the warranty request is updated in the RMA management section to this status, the product or service would now be deemed as returned, and become a completed request.

- Warranty Button Text: Use this field to define the text on your warranty button seen in My Account by your customers.

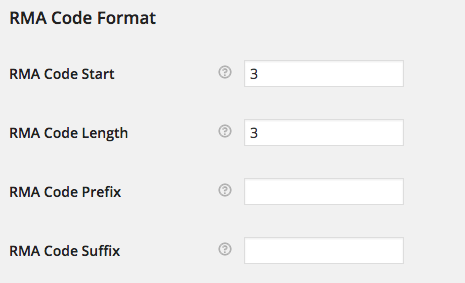
- RMA Code Format: Each store has its own processes and tracking needs. With warranties, this is no different. When a user requests a warranty, you may choose to define a Return Materials Authorization, or RMA, that the user must provide when shipping the product back to you. We allow you to define the format of this code if you choose.
- RMA Code Start: The starting number for the incrementing portion of the code. This number will increase by one for each warranty request.
- RMA Code Length: The desired minimum length of the incrementing portion of the code. This can be 1, 2, 3, etc numbers.
- RMA Code Prefix: You may choose to begin the incrementing number with a defined prefix – for example, the request date. Accepted values for date are as follows: {DD},{MM},{YYYY},{YY}. To enter multiple values do not separate with commas. As an example if you want Day and Year {DD}{YYYY} would be added.
- RMA Code Suffix: Same as the above, but appended to the end of the number.
Default warranty
↑ Back to topSome stores only offer a standard warranty on all products. Some stores have hundreds, if not thousands, of products, and it can become difficult to manage from a warranty standpoint. This is why Warranties give you the ability to set a default warranty on all products in your store.
The settings for creating your default warranty are exactly this same as adding them to single products. See Setting Warranties on Products for details.
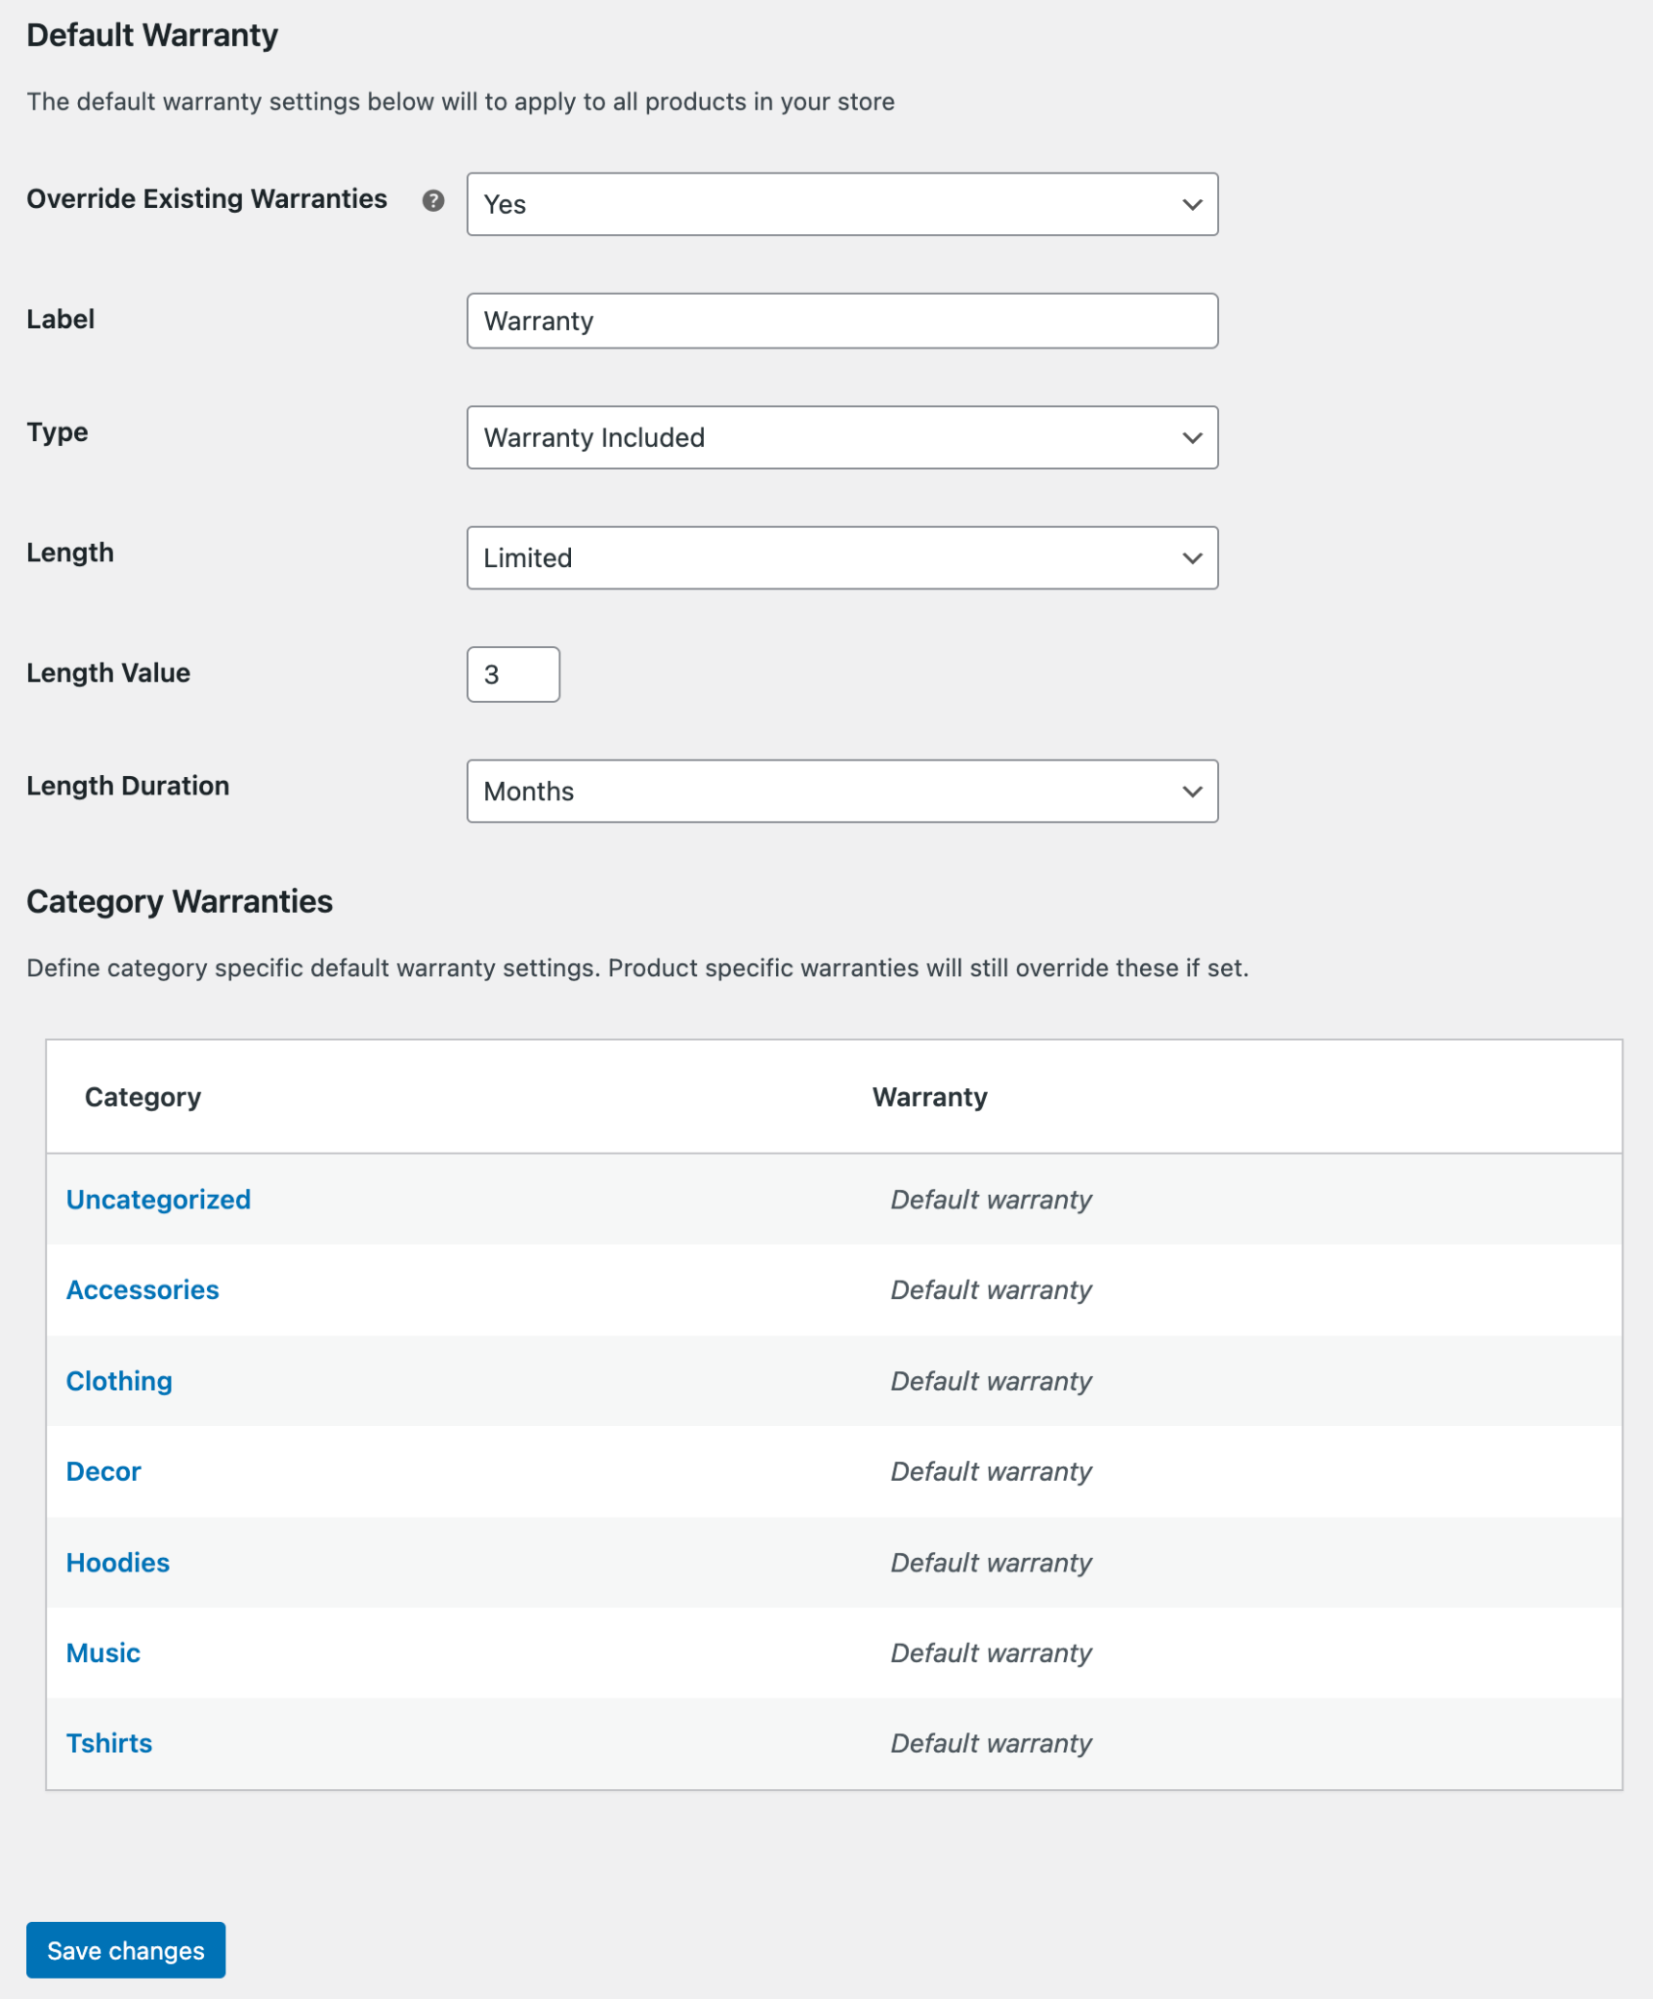
The only setting that differs is that on the default warranty, you can choose to override all existing warranties when saved. Choosing yes will overwrite all product warranty settings. Choosing no will not apply the default settings to your existing products. You can still use the default warranty on new products, or update existing ones to use the default warranty.
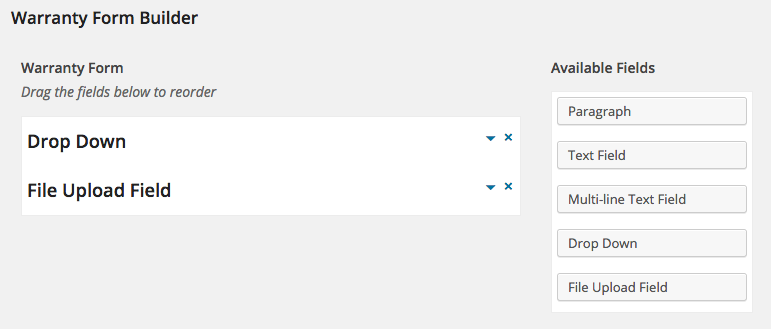
Warranty form builder
↑ Back to topThis section allows you to define the warranty form you wish your customers to complete before submitting a warranty request for a purchase. The following field types are available:
- Paragraph
- Text field
- Multi-line text field
- Drop down
- File upload field
Simply click the button for these types, and they will be added to your custom form. There is no limit to the form you can build for your customers. You can also customize what text your customers see for these different fields on the form as well.
Notification emails
↑ Back to topKnown for our email marketing extension, we chose to provide a robust notification system directly within this plugin.
You have the ability to create an email or emails for every combination of “Warranty Status” you define.
You can choose to have the email send to the Admin, Customer, or Both the Admin and Customer.
You can then define the email subject, and the body of the email. These emails will utilize the default WooCommerce email template. The subject and the body can use any of the following variables as well as whatever message you wish to convey to the customer.
Available variables:
{order_id}{rma_code}{product_id}{product_name}{warranty_status}{warranty_reason}{attachment_name}{attachment_url}{customer_name}{customer_email}{customer_shipping_code}{store_shipping_code}{warranty_request_url}{store_url}

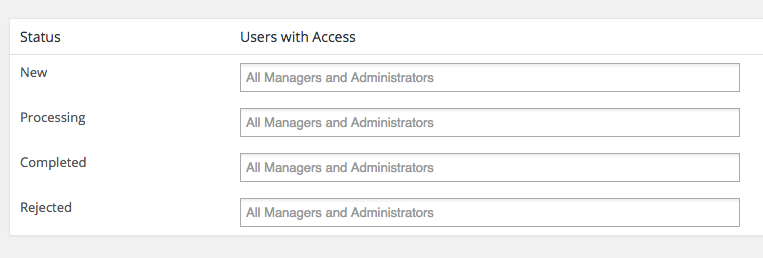
Permissions
↑ Back to topManaging returns is a complex process, and sometimes requires a team to manage. In these cases Warranties allows you to set the permissions for warranties by status of the warranty request. You can allow specific users access to specific warranty statuses. By default All Managers and Administrators have access to view warranties in each status.
Setting warranties on products
↑ Back to topAdding a warranty and return policy is both simple and complex. Simple because it is easy to add a warranty to a product – it can take you less than one minute, but complex because this extension has an extreme amount of customization.
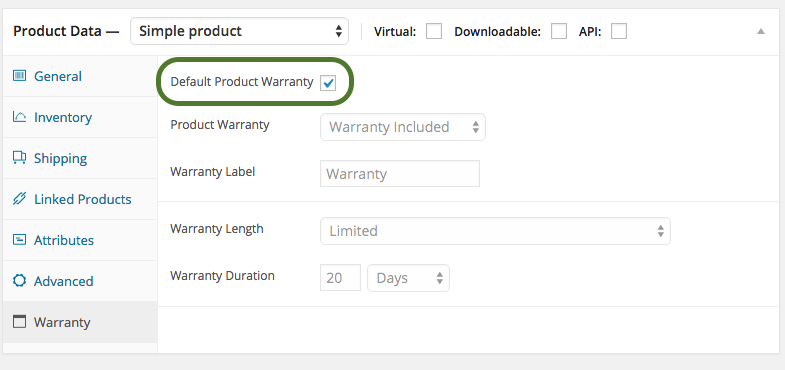
Click on the Warranty menu item in “Product Data” box.
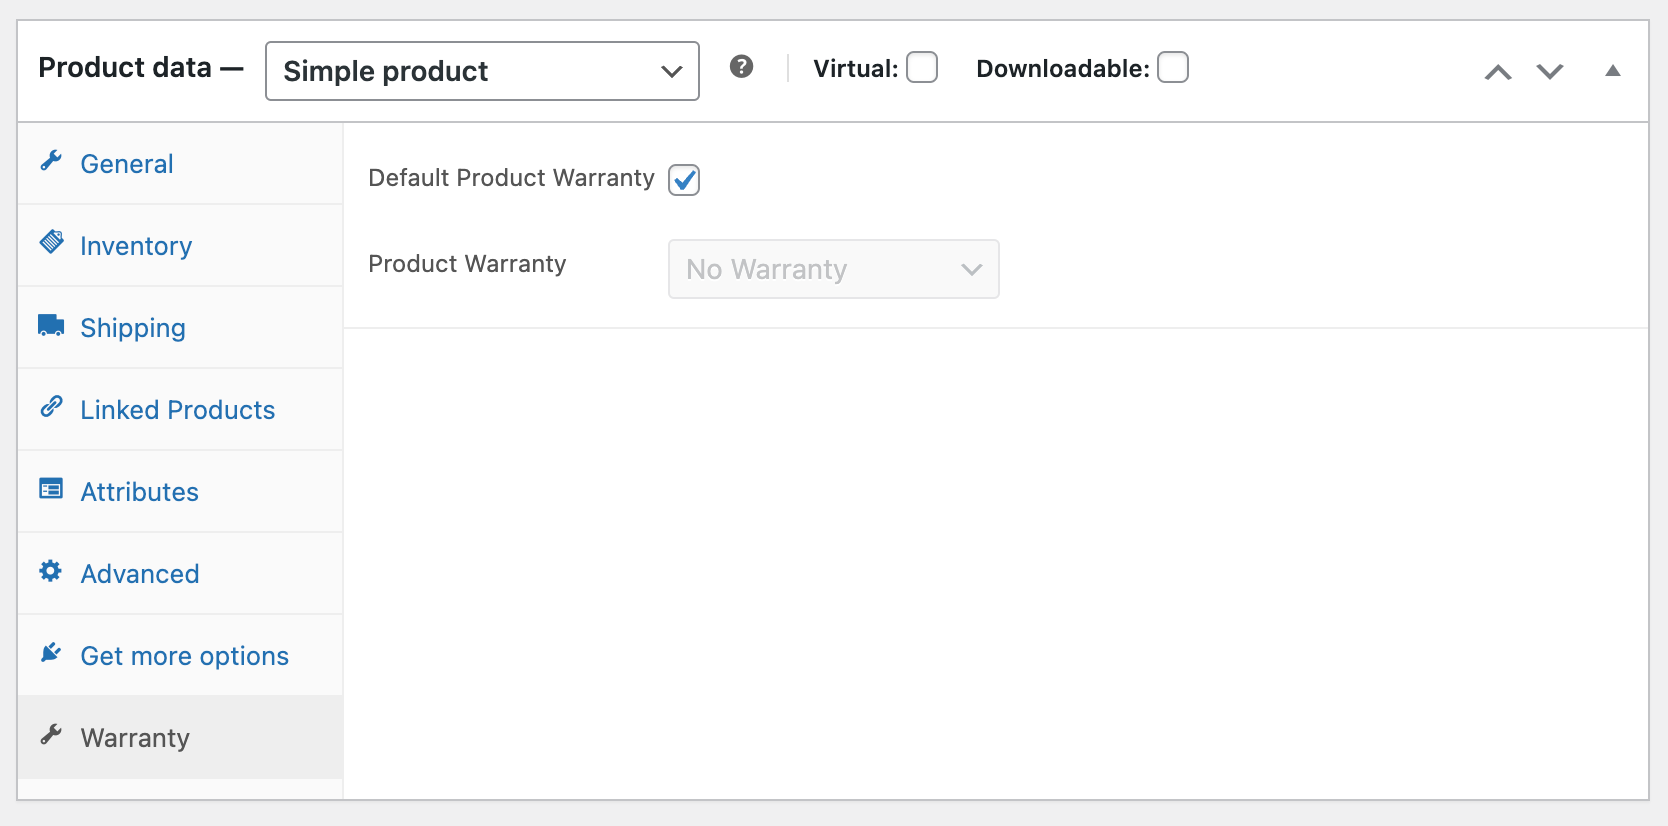
Default Product Warranty
↑ Back to topThe “Default Product Warranty” applies the preset warranty settings to the product you are currently creating or modifying.
Product warranty options
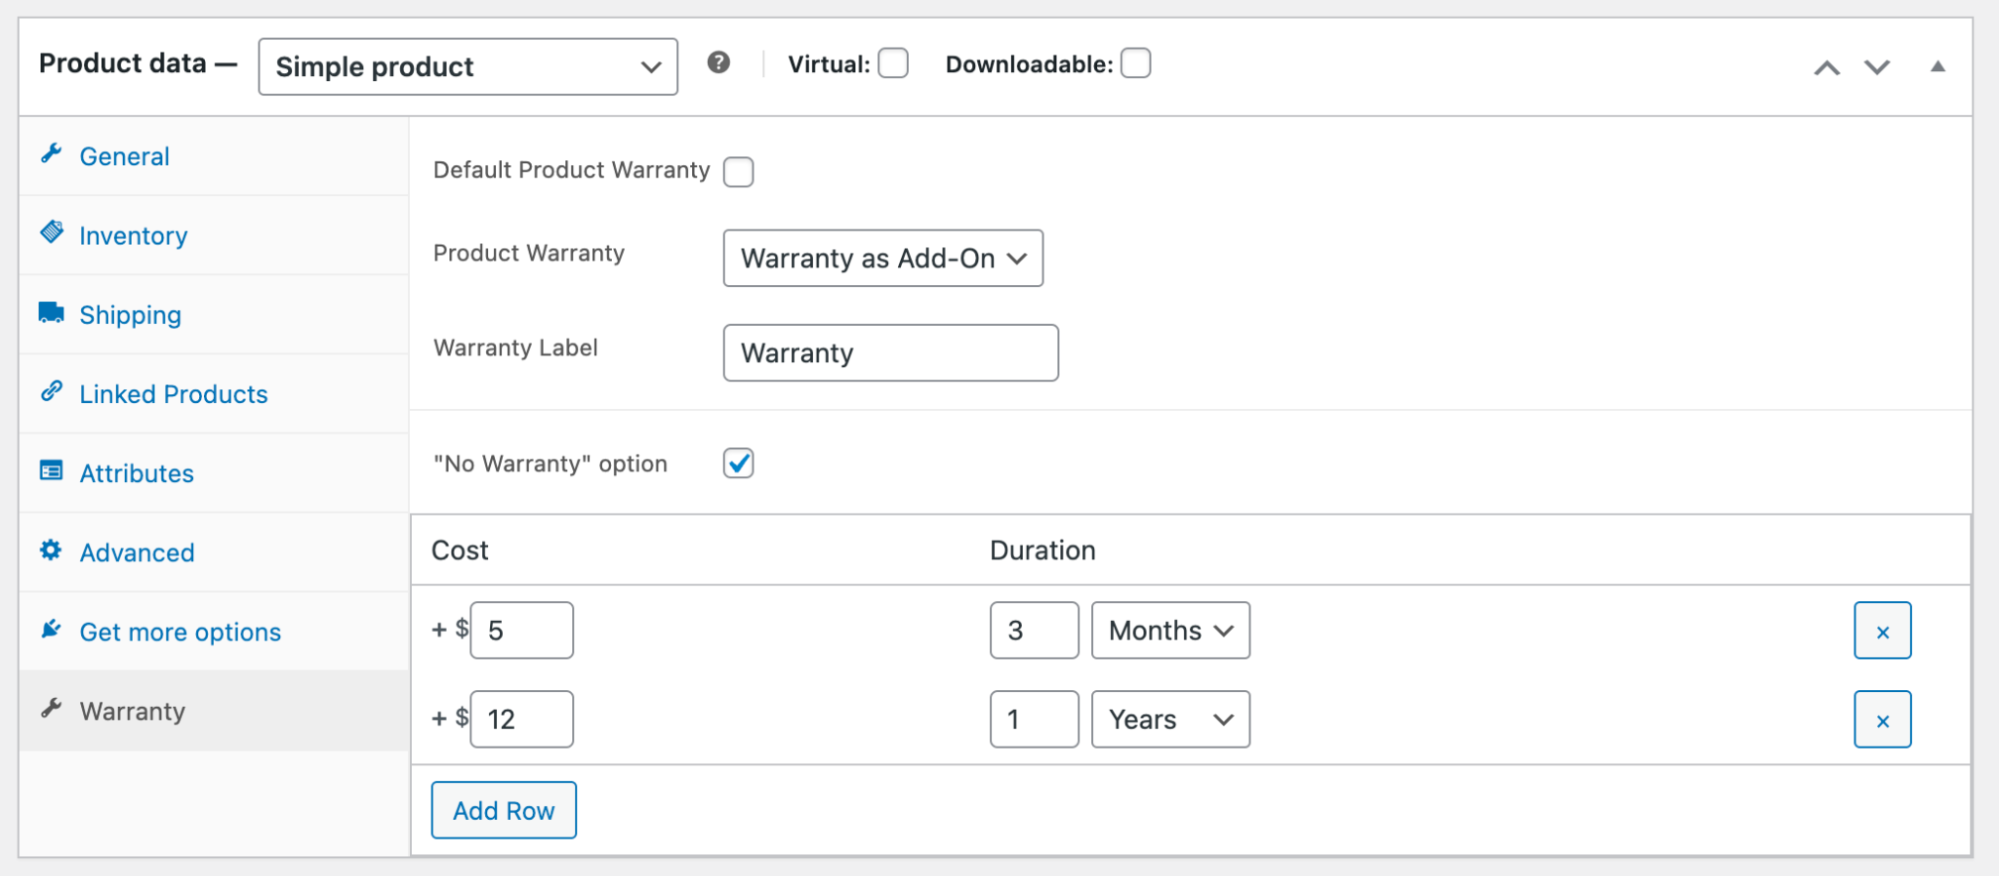
↑ Back to topYou have the ability to choose three warranty types.
- No Warranty
- Warranty Included
- Warranty as Add-on
No Warranty is your product exactly as it is today. No warranty terms.
Warranty Included allows you to include a warranty with your product at no additional cost. As a store owner, you can define the Warranty Length as Lifetime or Limited.
Lifetime warranties allow warranty requests for the life of the product sold.
Limited warranties allow you to define the warranty duration for the product. The duration can be in:
- Days
- Weeks
- Months
- Years

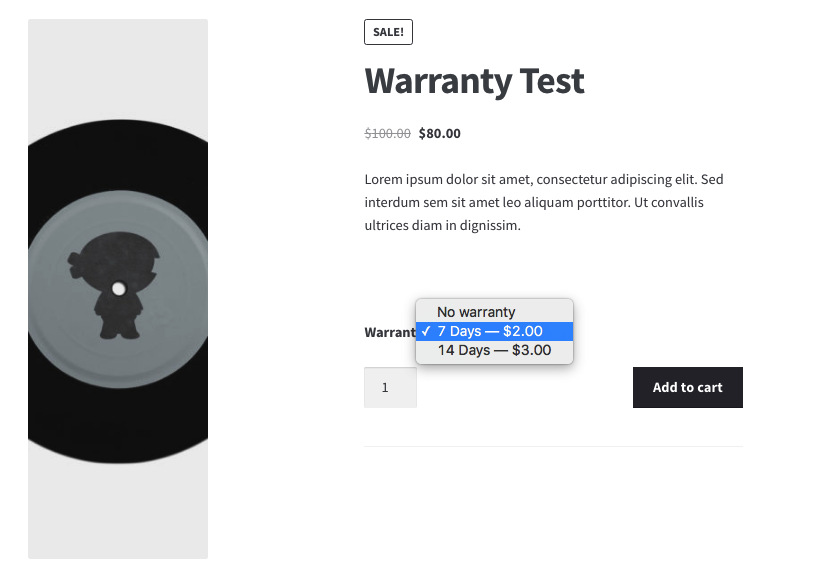
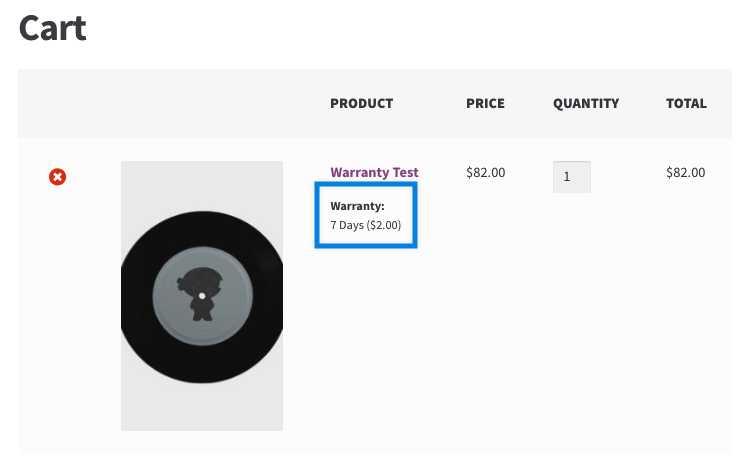
Warranty as Add-on gives you the ability to sell warranties as an additional cost on your products. Think of this as a warranty add-on product. It is an option that your customer can choose to purchase or not, and there can be a cost associated with it (or certainly options can be free). You can have unlimited add-on warranties added to a product. You simply set a price for the following terms:
- Days
- Weeks
- Months
- Years
The RMA management process
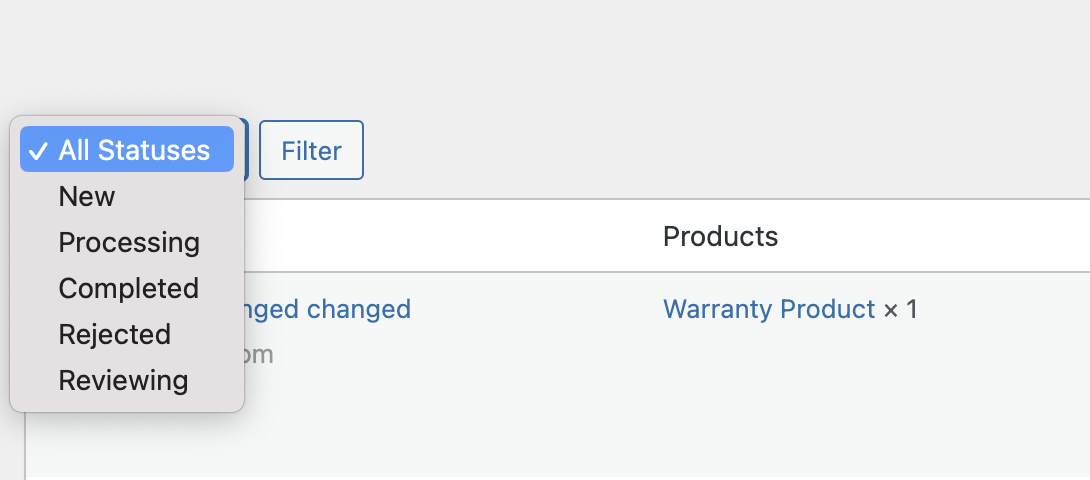
↑ Back to topWhen a user submits a warranty request, if you have created an email notification, you’ll be notified as will the user if you have selected to send an email to them as well. When going to WooCommerce Warranty Requests, you will be presented to all the requests that are in your first status you defined. In the example below, the first status is “New.” You can use the dropdown filter as shown below to see only requests in specific statuses.
Once you have reviewed the warranty request, you can change the status if you are ready to.

Once you have moved the request out of your first status, it is “active” in the warranty process. At this point, the request moves to the next status list, and you are presented with new options for Shipping Tracking.
- You can add a shipping label for your customer to use for shipping the product back to you. This label will be available to the user from their order details.
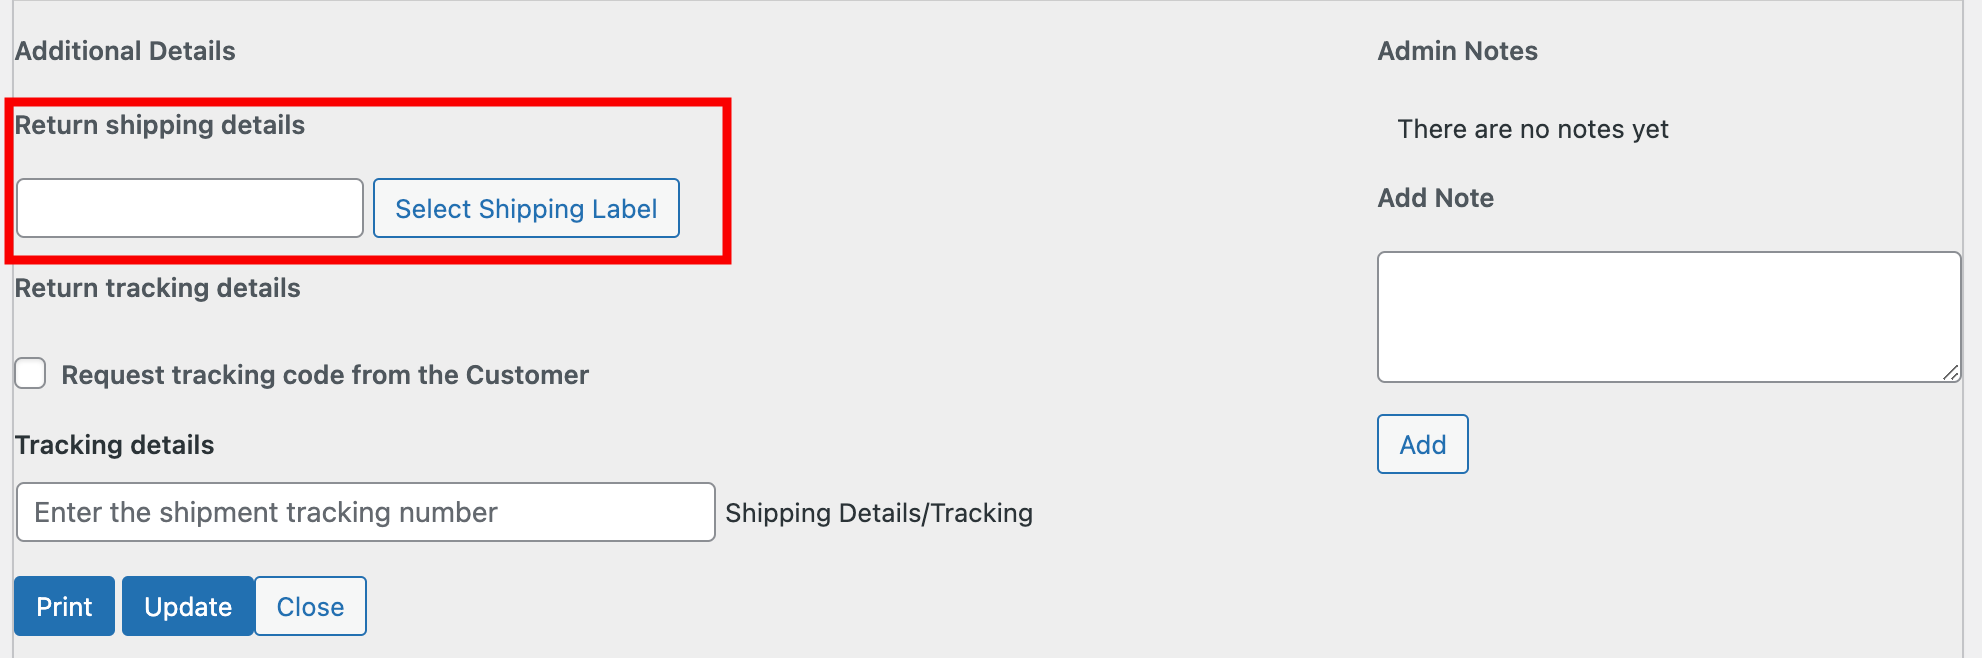
- You can request a tracking code from your customer if you require them to do their own shipping
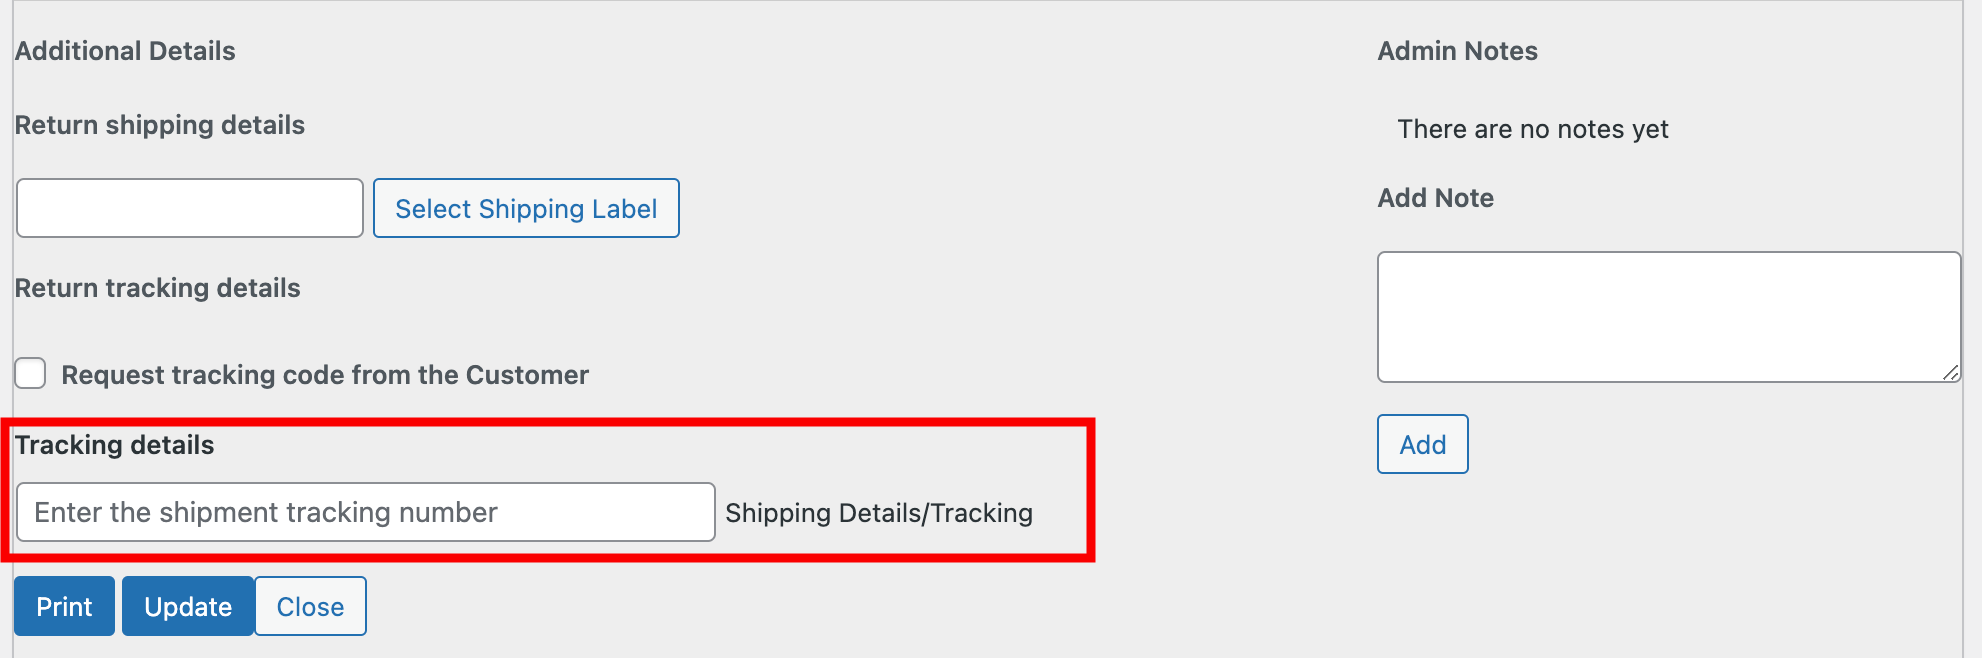
- You can add a tracking code for your customer to track the shipment of a replacement product. The customer will get a tracking link in their order details view.
Issuing Coupons after processed return
↑ Back to topIf the user requested a coupon when the return was submitted, the store owner will be given the option to send a coupon after the warranty status is set to Completed.

Manually processing returns
↑ Back to topSometimes customers do not want to do things self-serve online – as hard as you may try to get them to. There are occasions where a phone call is more warranted. Whatever the reason – even if there is no warranty available, you can elect to process a return for the customer manually. RMA for WooCommerce allows you to process warranties from the WooCommerce admin!

Select Create Request, and do a search for an order by:
- Order number
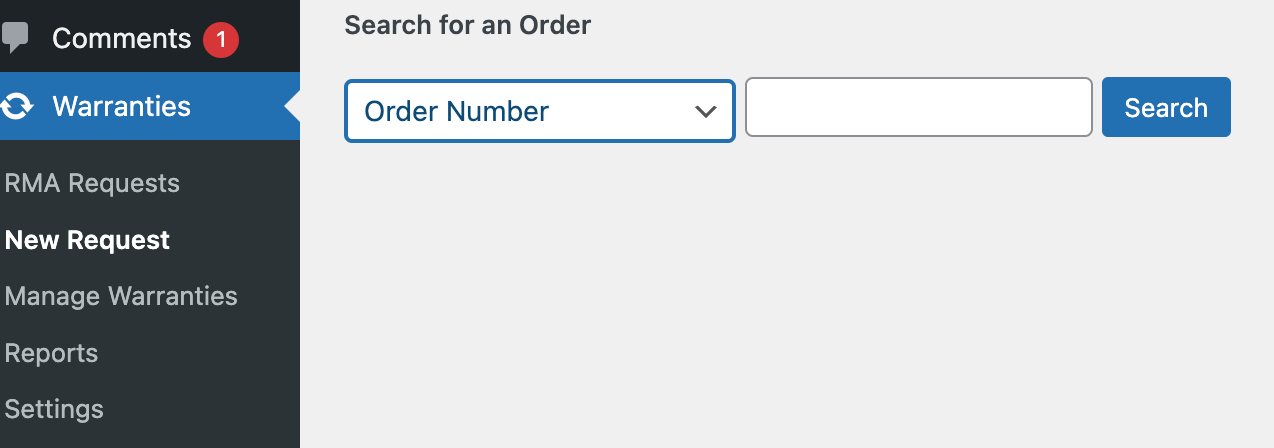
- Customer name or email
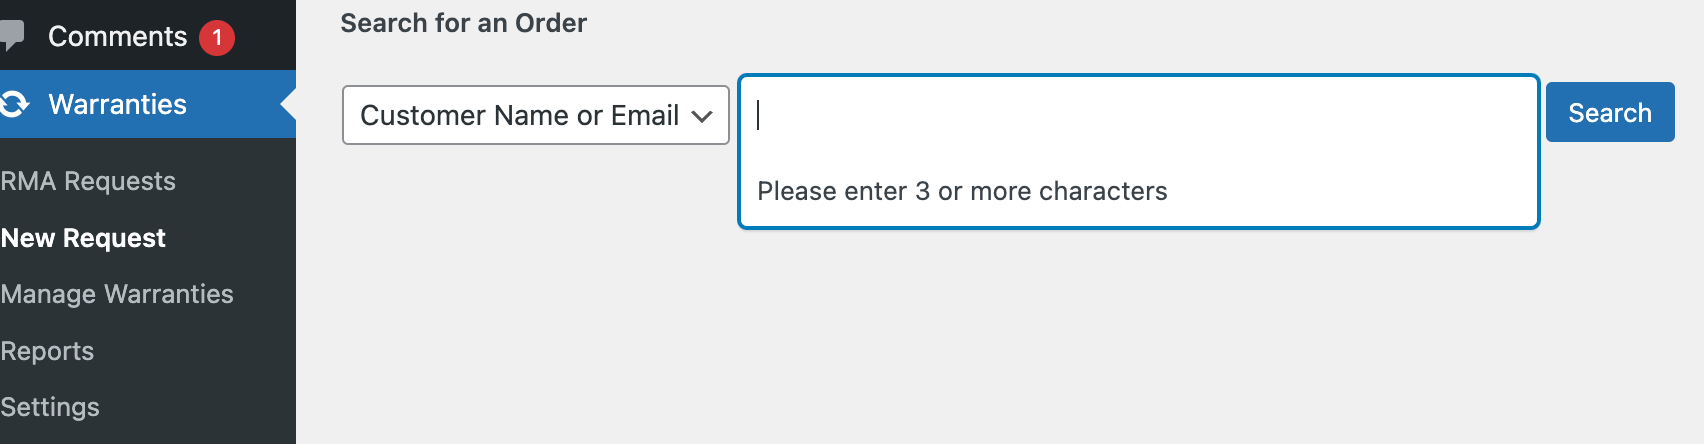
Once you find the order, click “Create Request” and process the warranty for the customer. How much information you request or require is up to you.
Managing warranties in bulk
↑ Back to topThis process is similar to the product editing process or the post editing process.
You will be presented with a familiar screen that has warranty details for each product.
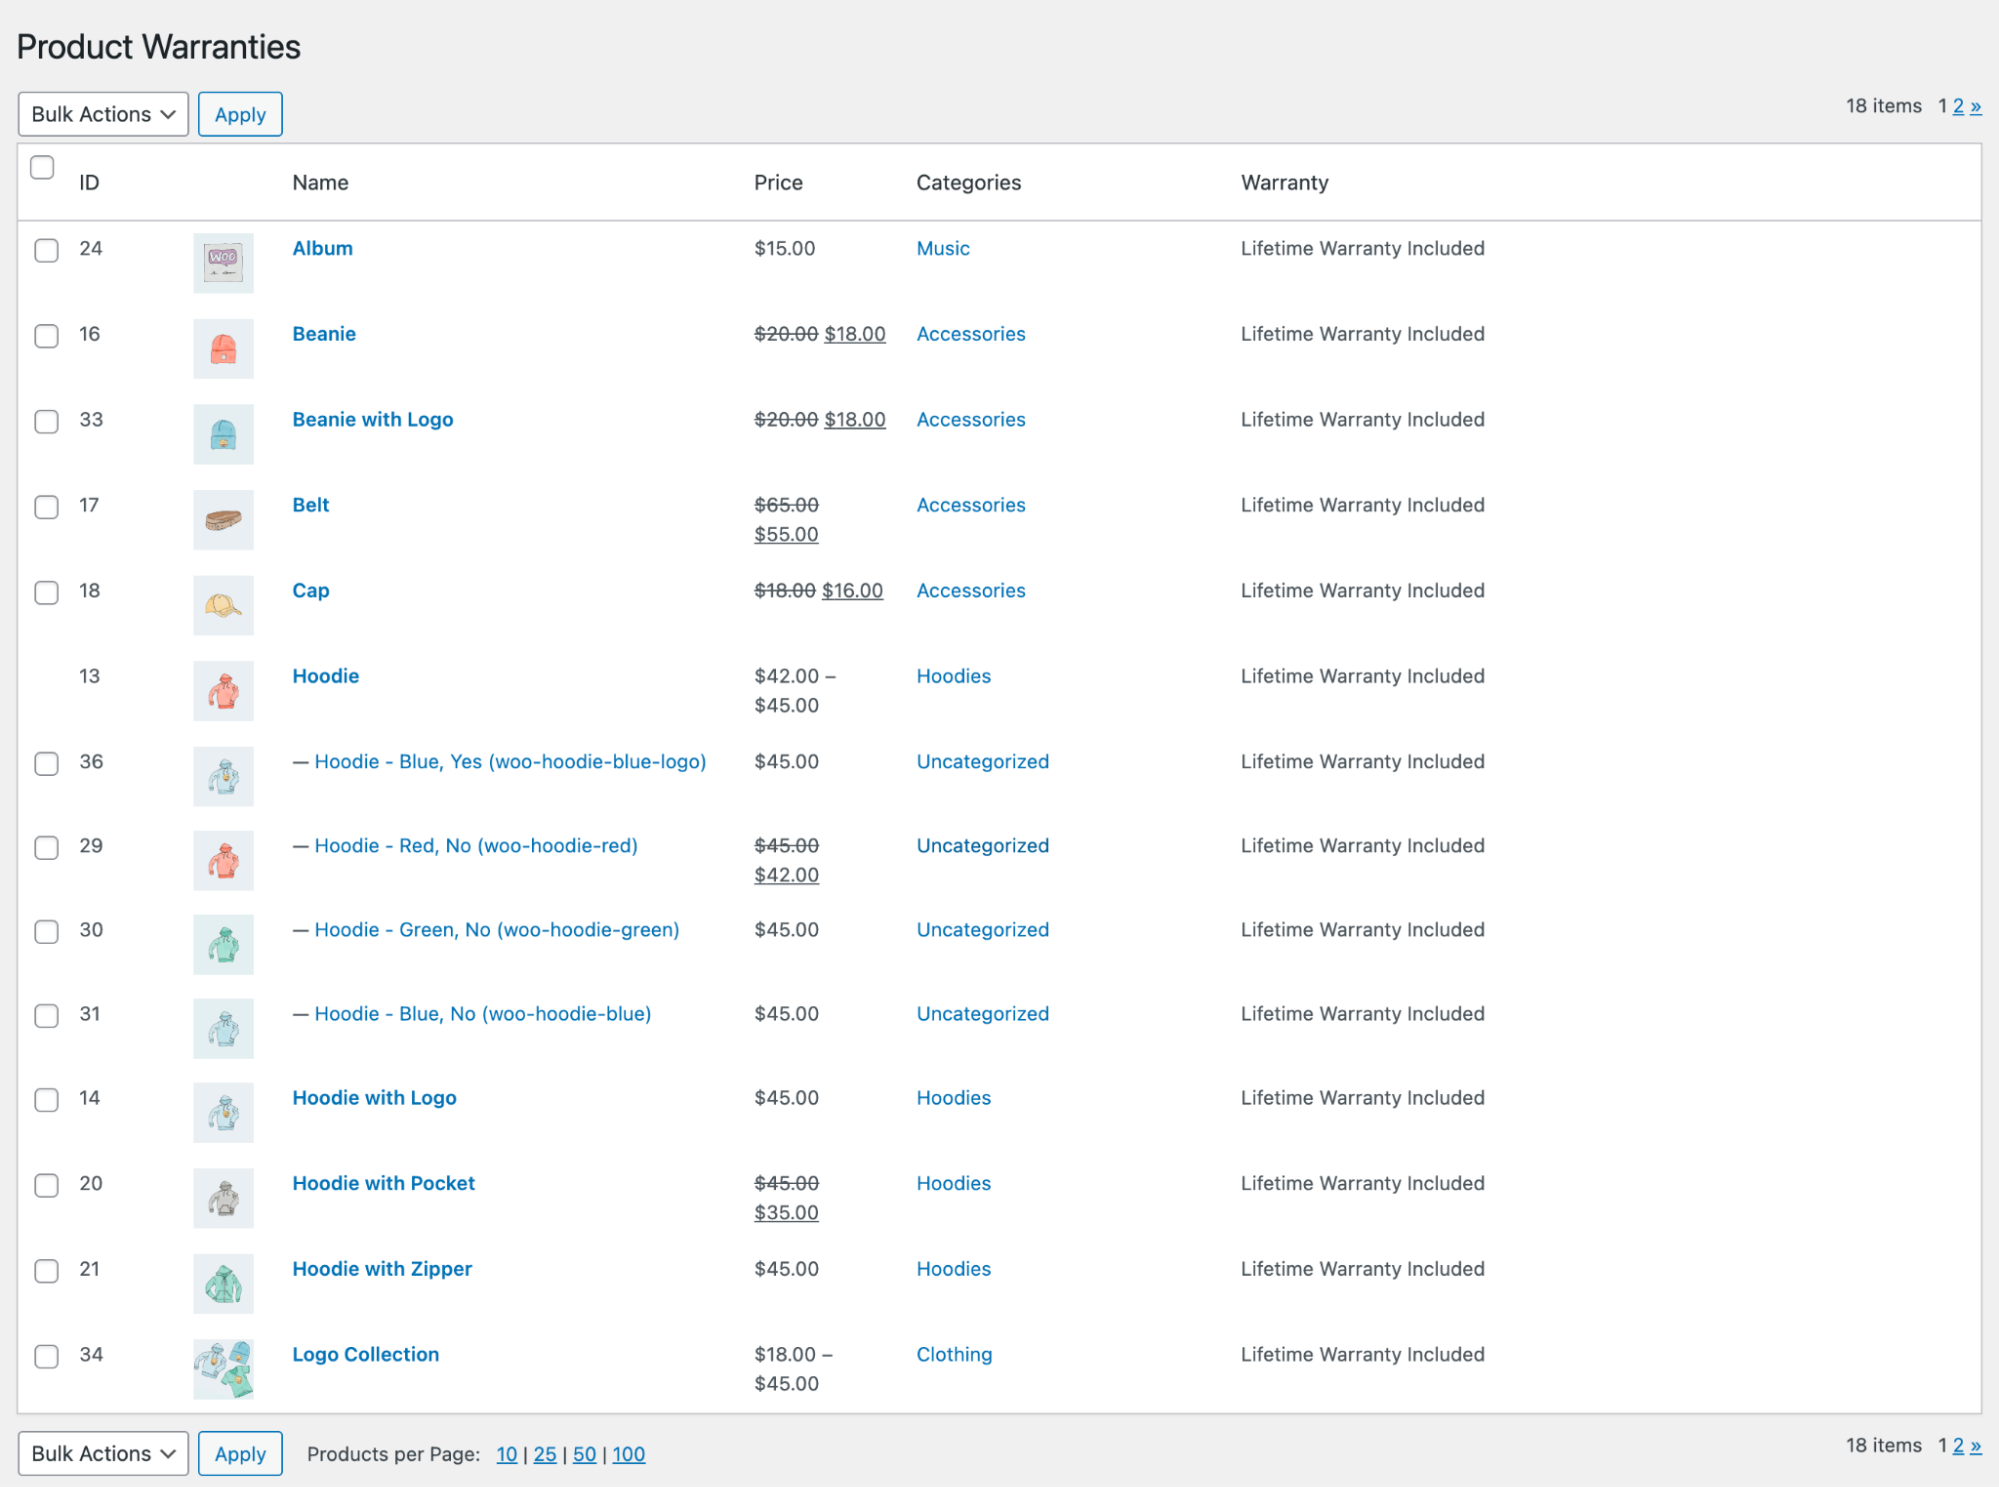
Hovering over a product name will present an “Edit” link, and clicking that link will show the warranty details for that specific product. Once edited, just remember to click the update button.

You can also edit multiple product warranties at once. Simply select the products you wish to edit by selecting their checkboxes. Then select edit in the dropdown and apply. Set your warranty, and click update.
Usage
↑ Back to topCustomer view
↑ Back to topOn different pages, customers will be able to see different aspects:
- Product page
- Cart
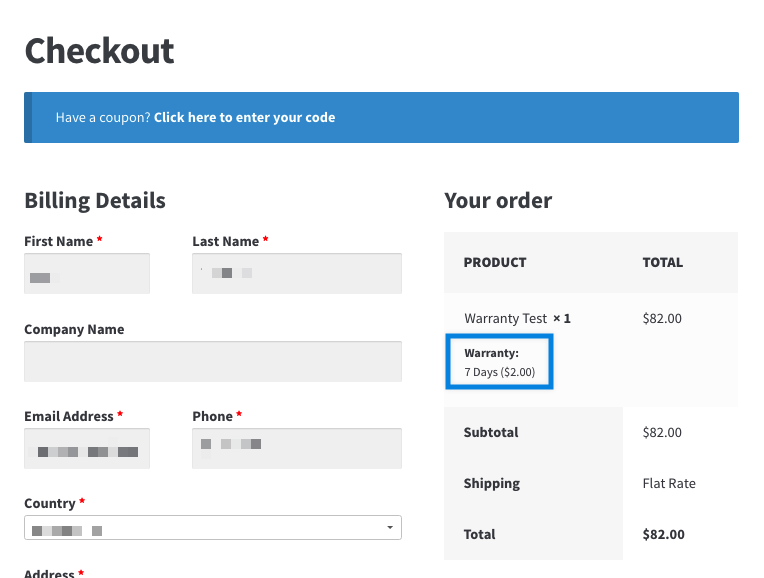
- Checkout
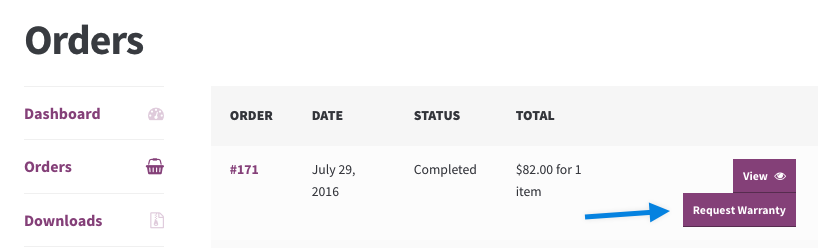
- Orders
- Requests
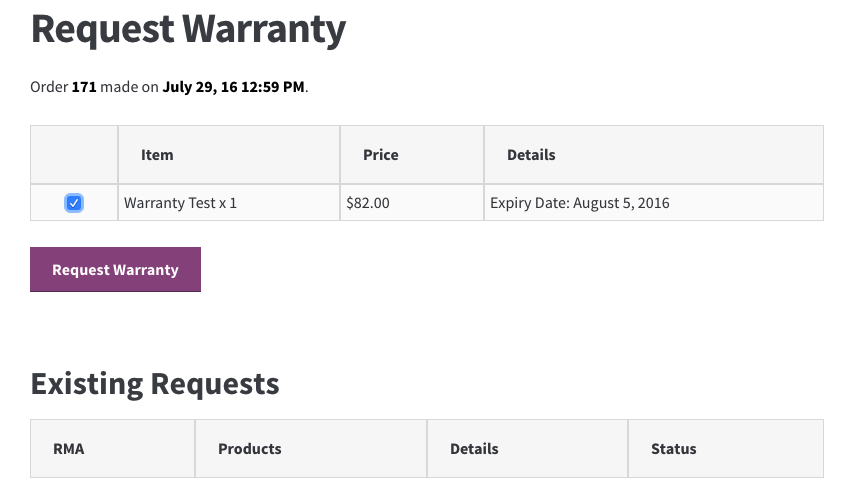
- Single request
Customization
↑ Back to topAdd custom statuses
↑ Back to top
Adding a custom status requires a slightly more advanced knowledge of WordPress, WooCommerce, and PHP. It will require you to edit your functions.php file. It is recommended to create a backup of your functions.php before starting to make any edits.
Remove product warranty from above add to cart button
↑ Back to topThe code snippet that follows the image below will remove the text indicated by the arrow.

woo_remove_product_warranty.php content:
add_action( 'woocommerce_before_add_to_cart_button', 'woo_remove_product_warranty', 9);

function woo_remove_product_warranty() {

	global $warranty_cart;
	remove_action( 'woocommerce_before_add_to_cart_button', array( $warranty_cart, 'show_product_warranty' ) );

}
Frequently Asked Questions
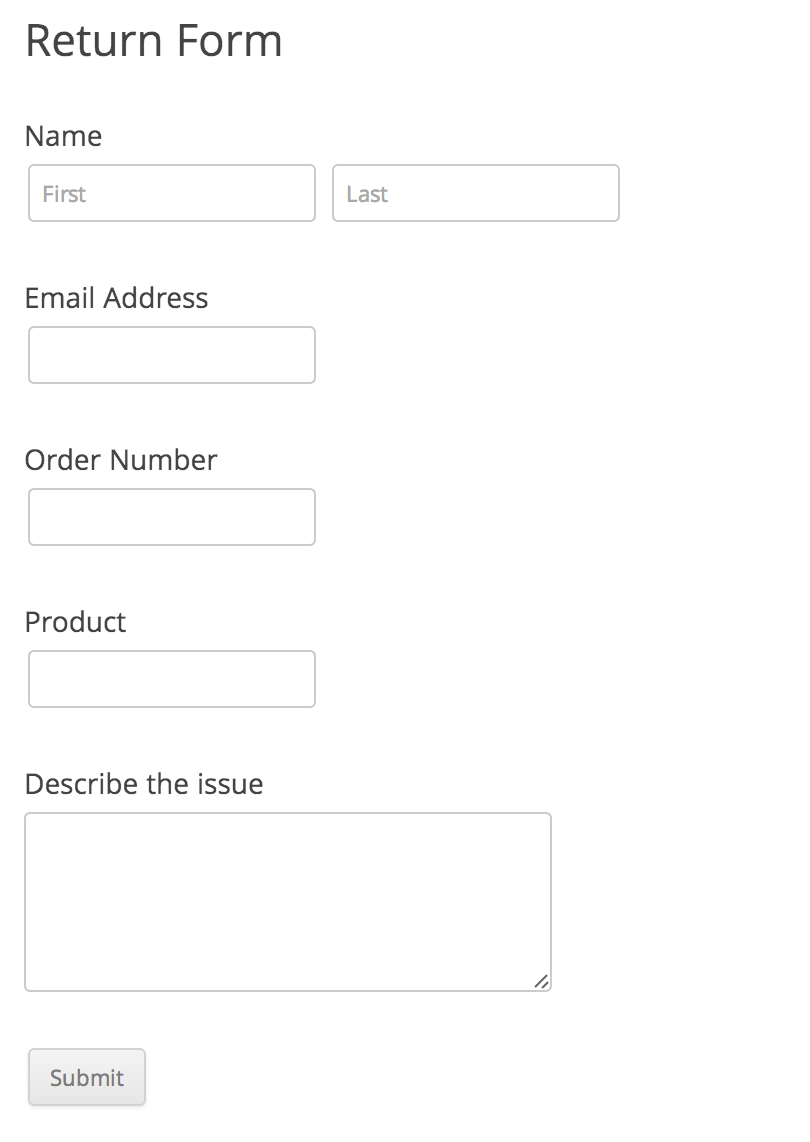
↑ Back to topI want to just have a generic return form on one of my pages. How do I do this?
↑ Back to topYou can also add a generic “return” form to any page. These forms are not tied to any specific order or product – they simply allow you to give your customers the ability to report an issue and request a return, or refund. These returns will flow directly into the RMA management area, but won’t have the added benefit of being tied to a specific product/order or User account. Simply place the shortcode [warranty_return_form] onto any WordPress page or post, and you will get the simple form seen below:
How can I bulk edit products to include Warranty and RMA information?
↑ Back to topTo edit or add warranty and RMA information to your products you can use the Product CSV Import Suite with the following column headers:
| Column | Description | Accepted values | Example |
|---|---|---|---|
_warranty | This is an array that holds the selected warranty options for a product. |
{
"type":"addon_warranty",
"addons":[
  {"amount":"100","value":"1","duration":"years"},
  {"amount":"200","value":"2","duration":"years"}],
"no_warranty_option":"no"}
| |
meta:_warranty_type | no_warrantyvalue: empty array included_warrantyvalue: array (type, length, value, duration) addon_warrantyvalue: array (type, addons, no_warranty_option), where addons is an array of (amount, value, duration) that are available to the product | no_warranty / included_warranty / addon_warranty | |
meta:_warranty_duration | Warranty duration for the product | days / weeks / months / years | years |
meta:_warranty_unit | Integer that’s used with the duration to form the period of the warranty | ||
meta:_warranty_label | The text displayed to the customer. Defaults to “Warranty.” | Warranty |
To learn more about how to use the Product CSV Import Suite please see the documentation.
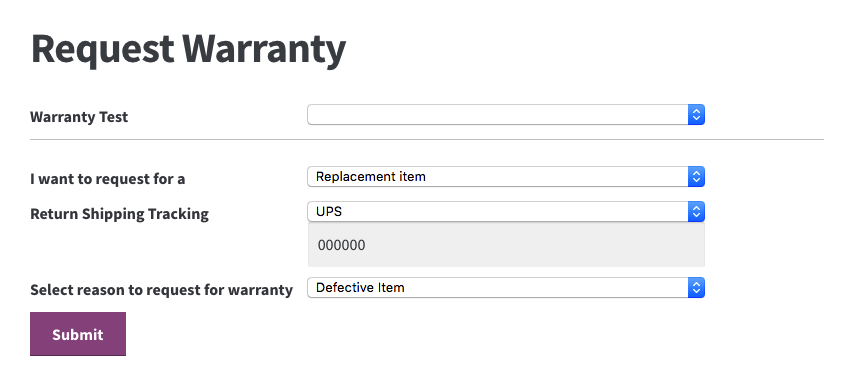
How does the customer initiate the warranty process?
↑ Back to topWhen signed in, the customer needs to select My Account to see the order where you can request a warranty.
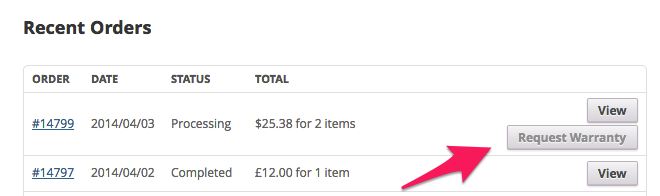
Once the Request Warranty button has been selected, the customer will have the option to pick a specific product.
Note: The Request Warrant button will only show up for completed orders.
Questions and Feedback
↑ Back to topHave a question before you buy? Please fill out this pre-sales form.
Already purchased and need some assistance? Get in touch with a Happiness Engineer via the Help Desk.