Our ShipStation extension helps you get your orders from WooCommerce with ShipStation and expedite the shipping process as part of your order fulfillment steps.
ShipStation is a web-based shipping service that streamlines the order fulfillment process for online retailers, handling everything from order import and batch label creation to customer communication. ShipStation is a great fit for businesses with any number of users or locations.
Installation
↑ Back to top- Purchase the product from WooCommerce.com
- Download the ZIP file from your WooCommerce.com dashboard
- Go to Plugins > Add New > Upload and select the ZIP file you just downloaded
- Click Install Now and then Activate.
- Read on to learn how to set up and configure the product.
More information at: Install and Activate Plugins/Extensions.
Requirements
↑ Back to topTo use this integration, you must have:
- A ShipStation monthly plan. More info at: ShipStation.com
Setup and Configuration
↑ Back to topTo begin head to: WooCommerce > Settings > Integration > ShipStation.
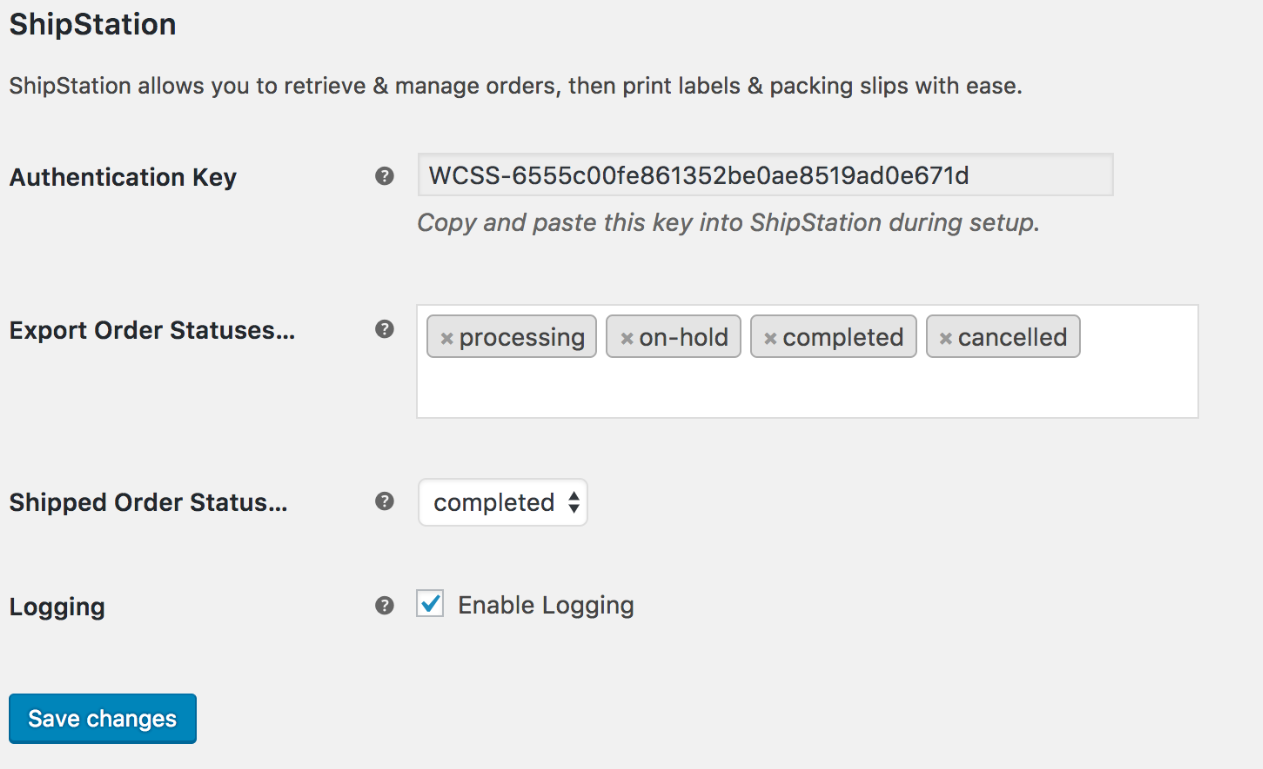
The Authentication Key is the first thing you’ll see here. This is generated for you. It’s a unique key that you’ll use when connecting your store to ShipStation.
Export Order Statuses
Select the WooCommerce orders with statuses you want sent to ShipStation. We recommend sending only orders that have been paid for, those being: Processing, Completed, and possibly On-Hold/Cancelled.
Shipped Order Status
Next set the order status an order should be changed to once marked shipped in ShipStation. We recommend Completed as that usually means the order needs no further action.
Logging
If you’ve run into any issues, enable logging here. This can be helpful for troubleshooting things. You can view the logs at: WooCommerce > System Status > Logs. Then in the logs dropdown find the appropriate ShipStation log files.
Finally select Save changes.
Sign up with ShipStation
↑ Back to topWith the plugin setup we need to now connect your store to your ShipStation account. If you don’t have one yet, sign up for an account at the link below. Next you’ll be prompted to pick a ‘Selling Channel’ that will let you to connect to your WooCommerce store.
If you’re an existing ShipStation user, you can find this at: ShipStation Account Settings > Selling Channels > Connect a store or marketplace.

After selecting WooCommerce we’re ready to set up the connection between your store and ShipStation account.

Enter the Auth Key found on your site at: WooCommerce > Settings > Integration > ShipStation. This is a unique key generated by the plugin and allows ShipStation to securely connect to your store.
Next enter your Store URL as this tells ShipStation where to check for this specific Auth Key. Select ‘Test Connection’ and Finish.
Shipped Orders
↑ Back to top
When marking an order shipped via ShipStation there is an important checkbox to select. Be sure to select/enable the “Notify Marketplace?” checkbox. This is required so ShipStation notifies your store which then does the following in WooCommerce:
- Changes the order status to your Shipped Order Status (which is typically Completed)
- Adds a customer note with carrier and tracking information.

If you are using our WooCommerce Shipment Tracking extension, then the tracking information is added there instead.
Export Custom Field Data to ShipStation
↑ Back to topNote: We are unable to provide support for customizations under our Support Policy. If you need to further customize a snippet, or extend its functionality, we highly recommend Codeable, or a Certified WooExpert.
ShipStation supports up to three custom fields that may contain extra data you want sent to the ShipStation orders section.
Custom Field 1 contains coupon codes used in an order. Enabled by default.
Custom Fields 2 and 3 can be customized with a snippet in which you define the name of meta data you want to export. Example:
We are unable to provide support for customizations under our Support Policy. If you are unfamiliar with code and resolving potential conflicts, select a WooExpert or Developer for assistance.
Usage
↑ Back to topHow ShipStation works with your ShipStation account:
- Customer places an order on your WooCommerce shop that requires shipping.
- ShipStation.com makes an API call to the Merchant’s store to the extension’s endpoint.
- Extension looks at the setup, and generates an XML output response to the ShipStation API. ShipStation imports those orders into their system.
- Merchant’s shipping person/people go into ShipStation.com, sees orders that need shipment, and generates shipping labels (aka: “ships them”).
- Once a label is generated, ShipStation.com sends a notification to the Merchant’s store via the extension’s endpoint.
- Extension updates the order to Shipped Order status (typically ‘Completed’) and stores the shipping info within the order.
Troubleshooting
↑ Back to topMy orders are not imported into ShipStation
↑ Back to topCaching plugins providing file minification can generate this kind of issue. Make sure that you disable file minification and try to import orders again.
Testing the XML Export
↑ Back to topThe XML feed for ShipStation is can be tested at a specific URL. It’s formatted as per this example below that looks at orders from 1 Feb 2022 until 30 April 2022. https://example.com/?wc-api=wc_shipstation&auth_key=YOUR_AUTH_KEY&action=export&start_date=02/01/2022%2000:05&end_date=04/30/2022%2021:00
Be sure to replace example.com with your site’s URL, and YOUR_AUTH_KEY with your authentication key. The link should then load an XML view of orders from your store, which is what ShipStation reads.
Frequently Asked Questions
↑ Back to topDoes ShipStation provide real-time shipping quotes that can be used at checkout?
No. Store owners need a real-time shipping quote extension such as USPS, FedEx, UPS, etc. or have an alternate way to show shipping quotes (e.g. the built-in Flat rate method).
Does ShipStation send data when not being used (e.g., Free Shipping)?
↑ Back to topYes, there isn’t conditional exporting. If the data is there, we export it!
Why am I getting an “Unable to connect to the remote server” error?
↑ Back to topCheck if you have security plugins active – Security plugins usually restrict the accessibility of endpoints/URLs on a WP online store. The Security plugin may not be allowing ShipStation to connect to the server. If it is, disable the security plugin and test again.
If the error is still not resolved, then please check with your host if they have some sort of firewall enabled. If they do, please ask them to disable that and check again. Also, make sure to Whitelist ShipStation IPs.
Why do multiple line items in an order on the WooCommerce side get combined when they reach ShipStation?
↑ Back to topThis is most likely because unique Product SKUs have not been configured for each product and variation in the Store. To ensure that order line items show up correctly in ShipStation, we recommend assigning a unique SKU to each product as well as each variation within a product.
Why don’t orders show as Completed in WooCommerce after being Shipped in ShipStation?
↑ Back to topMost likely causes are:
- A misconfiguration – Check WooCommerce > Integrations > ShipStation to ensure that “Shipped Order Status” is set to Completed
- A conflict with a Security plug-in – Security plugins usually restrict the accessibility of endpoints/URLs on a WP online store. Although orders may be exporting fine, the Security plugin may not be allowing ShipStation to POST shipping information to the server. If you have “Shipped” an Order in ShipStation (created a label or used ‘Mark as shipped’), but the order is not being updated to Completed, check to see if the WP site is running a Security plugin. If it is, disable the security plugin and test again. If disabling the plugin resolves the issue, see if it can whitelist your endpoints.
If the above two items do not resolve the issue, first contact ShipStation.com support to request further information on the error their system is seeing when communicating to the WP/WooCommerce server.
Once ShipStation has responded with the technical information, share the information with Woo Support for further investigation.
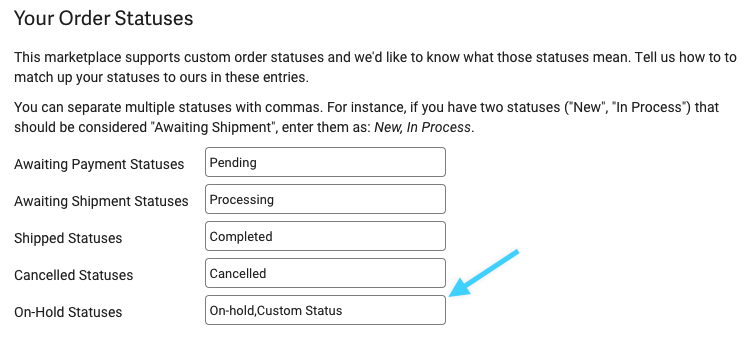
Using a custom order status with ShipStation
↑ Back to topShipStation supports custom order statuses but these must be setup in your ShipStation account. You can find this in your Account > Store Setup > Your Order Statuses. If you add a custom order status then you will need to use the slug (case insensitive), to match it to a ShipStation order status. You can use the WooCommerce Order Status Manager for creating a custom order status in WooCommerce.
How to change the Authentication Key
↑ Back to topTo change the Authentication Key, please go to your WordPress option page here: https://yoursitename.com/wp-admin/options.php and look for a field that’s called woocommerce_shipstation_auth_key.

Delete the value of the field and click save. This will allow a new Authentication Key to be generated which you can find here: WooCommerce > Settings > Integration > ShipStation
On multisite installations, the woocommerce_shipstation_auth_key data can be deleted in the store settings for each site. Doing this can help resolve issues related to non-unique key generation problems.
Questions and Feedback
↑ Back to topHave a question before you buy? Please fill out this pre-sales form.
Already purchased and need some assistance? Get in touch with a Happiness Engineer via the Help Desk.