WooCommerce Product Vendors turns your store into a multi-vendor marketplace. You can assign your existing products to Vendors or they can add and edit their own to sell through your store.
Each Vendor has a dedicated page where they list products, which can be displayed alongside yours on normal shop pages. While all sales are still processed via your store’s normal payment gateway(s), you have total control of the amount of commission paid to each vendor, with the option of manually adding new commissions or editing existing ones.
Along with this main documentation page, there is also the Vendor Guide and the Product Vendors FAQ.
Requirements
↑ Back to topProduct Vendors requires:
- WooCommerce 6.0+
- WordPress 5.6+
- PHP version 7.0+
- PayPal account
- optional, for PayPal Payouts
Installation
↑ Back to top- Purchase the product from WooCommerce.com
- Download the ZIP file from your WooCommerce.com dashboard
- Go to Plugins > Add New > Upload and select the ZIP file you just downloaded
- Click Install Now and then Activate.
- Read on to learn how to set up and configure the product.
More information at: Install and Activate Plugins/Extensions.
Setup and Configuration
↑ Back to topTerminology
↑ Back to topFor the purpose of explaining Product Vendors and the different roles and people:
- Store Owner – WordPress and WooCommerce Admin. Owner of the website and/or store on which vendors register.
- Vendor Admin – Has access to all Vendor settings.
- Vendor Manager – Has limited access to the Vendor dashboard.
- Pending Vendor – A user that has registered to become a Vendor but has not yet been approved or assigned a Vendor Admin or Vendor Manager role.
- Vendor – An “account” added to products that Vendor Admin and Vendor Managers have access to.
- Think of WooCommerce.com – that is the Vendor and our team are Vendor Managers who can updates products, and Vendor Admin are similar to team leads.
- Shop Manager is a WooCommerce role that can manage vendors – this is the role given to Store Owners.
A single user with one user account can be set up to manage multiple Vendors if needed, switching between vendors to which they have access.
Setup
↑ Back to top- Sign up for a PayPal account or have your existing credentials ready. More information and instructions at PayPal Setup.
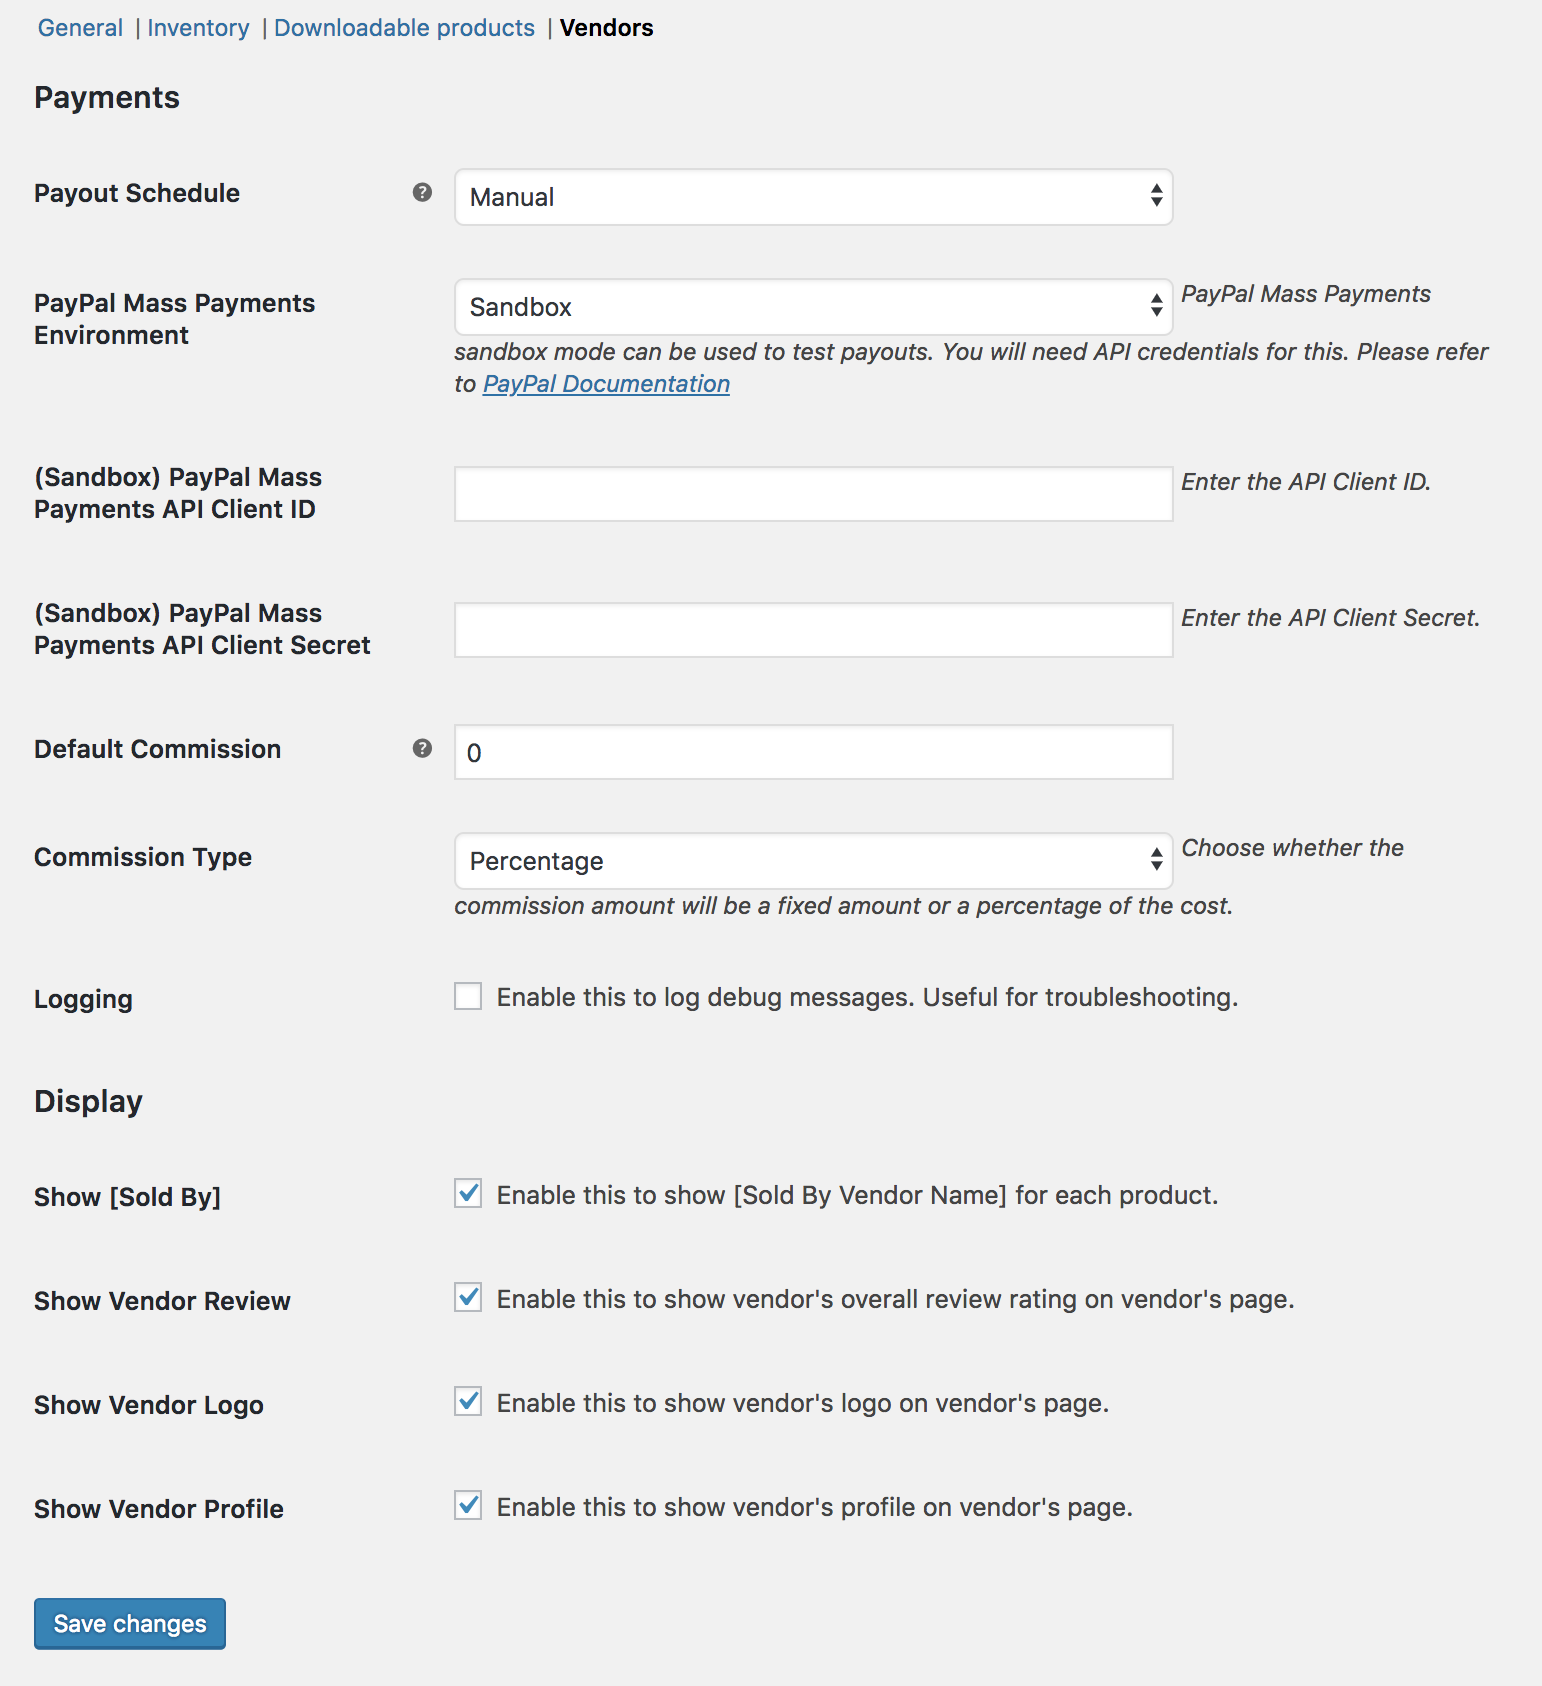
- Go to: WooCommerce > Settings > Products > Vendors. (on a WordPress.com hosted site, this should be WooCommerce > Product Vendors > Vendors)
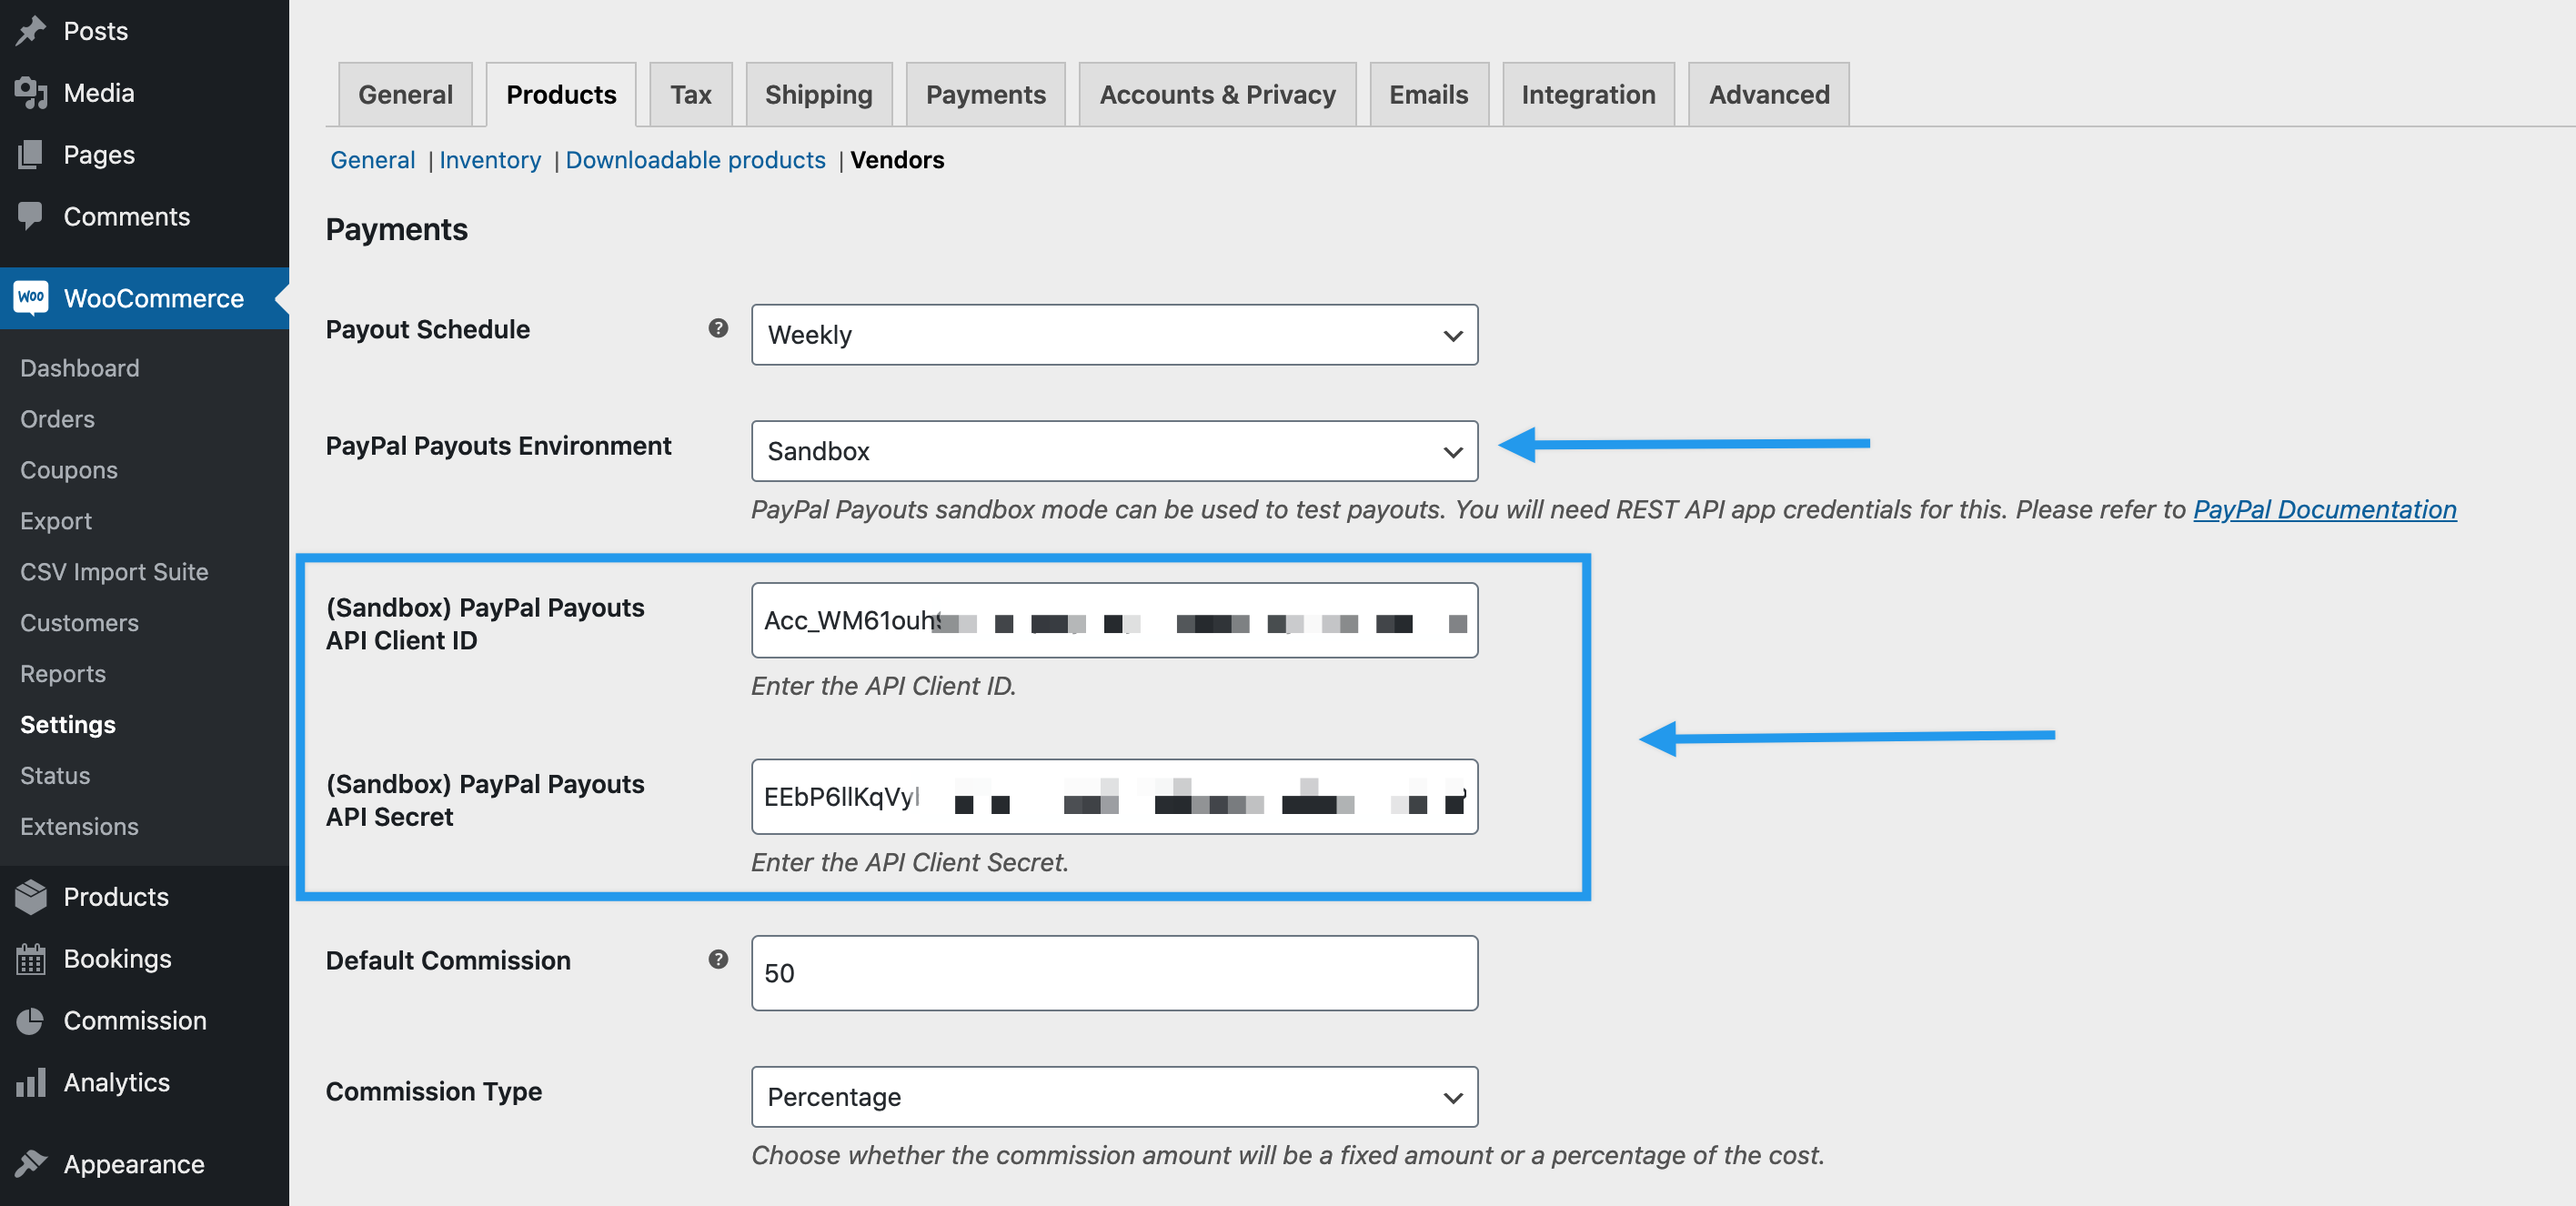
- Payout Schedule: Frequency of paying commissions.
- Manual: If this is set, any unpaid commission will not be automatically paid. This does not affect instant pay for each vendor described further down this documentation.
- Weekly, Bi-Weekly, Monthly: Once you choose a frequency, it triggers an immediate payout of unpaid commissions and the period starts from when you set/save the setting. Currently this uses PayPal Payouts so be sure you have your PayPal Client ID and Client Secret added to your settings and that you have enough funds. The vendors also would need to have their PayPal account email setup in their settings for them to receive commission.
- PayPal Payouts Payments Environment:
- Sandbox – PayPal Payouts Sandbox mode can be used to test payouts. You need API credentials. More info at: PayPal Developer – Manage Your Applications or go to PayPal Setup to see step by step instructions.
- Live
- PayPal Payouts Payments API Client ID – Sandbox or Live, depending on which you selected in previous step.
- PayPal Payouts Payments API Client Secret: Sandbox or Live, depending on which you selected in above step.
- Default Commission: Amount of commission paid to vendors, if a Vendor or Product level commission isn’t entered.
- Commission Type: Set if the Default Commission is a Fixed Amount or Percentage of product cost.
- Show [Sold By]: Enable to display [Sold By Vendor Name] for each product.
- Show Vendor Review: Enable to display overall review rating on vendor’s page.
- Show Vendor Logo: Enable to display logo on vendor’s page.
- Show Vendor Profile: Enable to display profile on vendor’s page.
- Save changes.
PayPal Payouts Webhook
When setting up the Payouts API details, it will automatically create a webhook for you. If you need to generate a new webhook, the tool “Product Vendors Delete Webhook” can be used. This tool can be found in WooCommerce > Status > Tools
Vendor Creation/Registration
↑ Back to topThere are two ways that a vendor can be created: They are either created from the vendor registration form that can be added to a page on your site. A vendor can also be created manually by the store admin.
Registration Form
↑ Back to topHere is how you can allow vendors to register an account and start selling products on your site
- Create a page in WordPress at Pages > Add New.
- Enter the shortcode
[wcpv_registration]on the page. - Publish the page.
If you’d like to preview the form just note that logged-in Admins will not see the form. You need to be a logged-out, or a logged-in to a user that is not Admin. The form looks like this, but styling can depend on your theme.
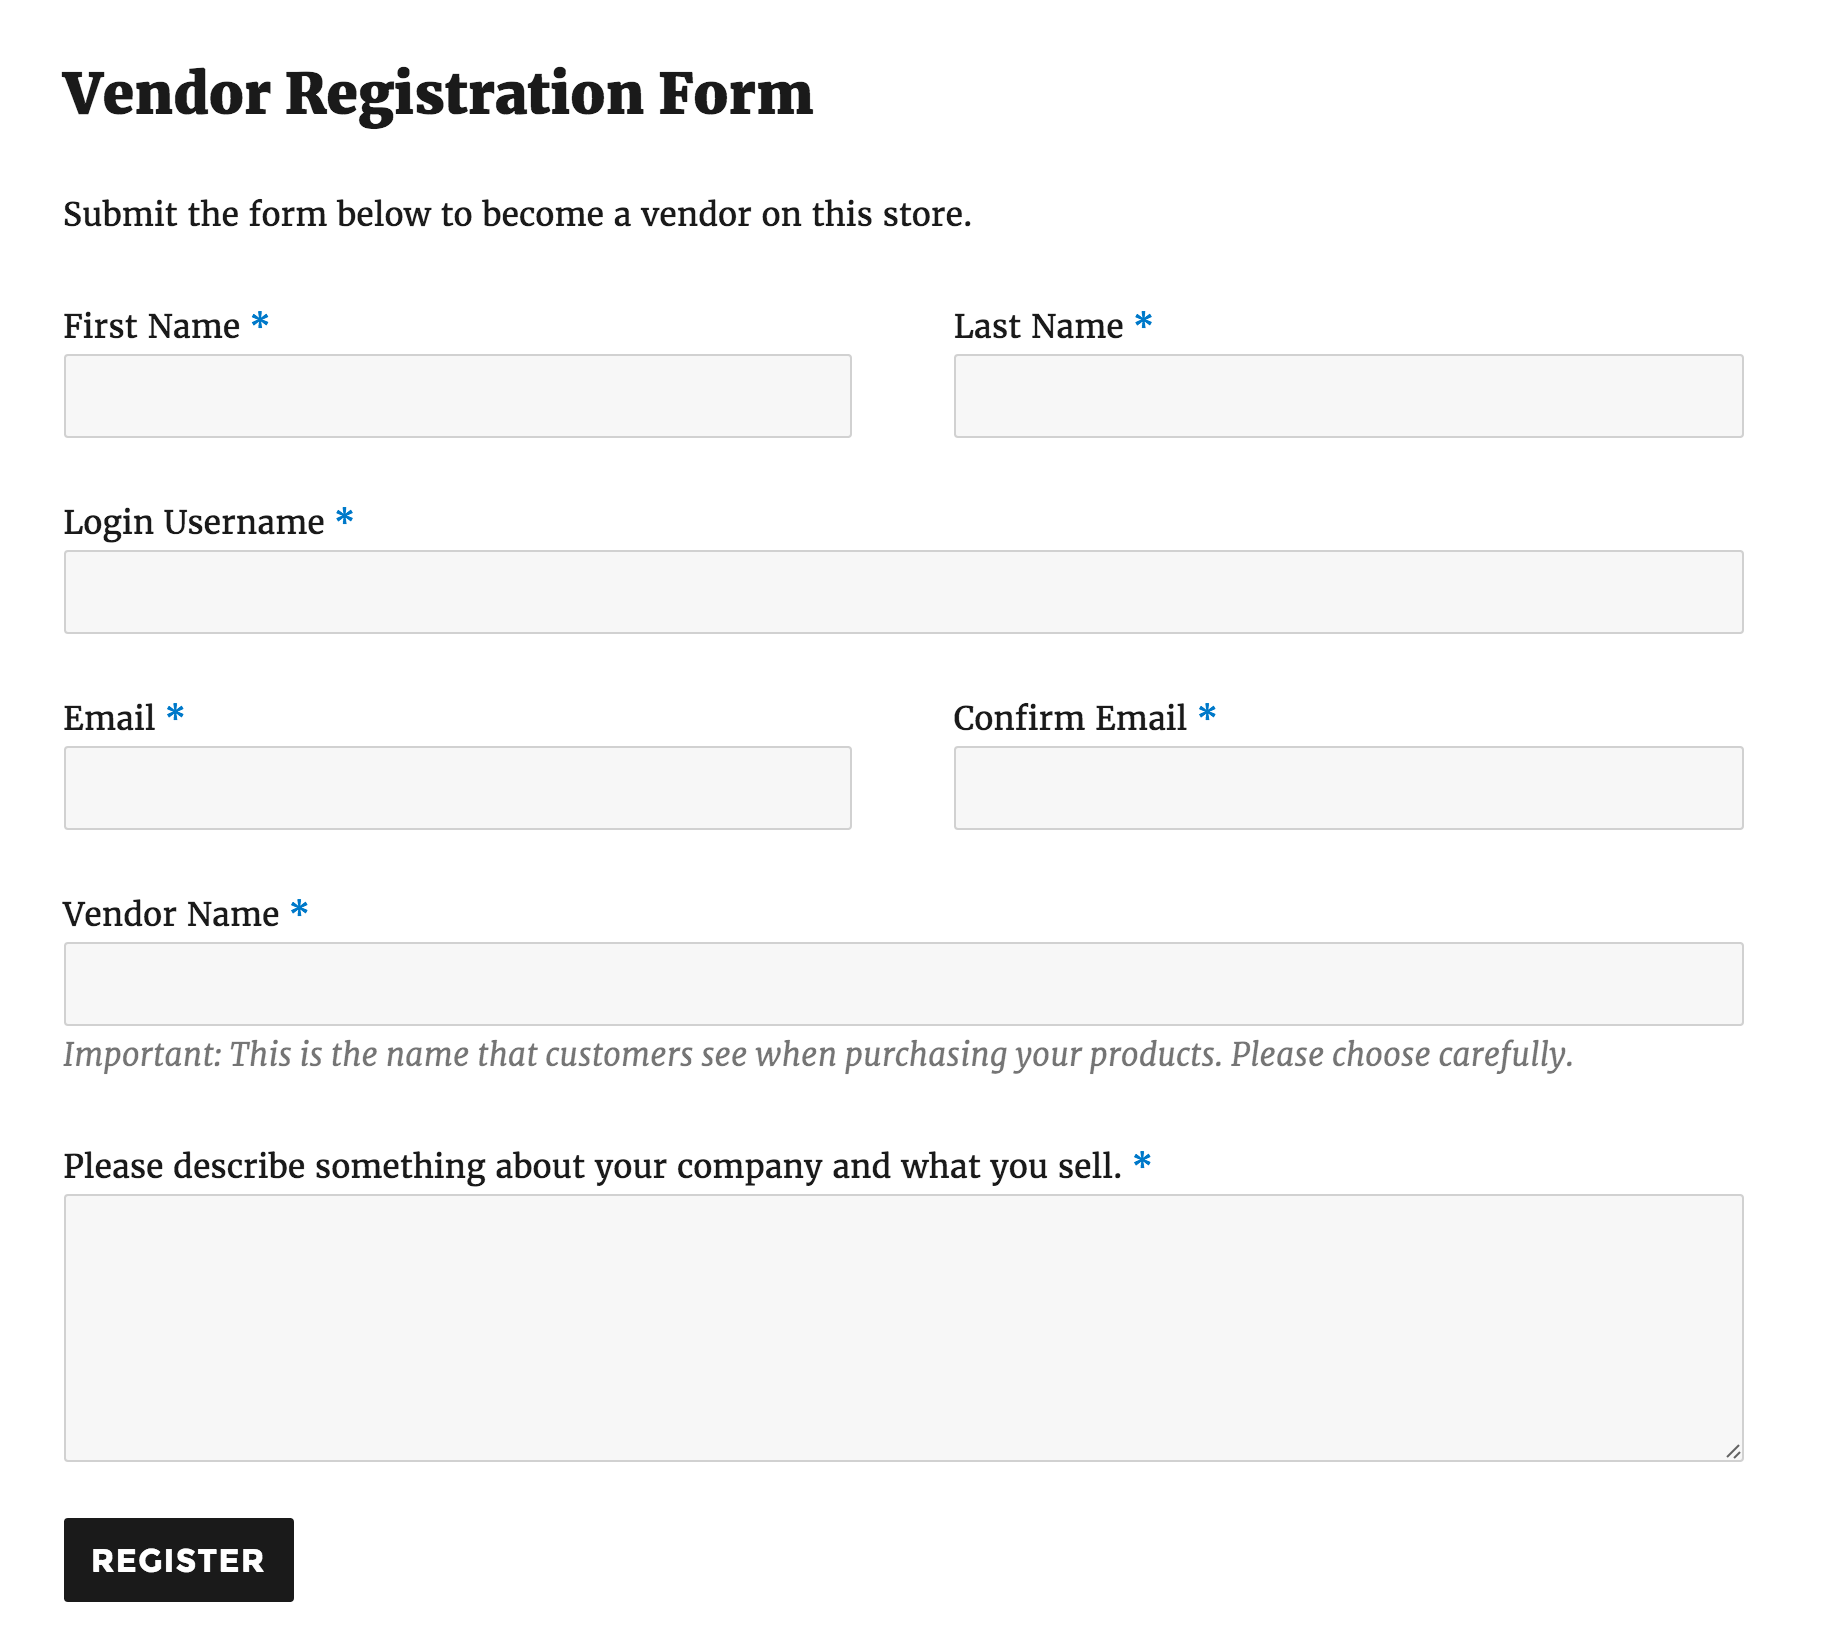
Vendor Name must be unique and determines the vendor name for the store, e.g., If they enter “Nike,” this is the name used throughout the store.
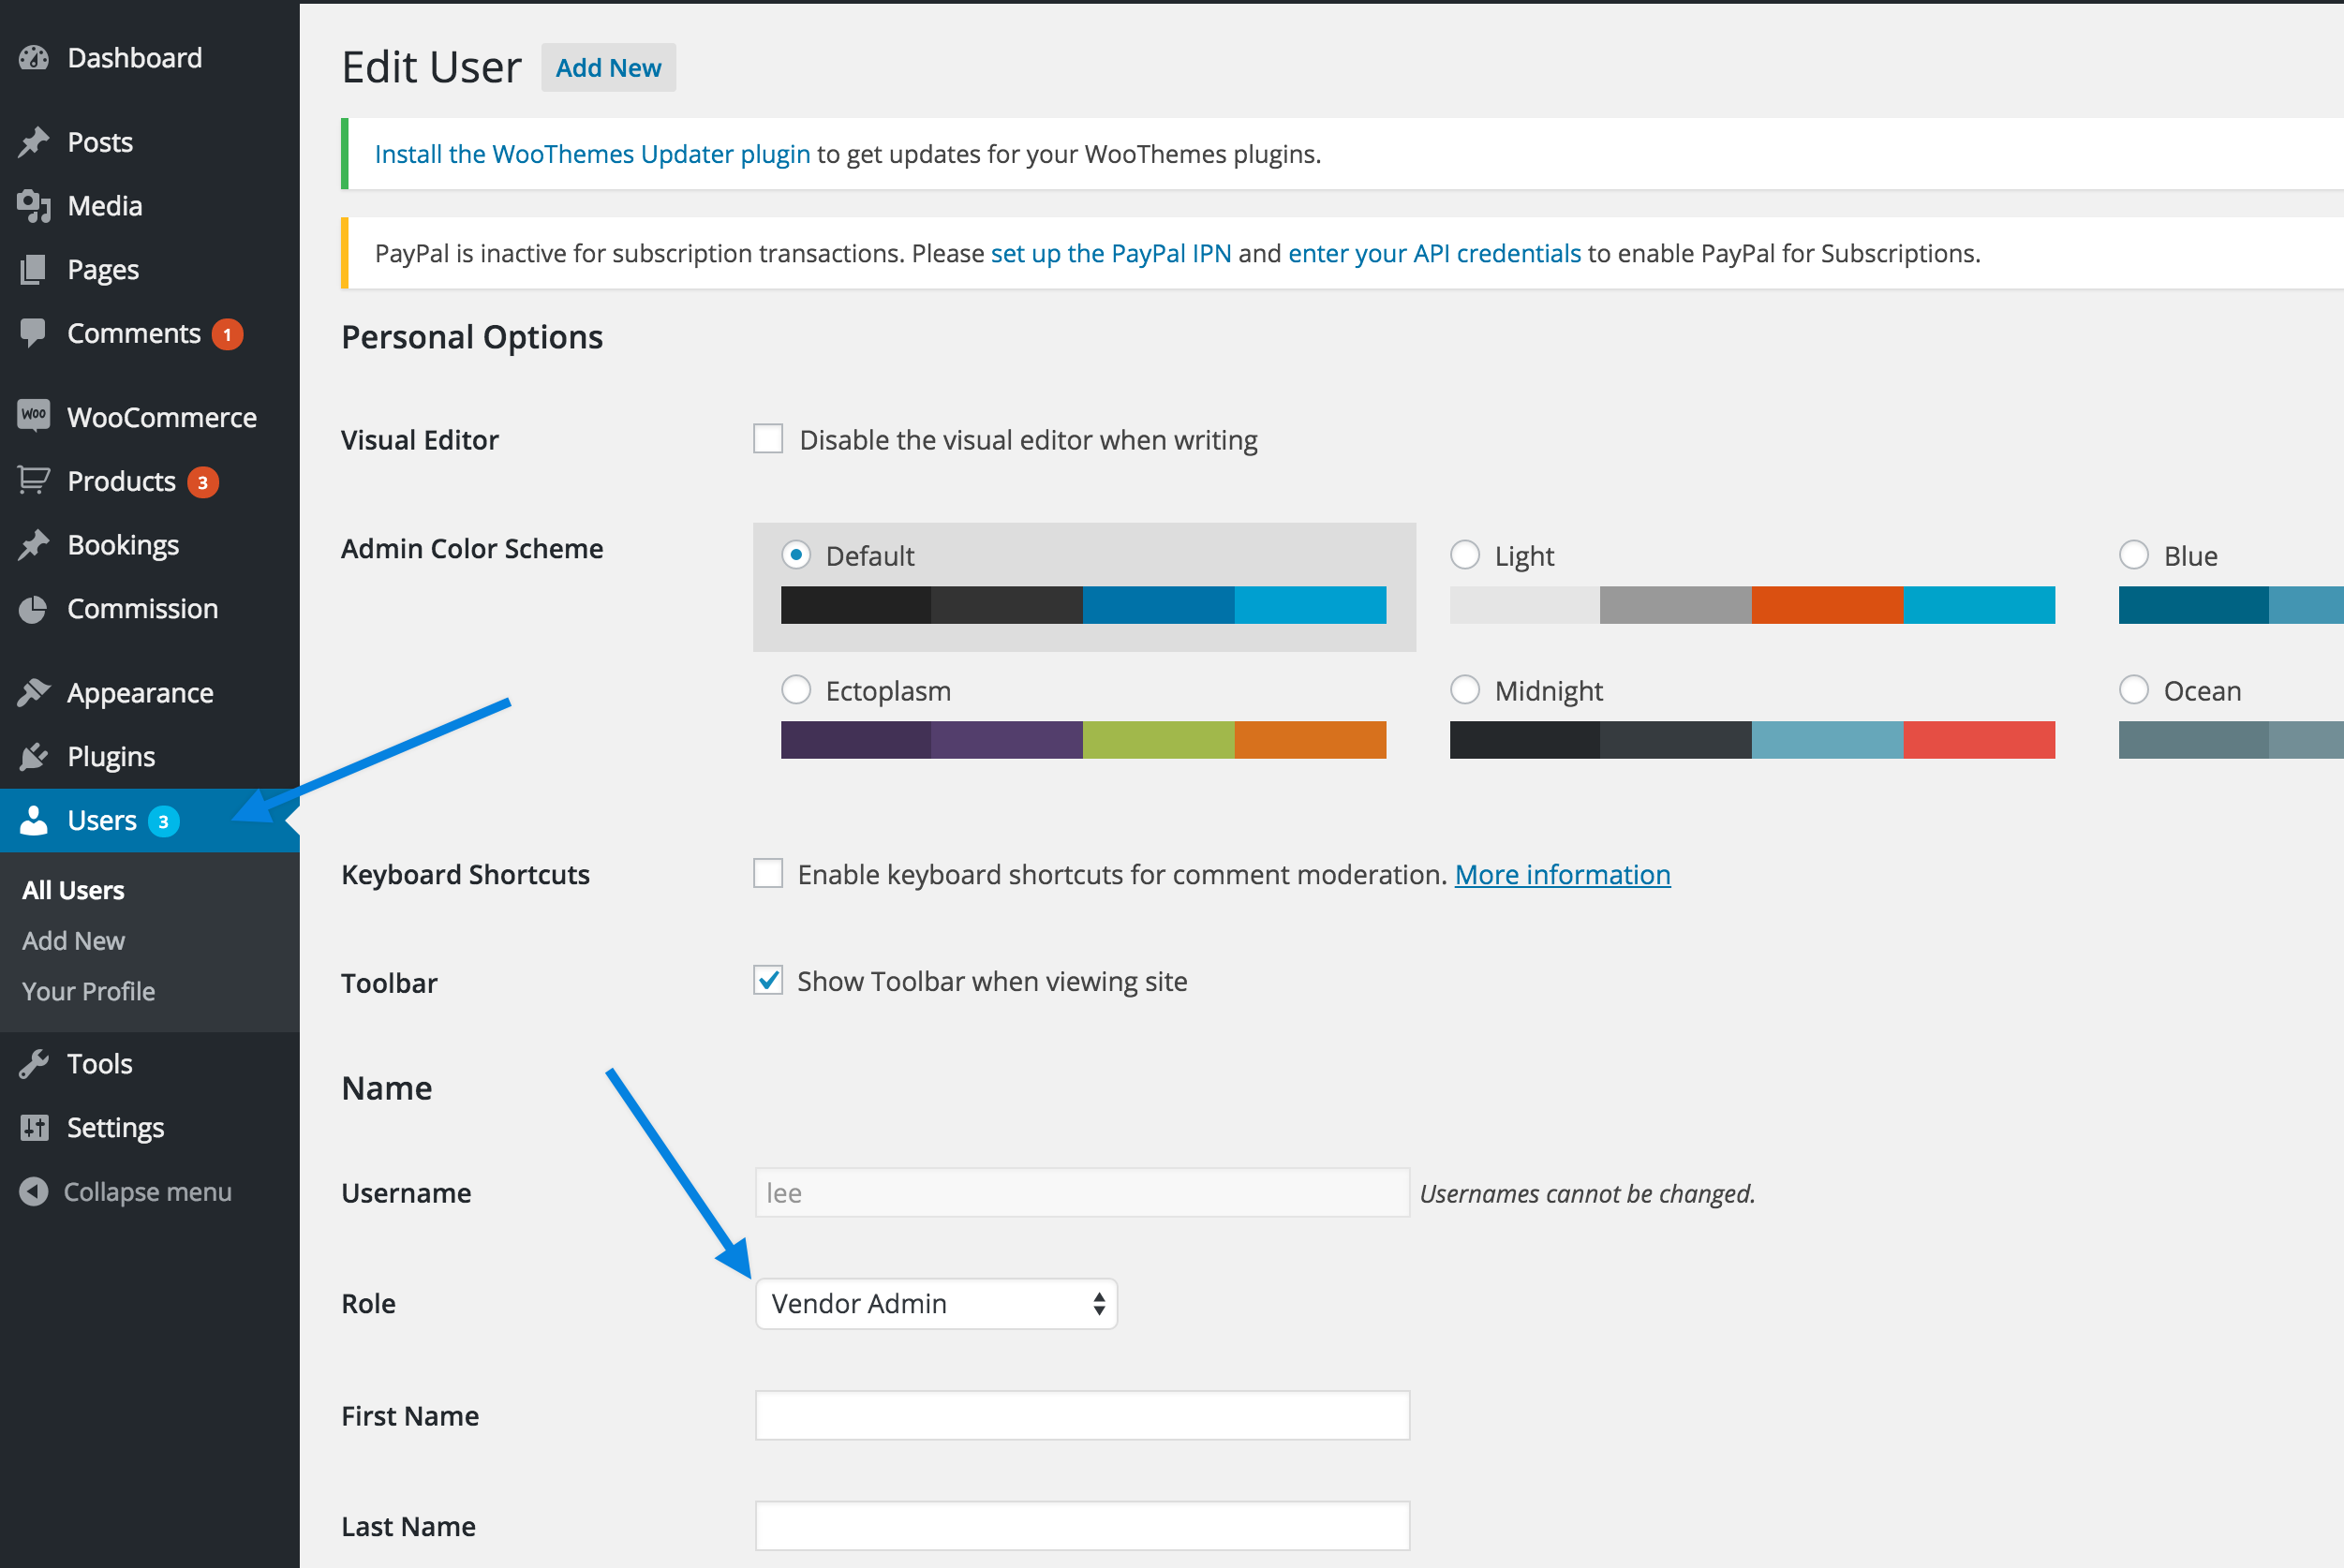
Once the vendor has submitted the form, the store owner gets an email notification that a vendor has applied and a user account is created for this vendor. As a Store Owner, you can “approve” the Vendor by changing the User Role to Vendor Admin or Vendor Manager and adding them to a Vendor under the Vendor Admins section.
You can add custom fields to the registration form. See Customize Registration Form. This is a Developer level article. If you are unfamiliar with code/templates and resolving potential conflicts, select a WooExpert or Developer for assistance. We are unable to provide support for customizations under our Support Policy.
Manual add a vendor
↑ Back to topStore owners can manually add and create a vendor.
- Go to: Products > Vendors.
- Complete fields, if known.
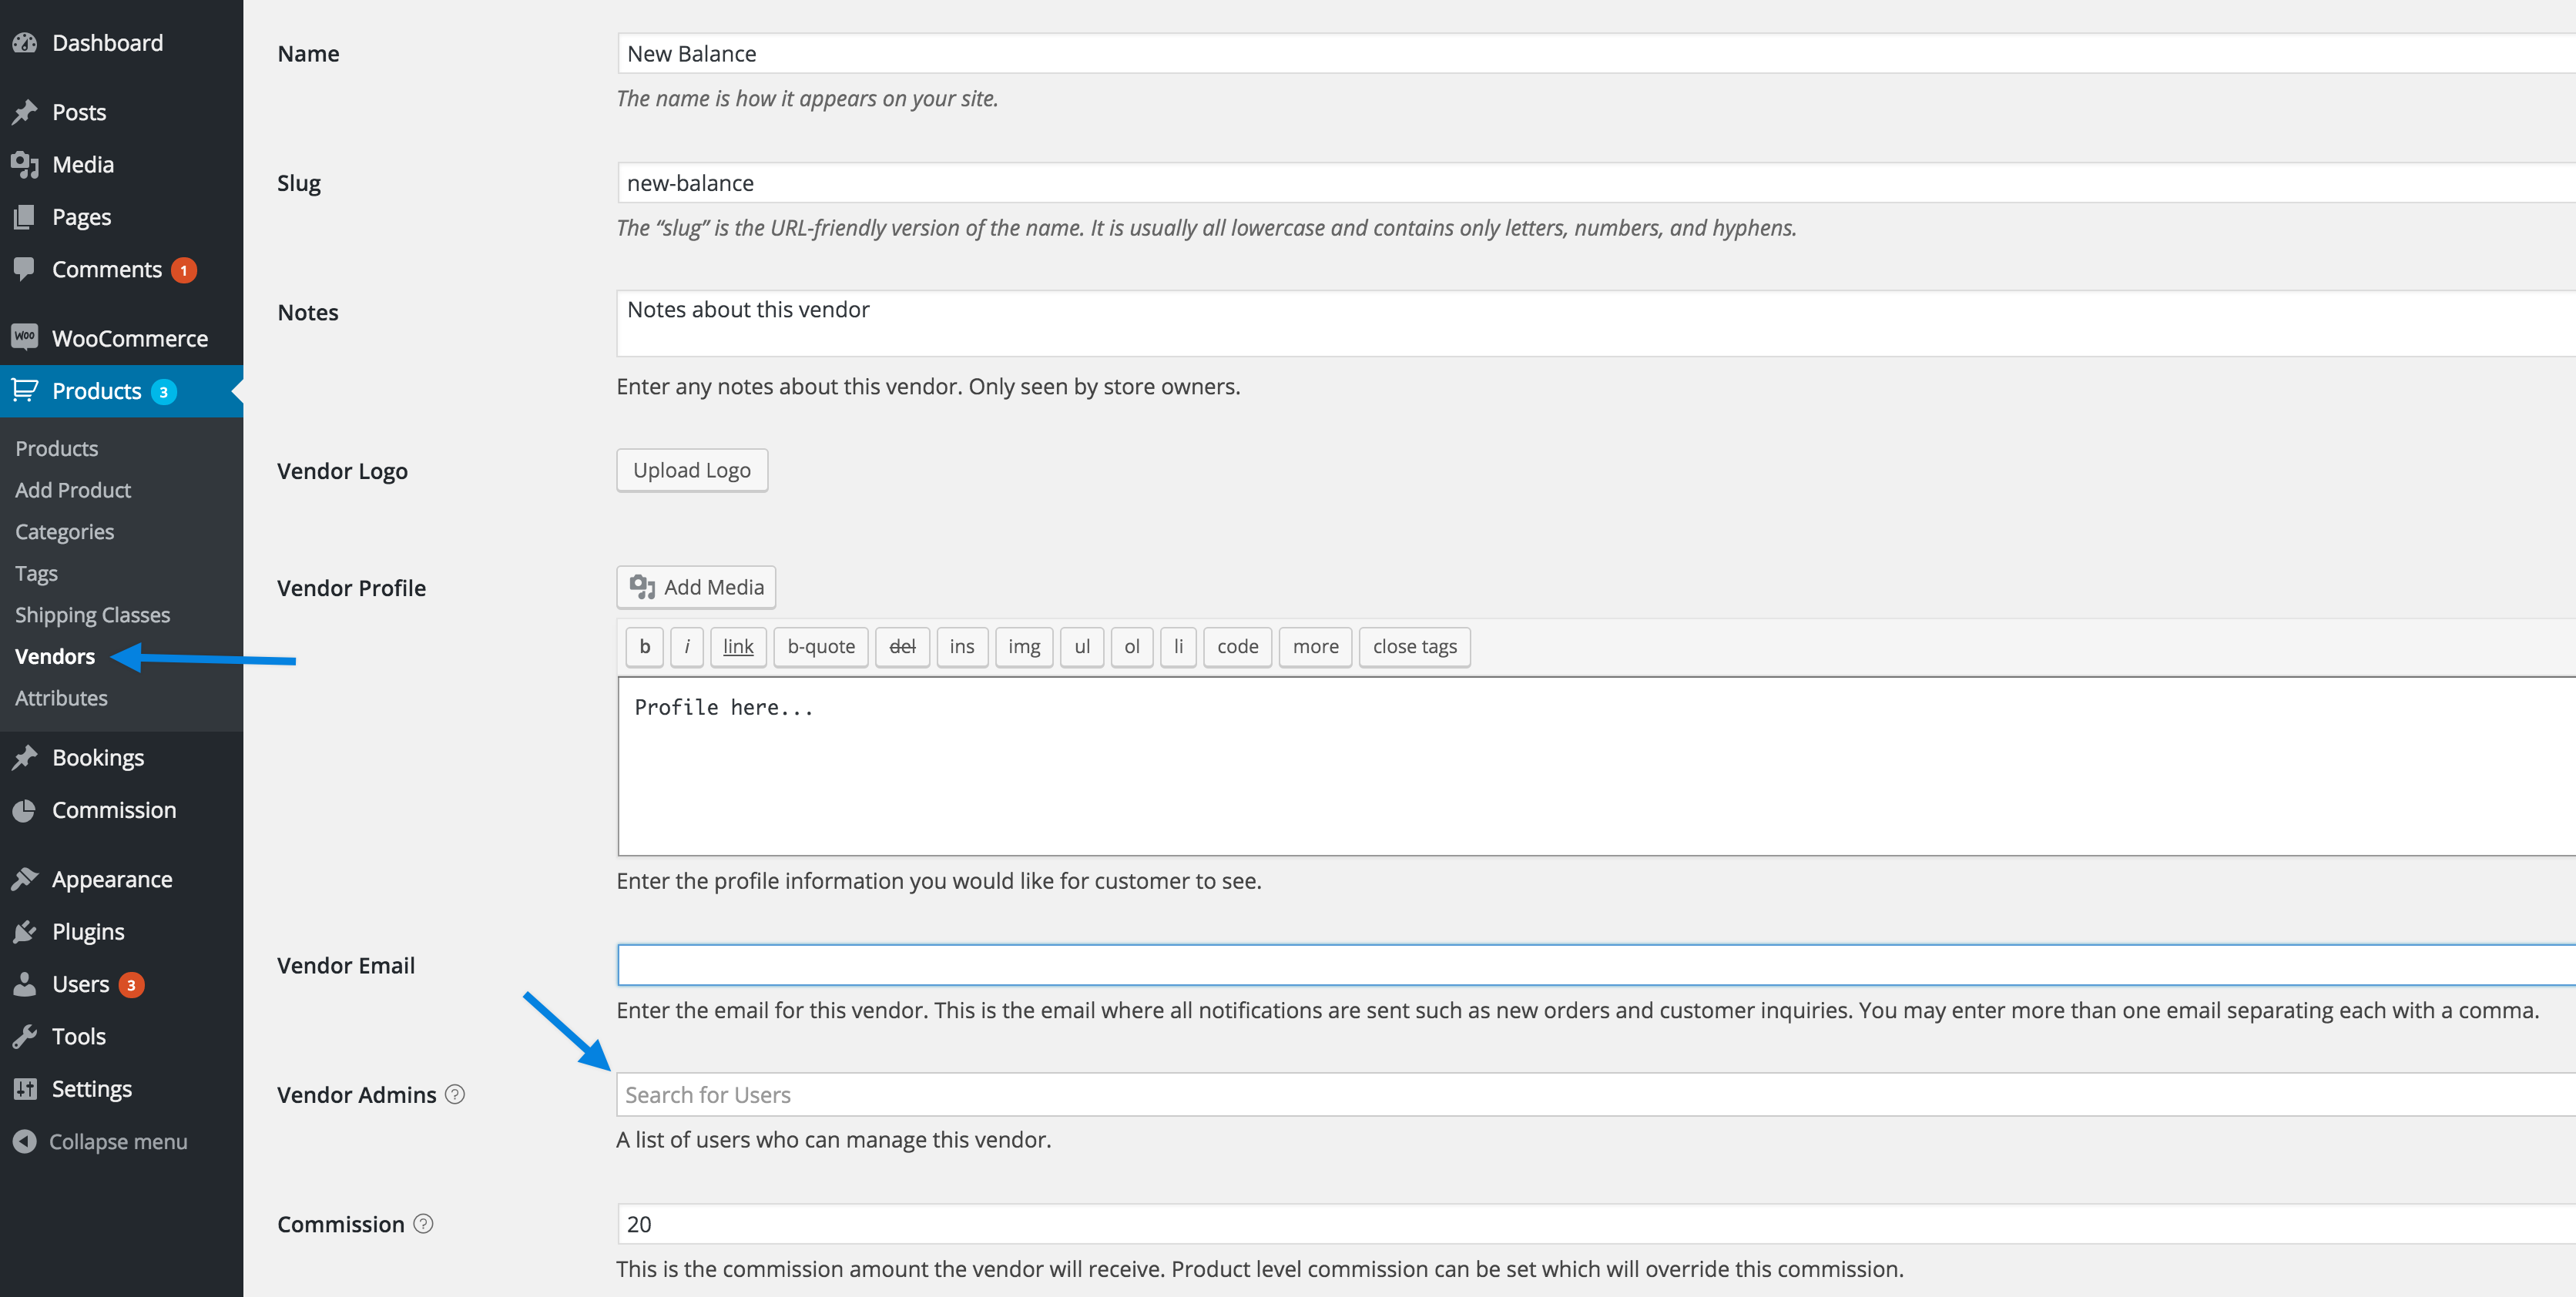
- Assign a Vendor Admin or Vendor Manager to the Vendor User, allowing an existing user to manage this vendor. Using the previous example, vendor “Nike,” go to Products > Vendors , click on a vendor to edit, find the Vendor Admins field (above) and search for the username/email to add as an admin.
- Give the Vendor User access as a Vendor Admin or Vendor Manager. Go to Users (below), find the Vendor User, click to edit, change the role to Vendor Admin or Vendor Manager.
- Scroll down to Vendor Management. Here you can allow the user to:
- Publish Products: This setting determines if this vendor user is allowed to publish products live with or without approval.
- Manage customers: This setting determines if this vendor user can manage customers which includes their own existing customers and create new customers.
Vendor users with capacity to manage customers will not be able to edit or search for administrator users, for security reasons. If an administrator would like to make a purchase on the store from one of the vendors, it is recommended they use a different account.
After a Vendor User registers via the form or is added manually, his/her role will initially be Pending Vendor.
Once you switch the role to Vendor Admin or Vendor Manager, an email is sent that states their application has been approved and they can now start to set up and manage their store.
Vendor Settings
↑ Back to topDetails of each setting after the screenshot:
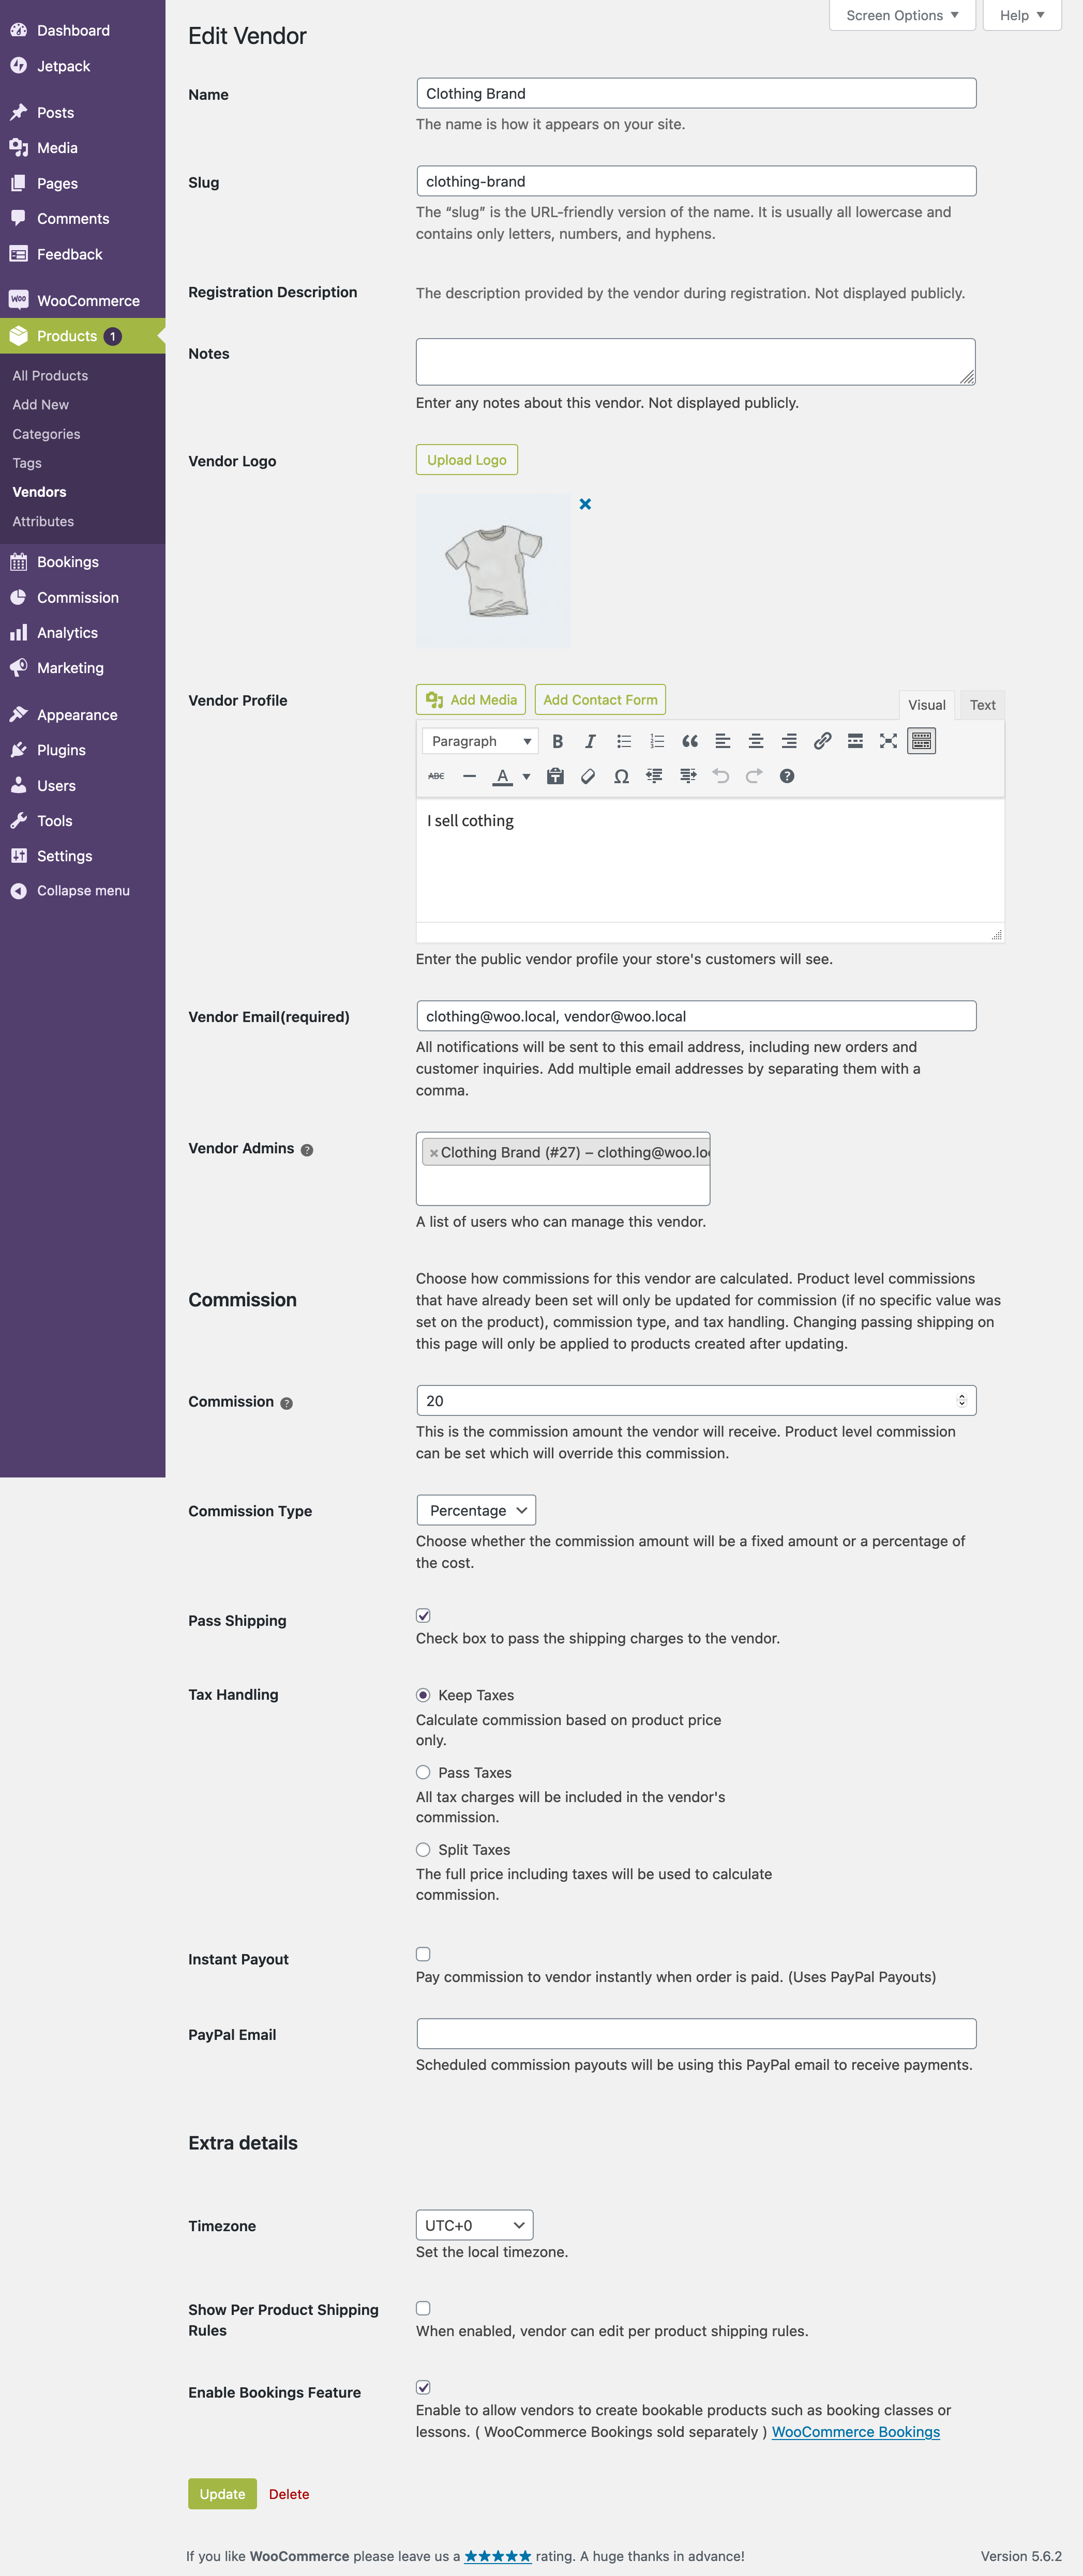
Settings are specific to a Vendor. Go to: Products > Vendors, click on a Vendor to edit.
- Name: Vendor name displayed to the public.
- Slug: Internal name for vendor, which also affects the vendor URL. Automatically assigned by default. We recommend leaving this field as-is.
- Notes: Store owner can enter any notes about this vendor. Only viewable by the store owner.
- Vendor Logo: Image that can be displayed on the website. Usually added by a vendor admin, but can be added by a Store Owner or Admin.
- Vendor Profile: Usually added by a vendor admin, but can be added by a Store Owner or Admin.
- Vendor Email: List of email addresses, separated by a comma, that receives store-related notifications. Usually added by a vendor admin, but can be added by a Store Owner or Admin.
- Vendor Admins: List of users who have access to manage this Vendor. Added by the Store Owner only.
- Commission: Vendor Level rate added by the Store Owner who processes all sales through their own payment gateway and needs to pay commission to vendors. This overrides the Default Commission setting, but the Product Level commission can override the Vendor Level rate.
- Commission Type: Set this if the Commission above is a Fixed Amount or a Percentage of the product cost.
- Pass Shipping: Check box to pass the shipping charges to the vendor.
- Tax Handling: Decide how you want the taxes to be handled
- Instant Payout: Enabling means that vendors are paid immediately after an order is placed and payment is received. Both the Store Owner and vendors need to have PayPal accounts for this option to work.
- PayPal Email: For commission payments configured by the Store Owner. It’s the email address that a Vendor has listed on his/her primary PayPal account to collect commission via PayPal Payouts. The commission cannot be paid automatically without it.
- Show Per Product Shipping Rules: Enabling allows vendors to add their own per product shipping rules. If disabled, the Store Owner decides.
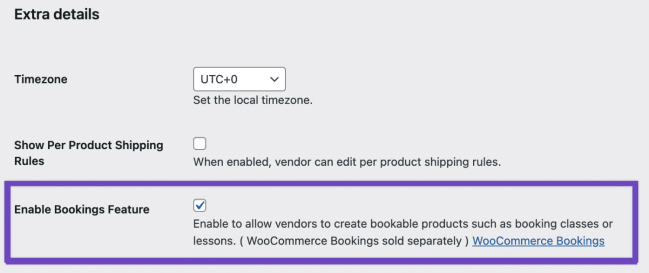
- Enable Bookings Feature: Enabling allows vendors to use bookings. Requires WooCommerce Bookings, sold separately. (Some limitations – please see below.)
Adding Products
↑ Back to topAdding products in Product Vendors is similar to adding products in WooCommerce, with additions or differences described below.
It’s important to note, that if more than one user has added products in WooCommerce (e.g. shop managers and product vendors), the Product listing page will display a “Mine” filter at the top. This is to distinguish between products added by administrators and shop managers, with products added by vendors.
If you’re unfamiliar with how to add products, see: Adding and Managing Products.
Filtering products
The Admin can filter a product list by Vendor.
Deleting/trashing products
A Vendor Admin has the ability to trash products; a Vendor Manager cannot.
Store Owner Product Editing
↑ Back to top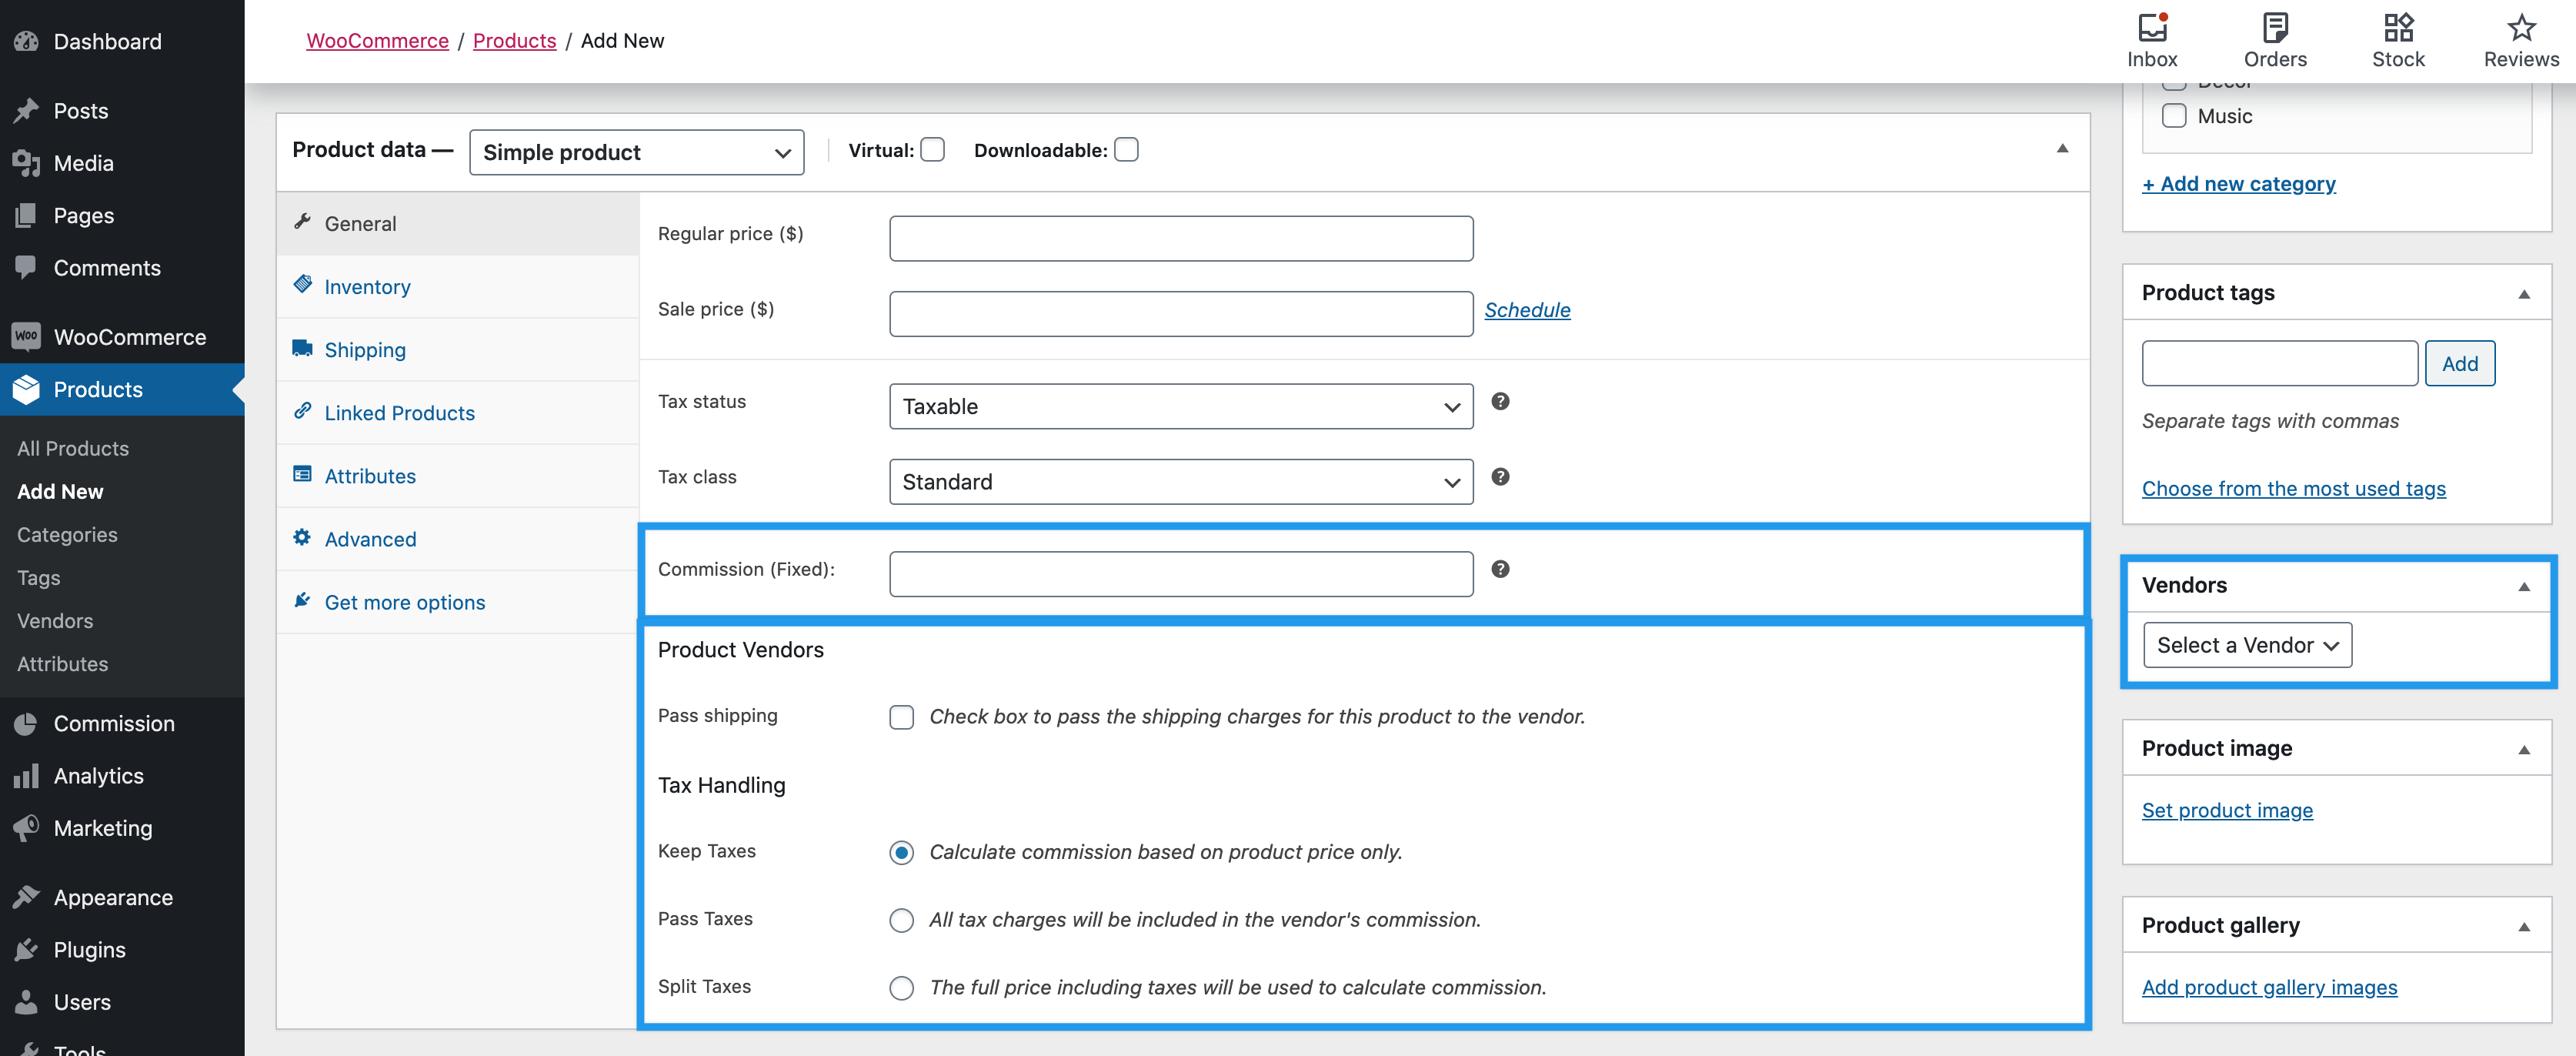
In addition to the normal product settings, the Store Owner needs to configure:
- Commission: Product Level commission added by the Store Owner only. This overrides the Vendor Level commission and Default General Commission.
- Pass Shipping: Enabling will pass shipping costs on to the vendor. Shipping costs and shipping tax costs will only be passed if Per Product Shipping that comes with Product Vendors is being used.
- Tax Handling
- Keep Taxes: Store owner keeps all taxes. Commission is calculated based on the product price only.
- Pass Taxes: All taxes charged to customer are included in the vendor’s commission.
- Split Taxes: The full price of the product including the taxes will be used to calculate the vendor’s commission.
- Product Vendors Widget Dropdown: Indicates the vendor associated with this product. It’s auto-assigned when vendors create their products.
Vendors Product Editing
↑ Back to topUsers who have manager access to the vendor are allowed to add/edit products.
- Vendor creates a product that is Pending Review after submission to the Store Owner.
- Email is sent to the Store Owner, notifying him/her that a vendor has submitted a product.
If you would like a Vendor to be able to publish products without approval, you can change the setting for the Vendor by following these steps.
- Go: to WordPress Admin > Users > Vendor
- Change the value in dropdown from Needs Approval to Allow for Publish Products
Reports
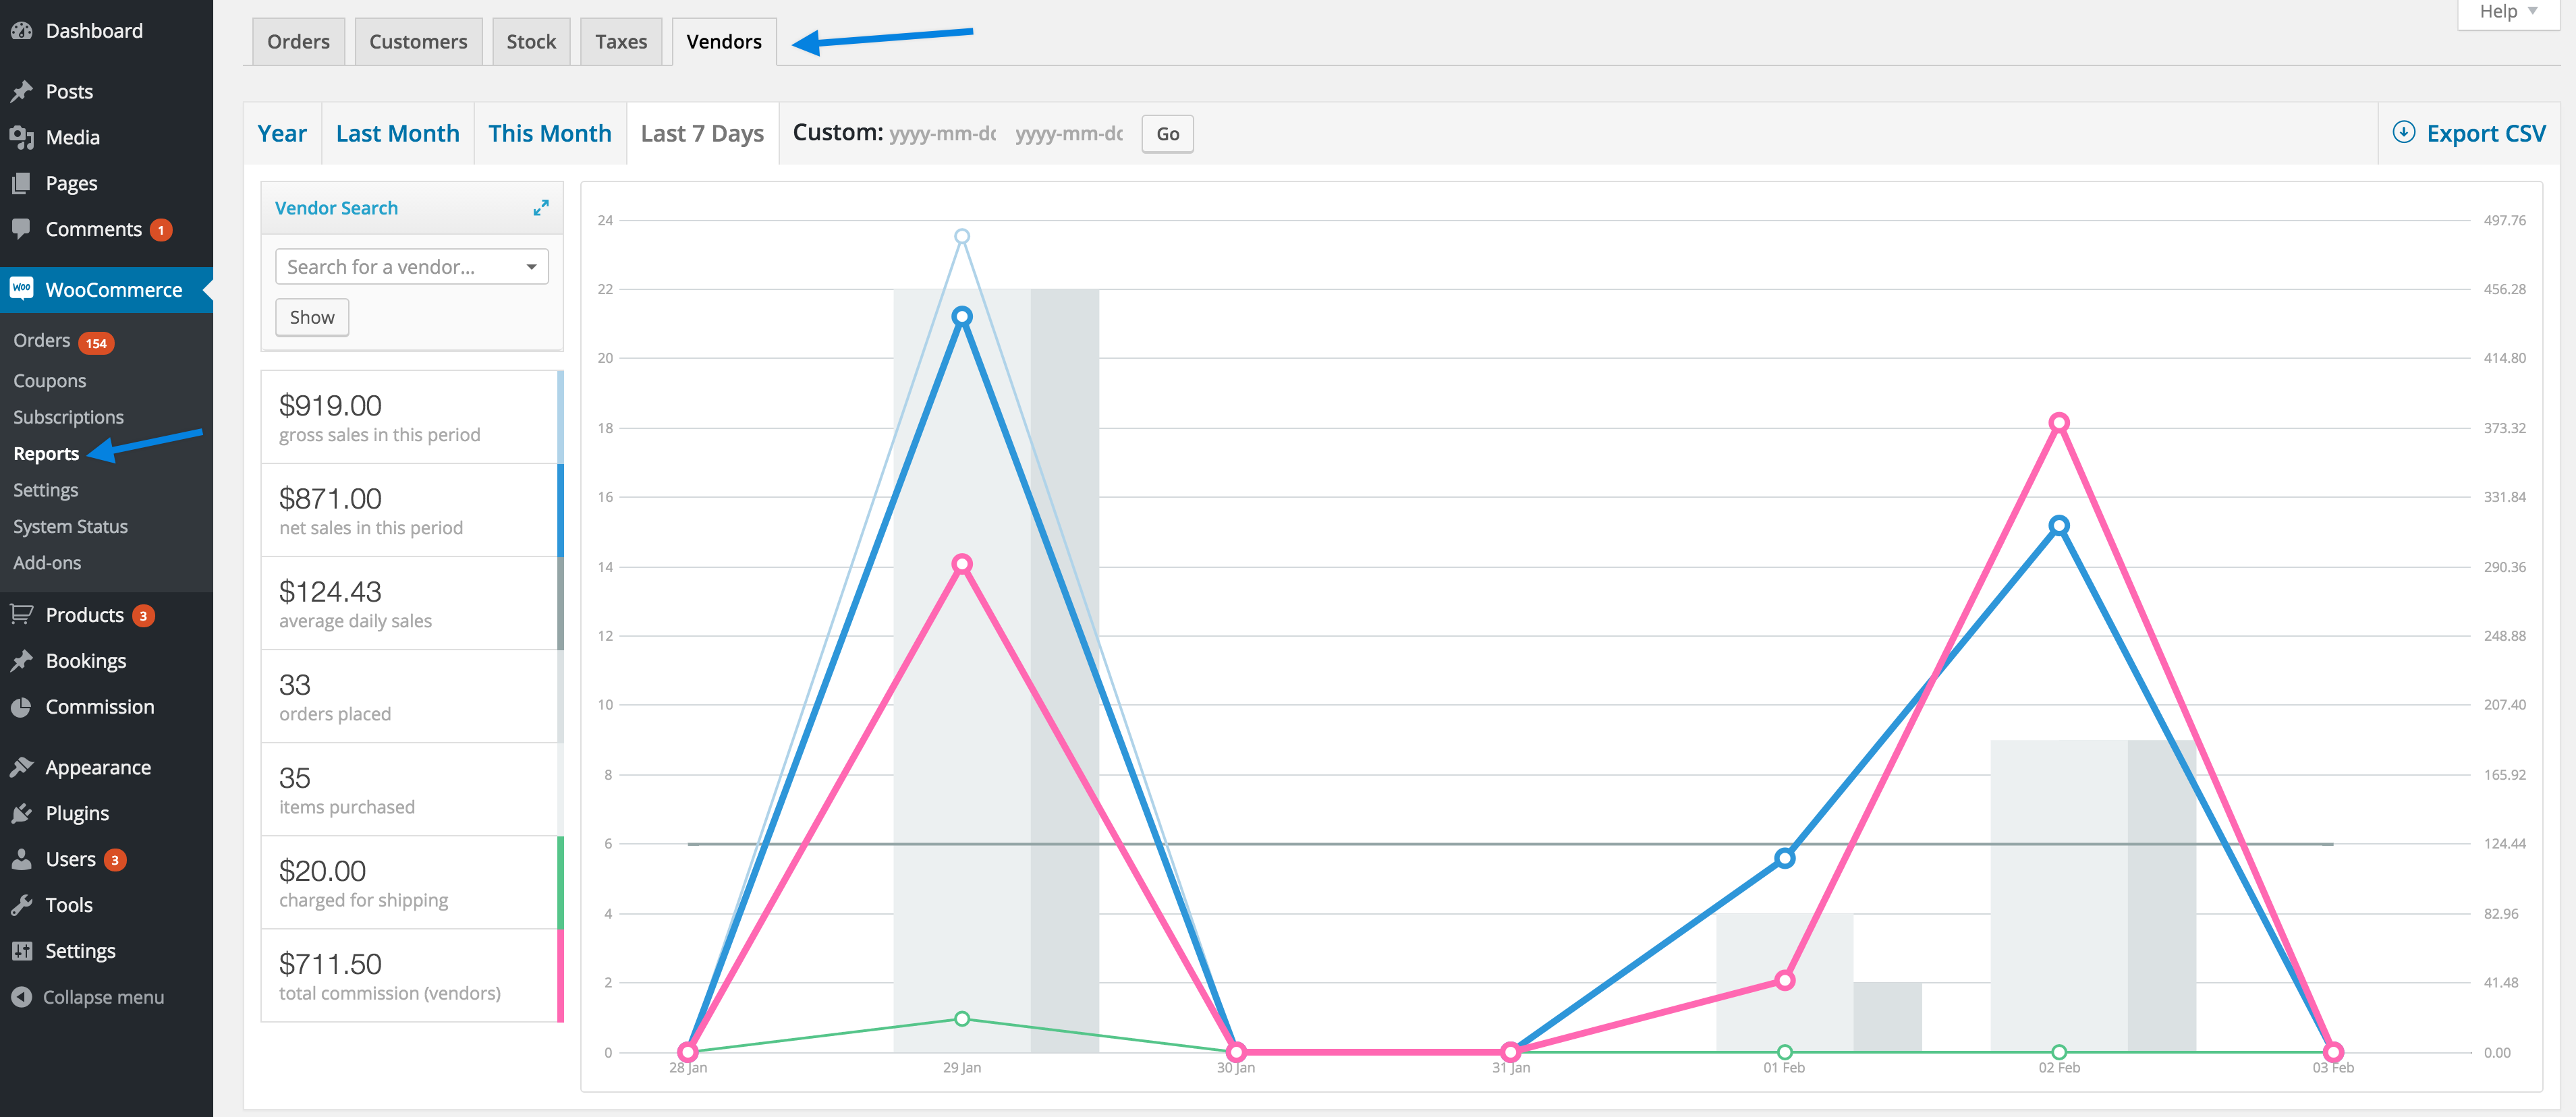
↑ Back to topStore Owner Reporting
↑ Back to topStore Owner reports for Product Vendors are found in the legacy WooCommerce Reports and located in the same location, under the extra Vendors tab.
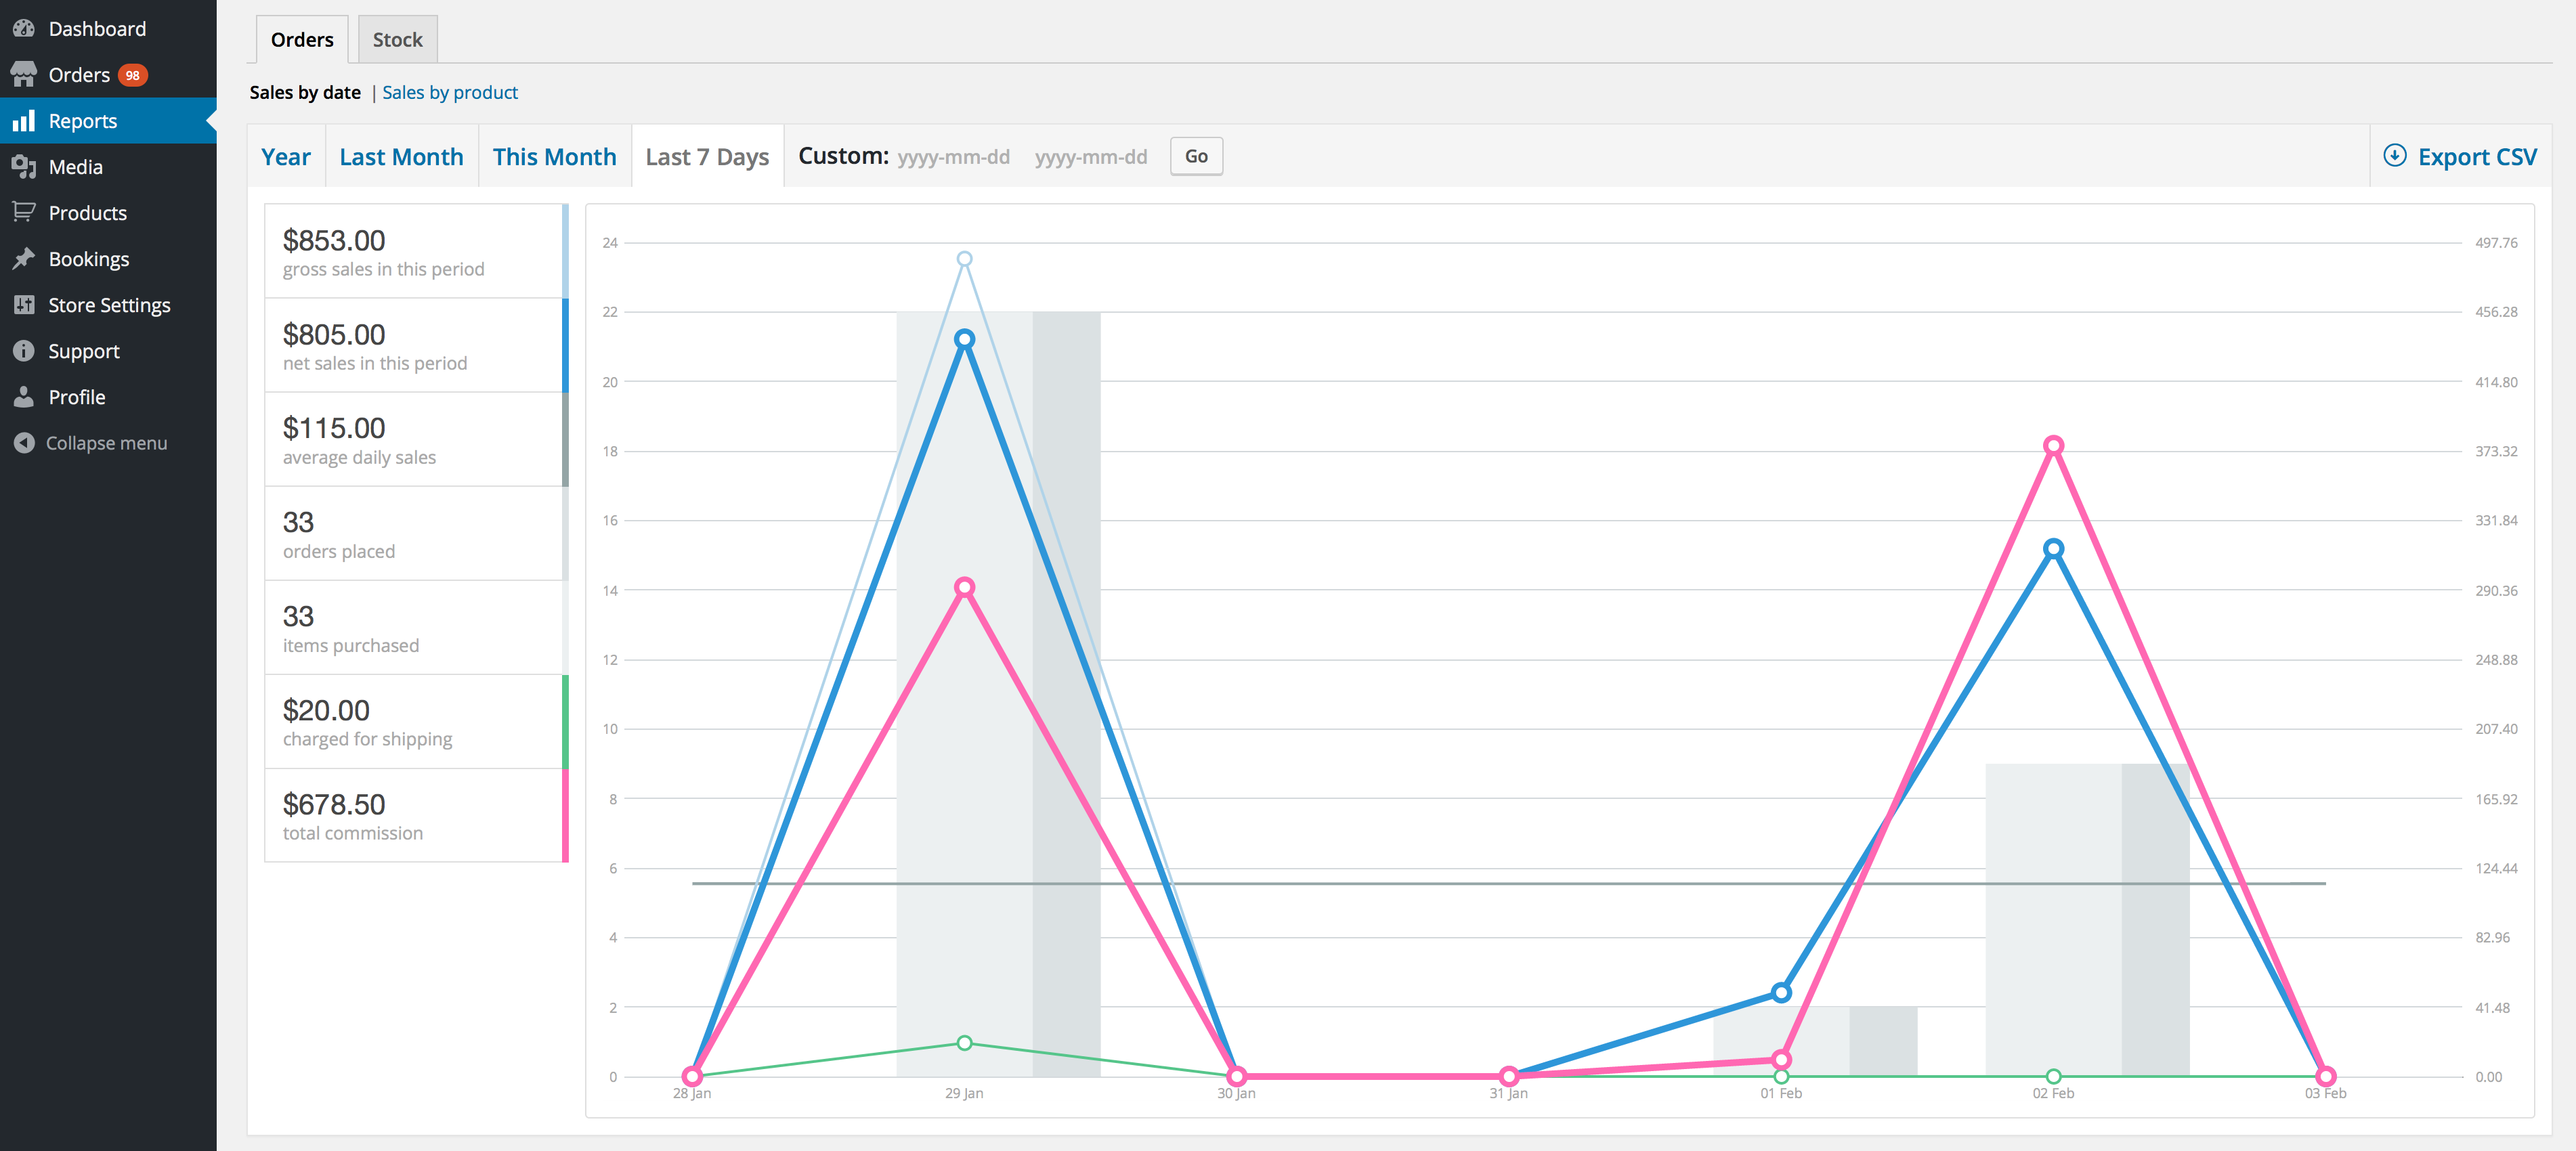
Vendors Reporting
↑ Back to topVendor reports are similar to the Store Owner, except they only see their own sales.
Commission
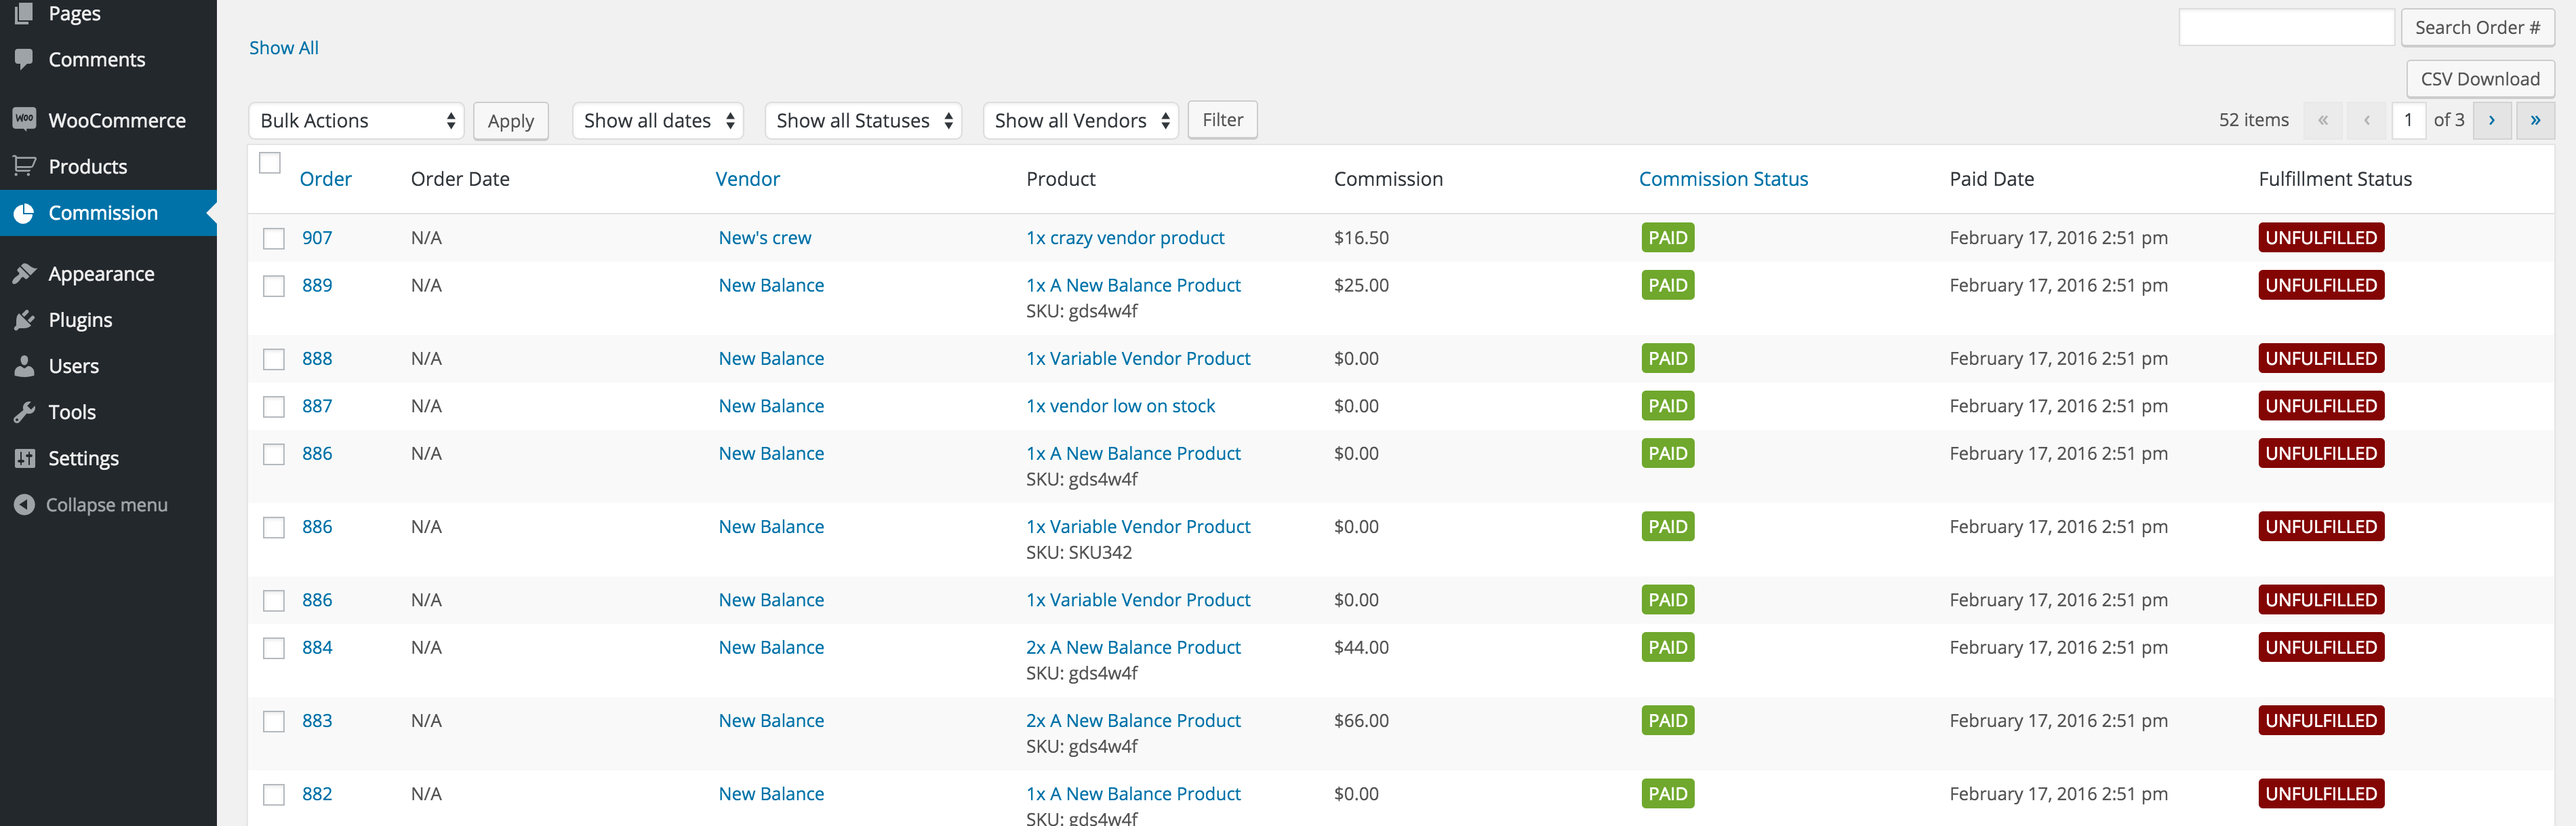
↑ Back to topAll sales are processed via the Store Owner’s payment gateways and a Vendor’s revenue is paid out to them, by the Store Owner, as commission. The Product Vendors Commissions page displays the commission of each product by order. Other info, such as commission/shipping/fulfillment status, is also included.
On this same page, you can export the commission in two different ways via two different buttons.
- The first is the “Export Commissions” button, which lets you export a CSV file of the commissions paid or unpaid in the current view. If you use the filter function, then the export shows data for the filtered view.
- The second export button is the “Export All Unpaid Commission.” This exports a CSV file for all unpaid commission, regardless of the view. This is useful when you want to manually process your mass payouts via PayPal Payouts.
Commissions can be calculated to include or exclude taxes in the product price.

Bulk Actions
↑ Back to topThe Store Owner can perform actions in bulk to process similar transactions and save time.
- Pay Commission: Pays commission for selected products.
- Mark Unpaid: Indicates that a commission is unpaid.
- Mark Paid: Indicates that a commission is paid. (Does not pay commission)
- Mark Void: Indicates that a commission has been voided.
- Mark Fulfilled: Indicates that the product has shipped.
- Mark Unfulfilled: Indicates that the product has not shipped.
- Delete Commission: Deletes commission. (Does not delete order)
Commission Scheduled Payout
↑ Back to topInstead of Instant Pay, you can schedule commission payouts to vendors on a weekly, bi-weekly or monthly basis.
Depending on your store and terms, you may want to pay commission at a later date so you can create a cushion for customer refunds or whatever processing you may need.
Note that when you select either weekly, bi-weekly or monthly and save, your interval will start at the time you clicked save. For example if I chose “bi-weekly” and click on save now, it means from now and two weeks later, run the payout.
The default setting is Manual, which means no commission is paid unless Instant Pay is enabled.
PayPal Setup
↑ Back to topTo use PayPal Payouts, you must sign up and be approved by PayPal themselves. They will screen your business and decline your account until you fulfill all requirements.
The PayPal Payout service to send, receive, and withdraw funds is subject to some country-specific restrictions and constraints. For more information, please refer to PayPal’s documentation here.
Using PayPal for Product Vendors isn’t possible in Germany. German law requires the funds to be held in escrow and PayPal Payouts doesn’t offer this feature.
Instant Pay and Scheduled commission payouts use PayPal Payouts, which is included and built into Product Vendors. You need a Business account with PayPal to automatically pay commission to vendors.
PayPal Payouts is the only automatic way to pay commissions from within Product Vendors, but it is not the only way to pay your vendors – you can pay vendors manually outside of the Product Vendor area such as manually via your payment gateway. Support at WooCommerce.com can only help with the functionality of the Product Vendors extension.
Vendor’s commissions are paid out separately for each order. Thus, PayPal transaction fee is charged per order. Now to set up PayPal Payouts for your store:
- Sign up for a PayPal Business account. Or contact PayPal and switch your existing account to Business.
- Request access to PayPal Payouts.
- More info at Get access to PayPal Payouts.
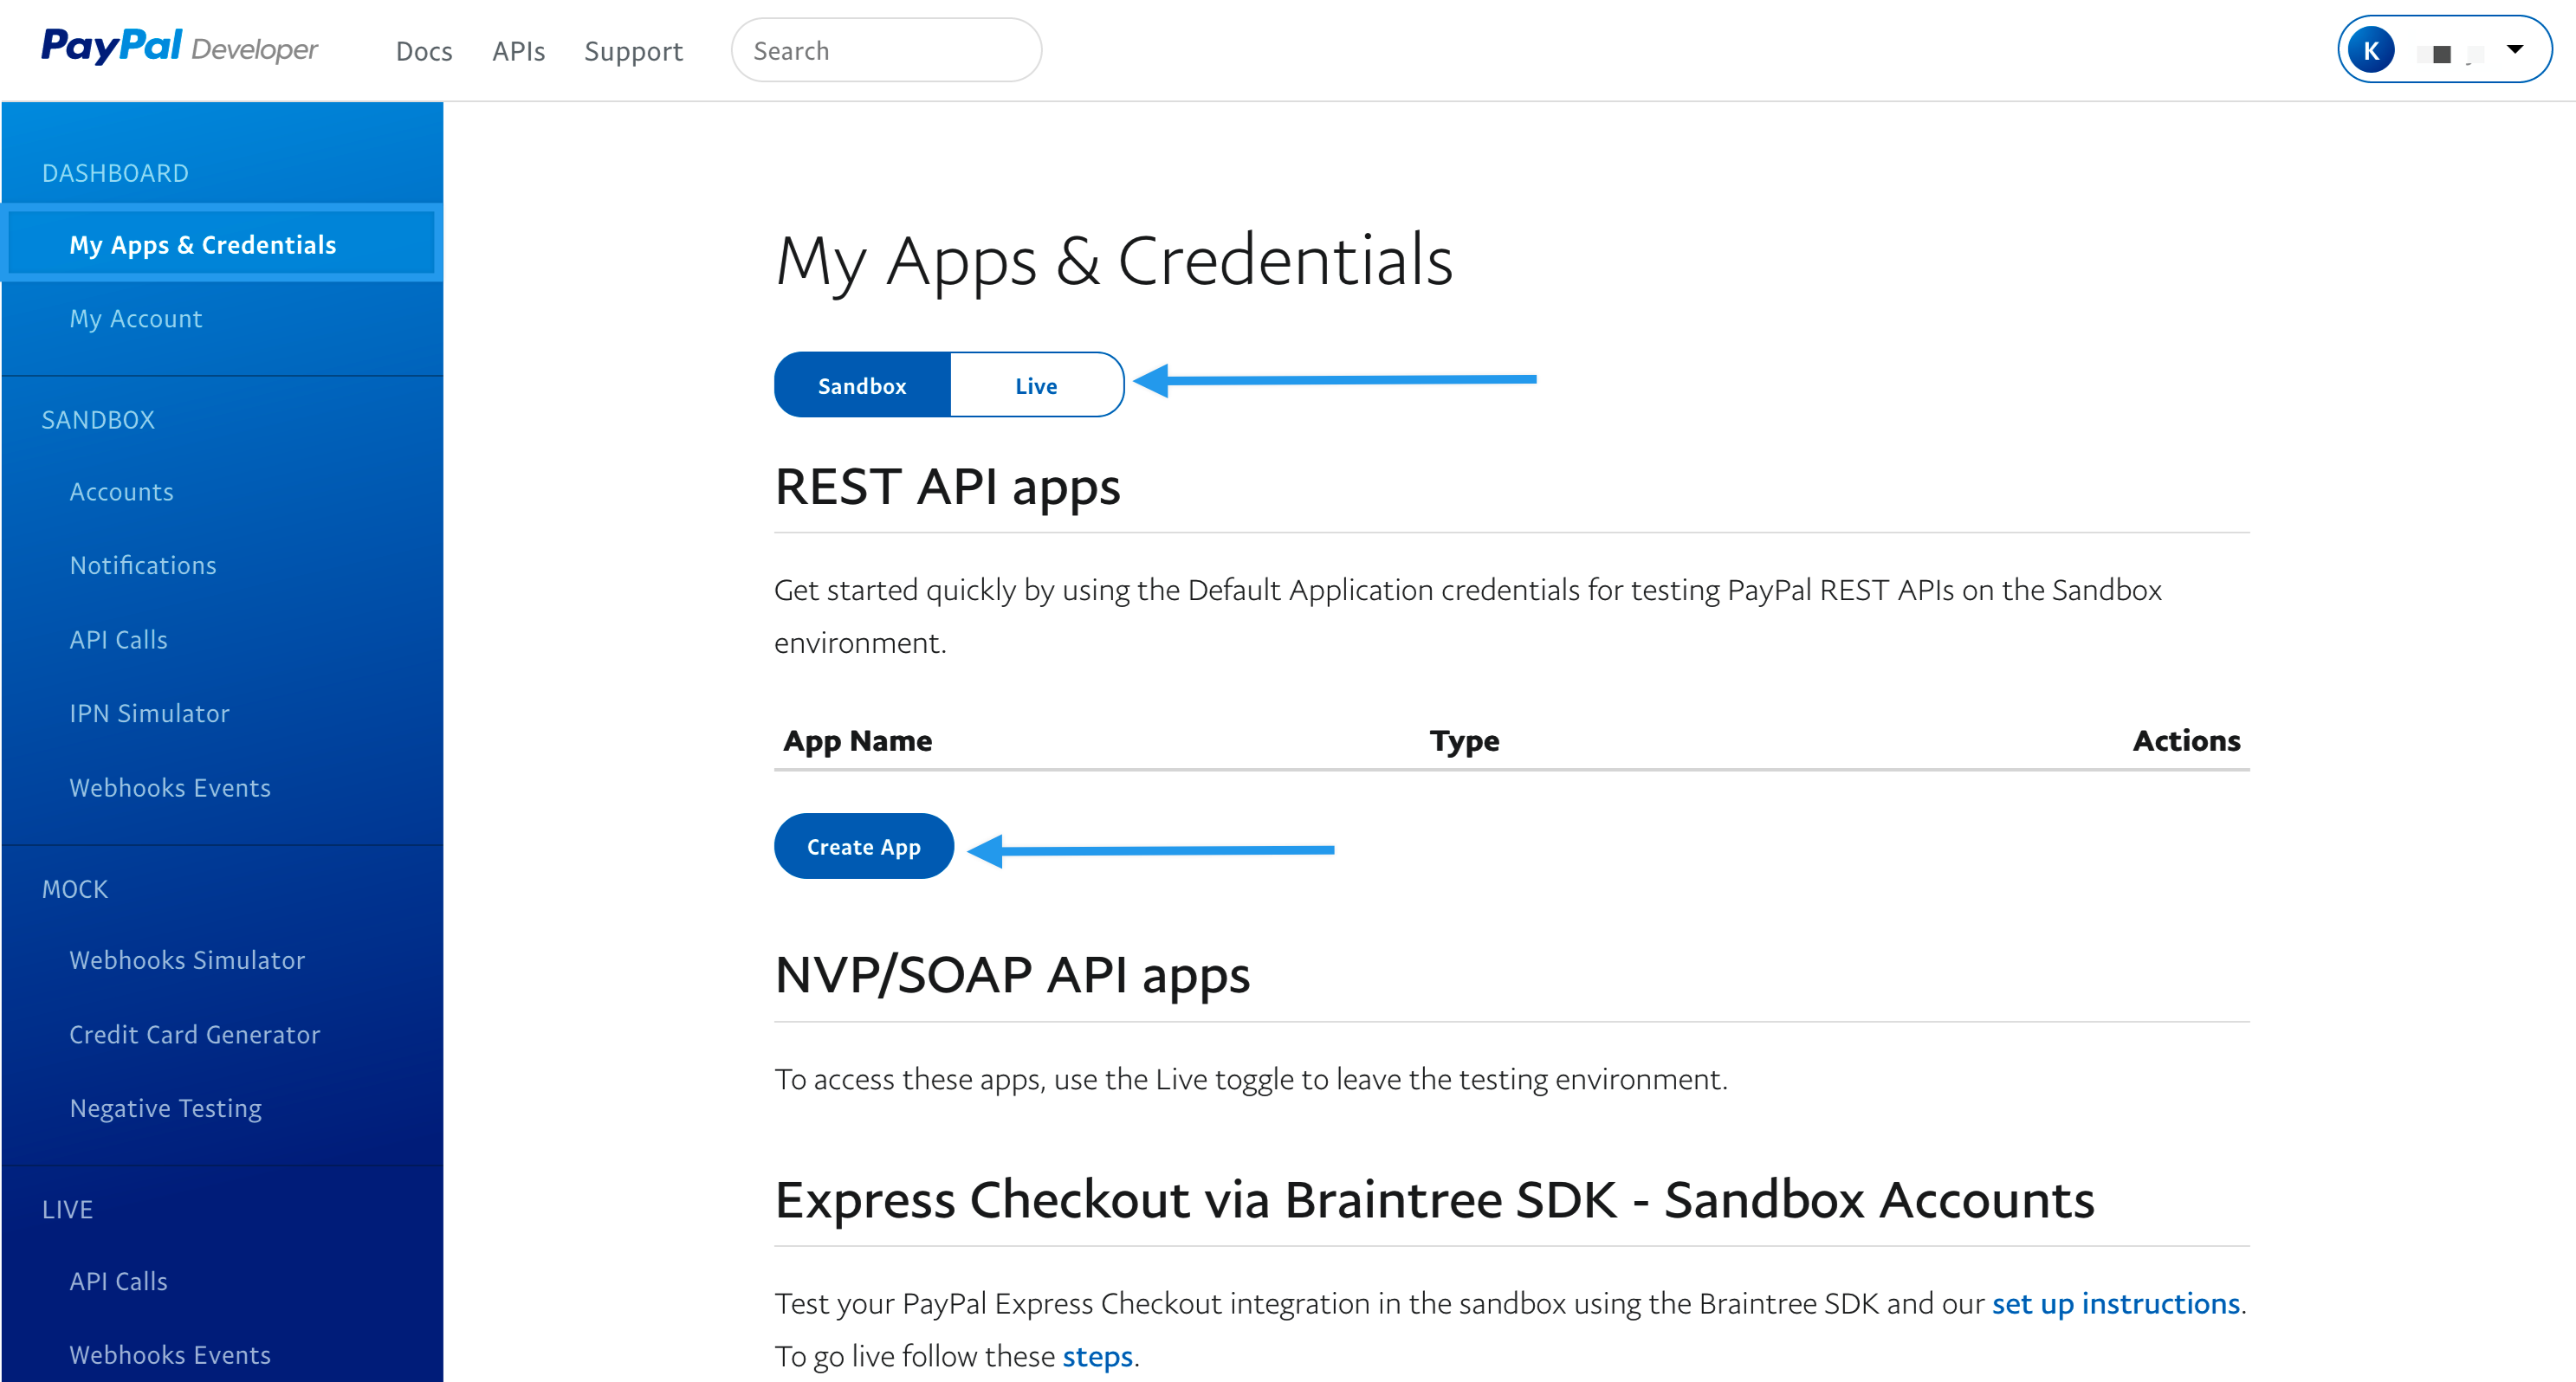
- Log into the PayPal Developers site with your PayPal account to set up an application.
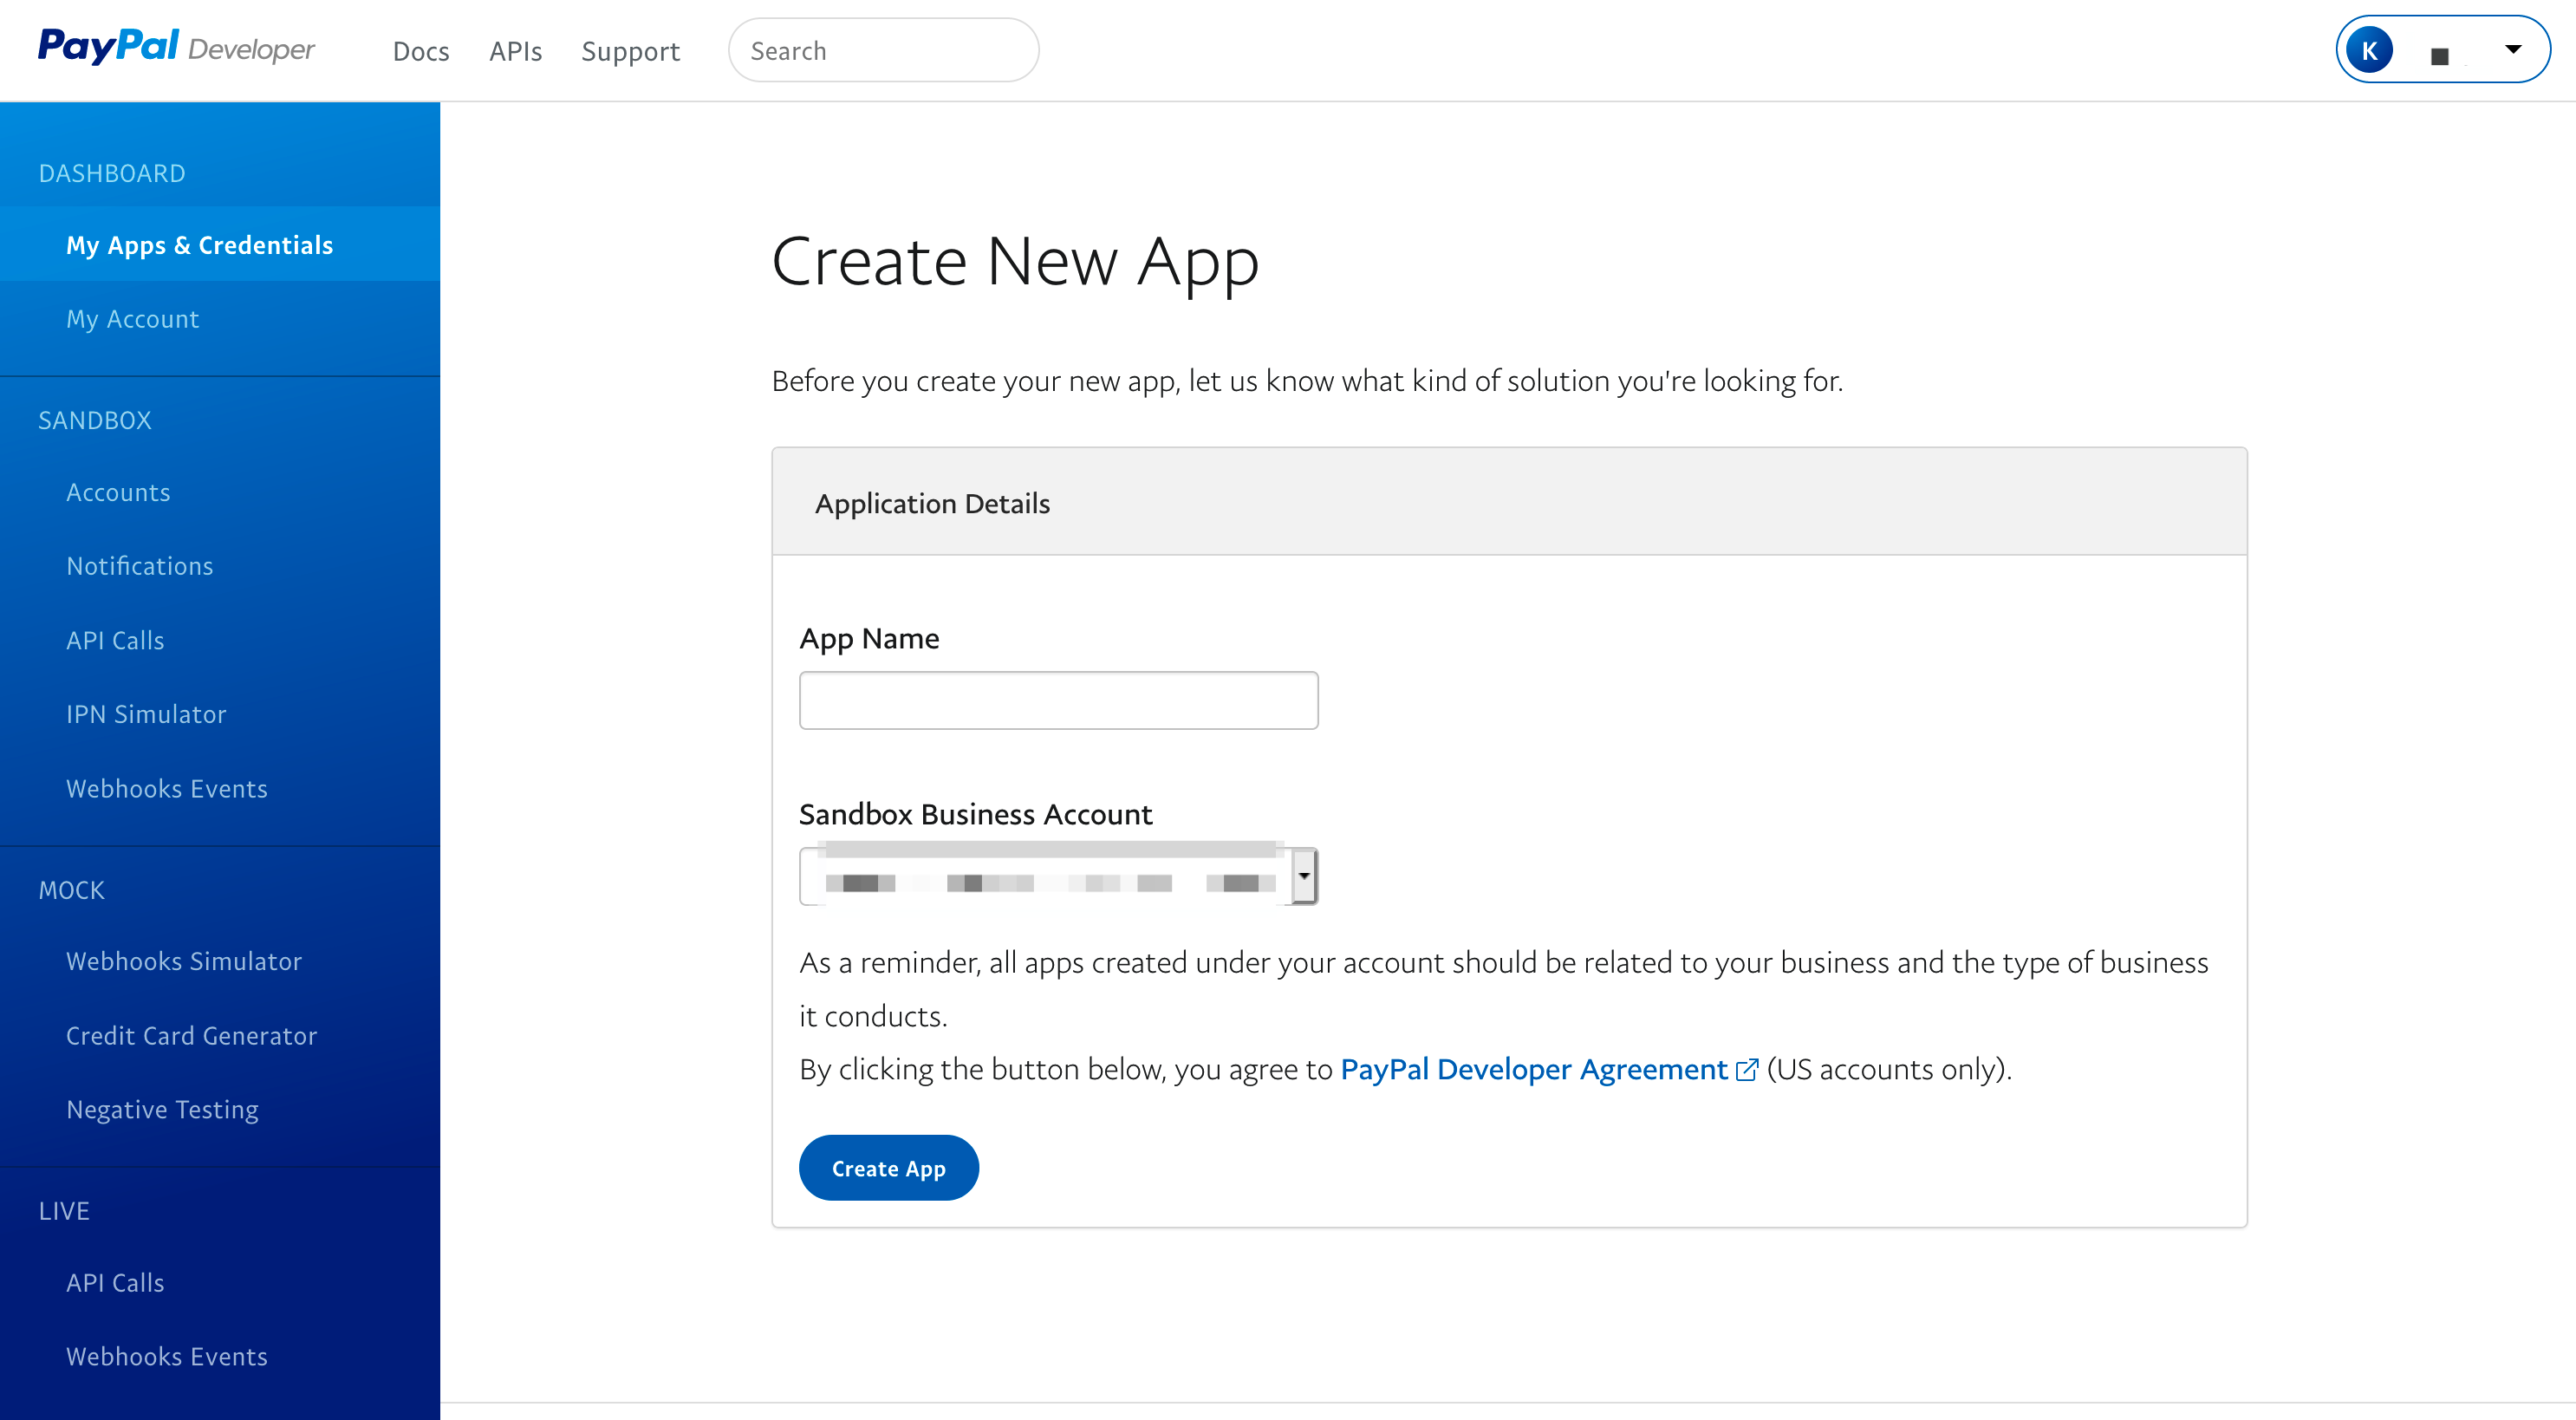
- Go to your PayPal Dashboard, select the mode you want to set up (either “Sandbox” for testing, or “Live” for production) and select Create App.
- Enter a descriptive name for the application,
- e.g., WooCommerce Payouts.
- If prompted, select the Sandbox account, which is automatically created for you.
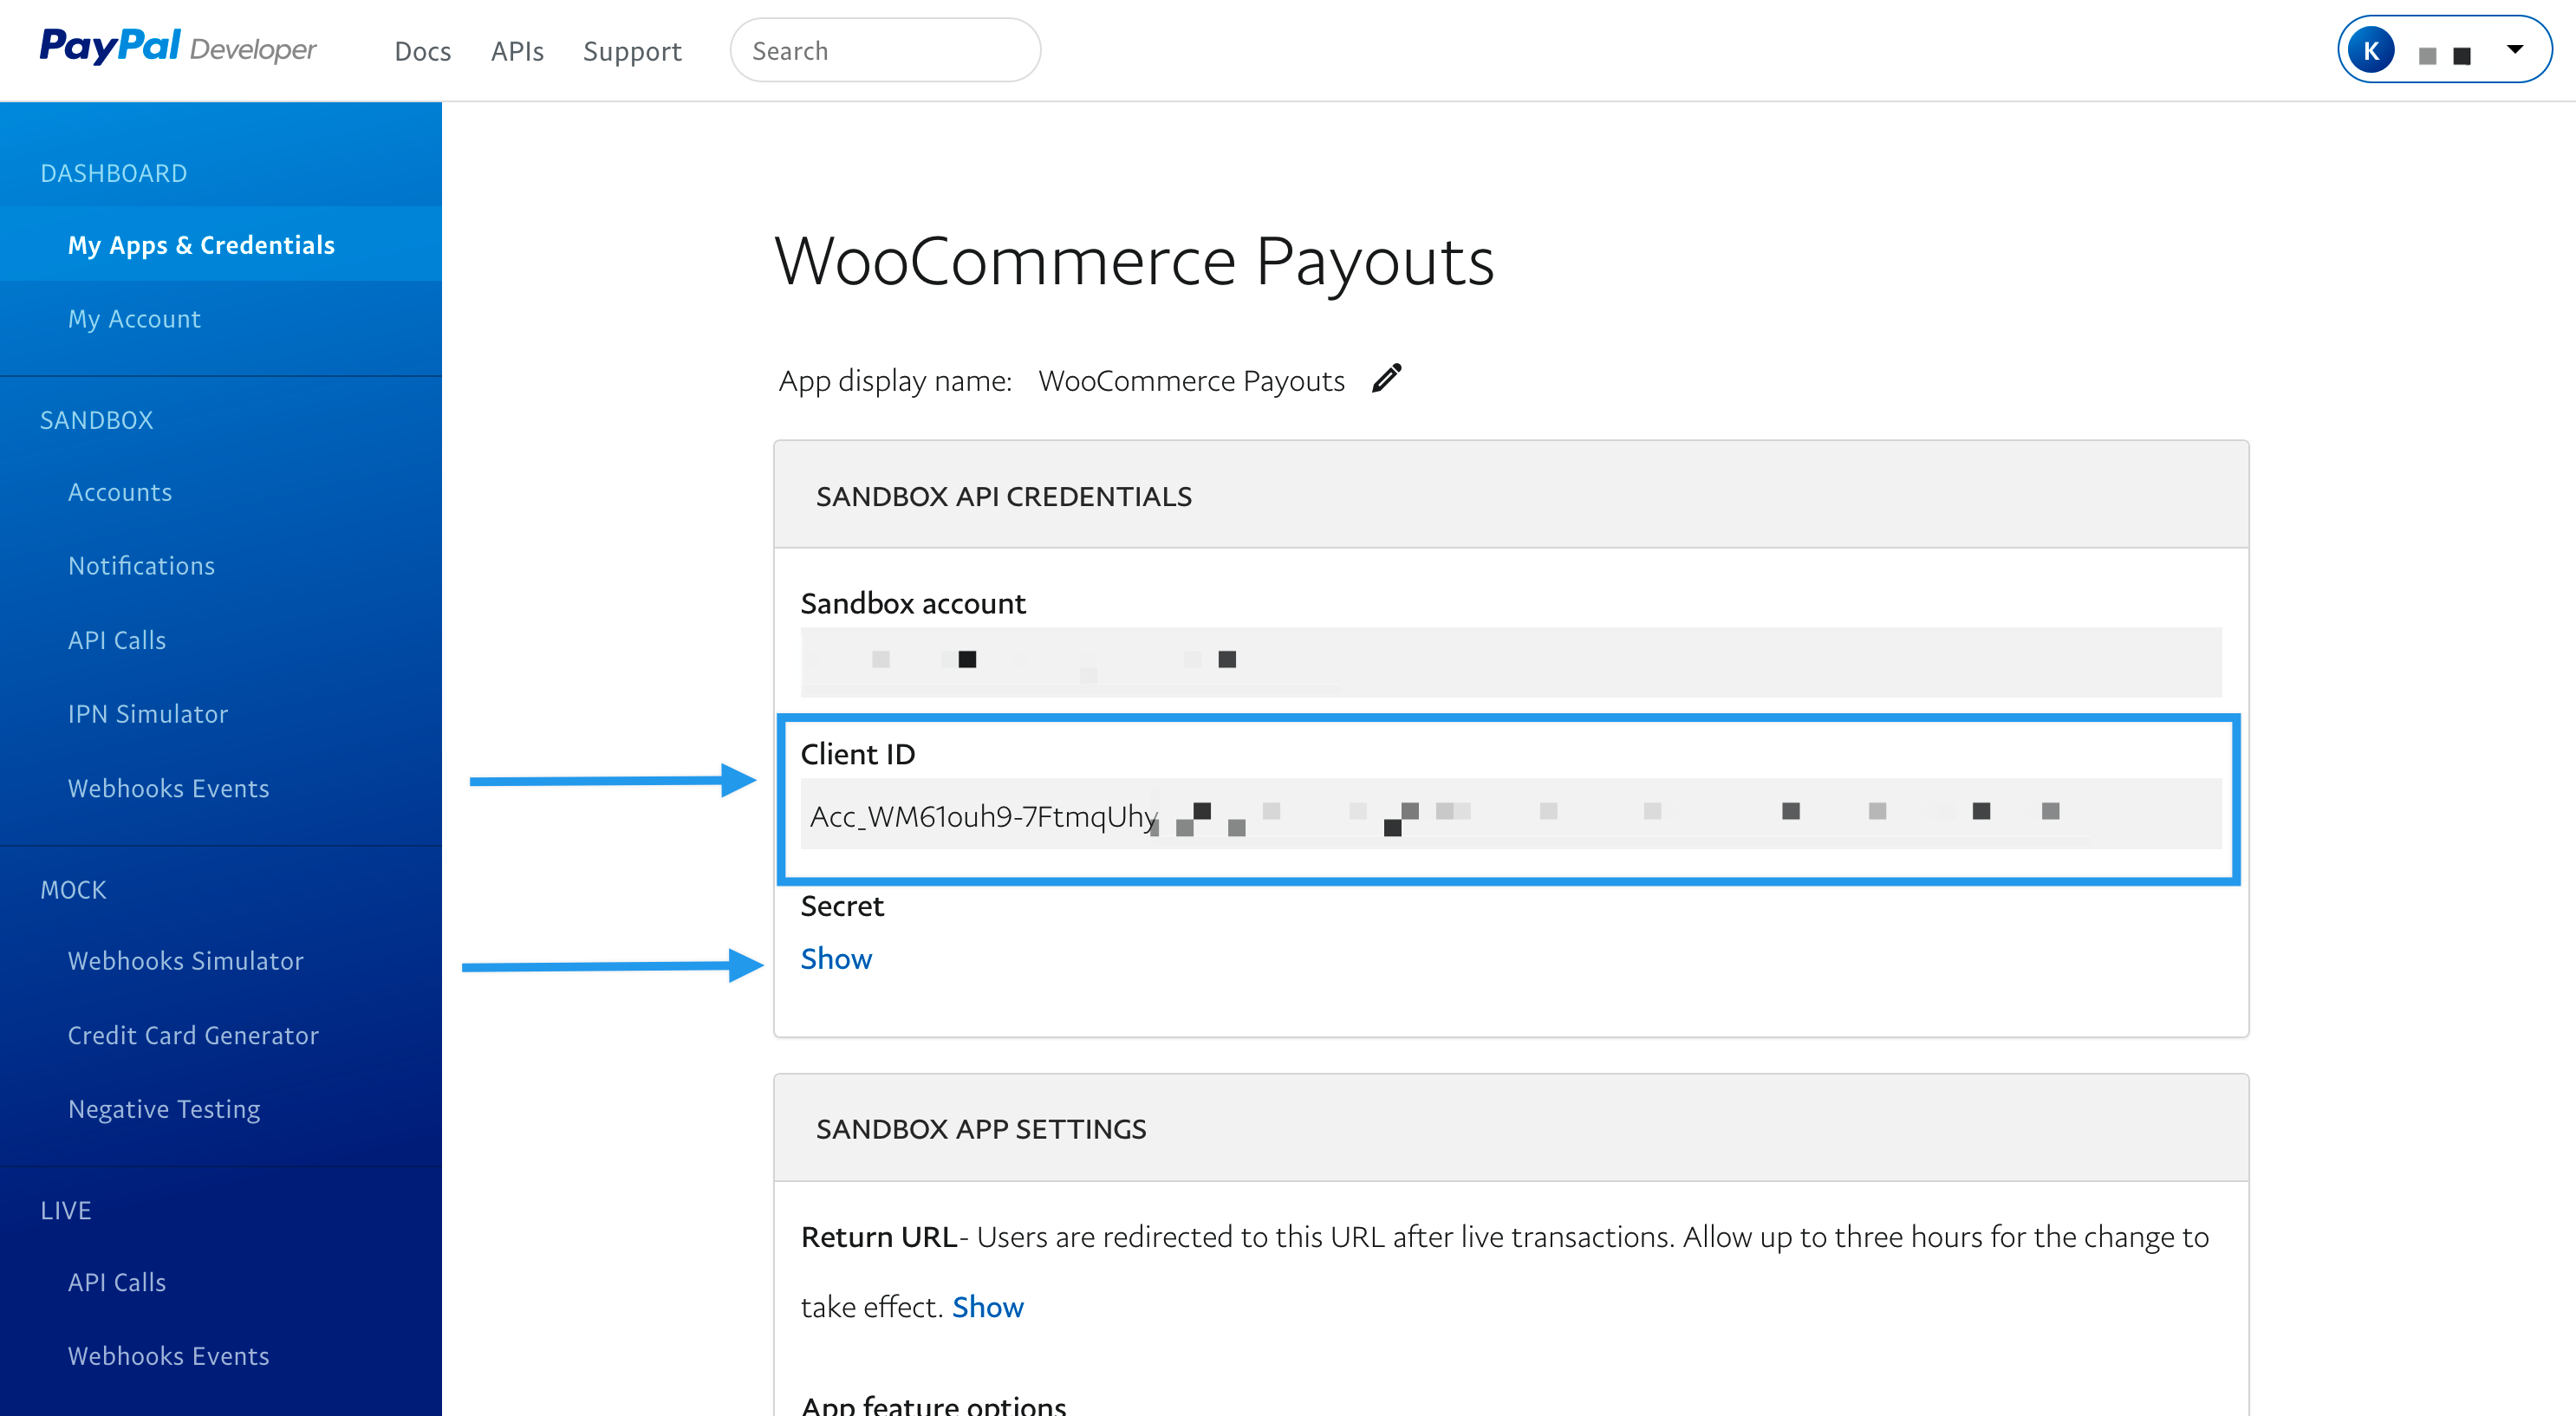
- Copy the Client ID and Client Secret on the next page after the app is created and the screen appears.
- Finally, in the settings under WooCommerce > Settings > Products > Vendors, paste the Client ID and Secret into the “PayPal Payouts API Client ID” and “PayPal Payouts API Secret” fields, respectively. Make sure the Environment is set to the appropriate mode (Sandbox / Live) to match the ID and Secret that were copied from the PayPal dashboard.
Shipping
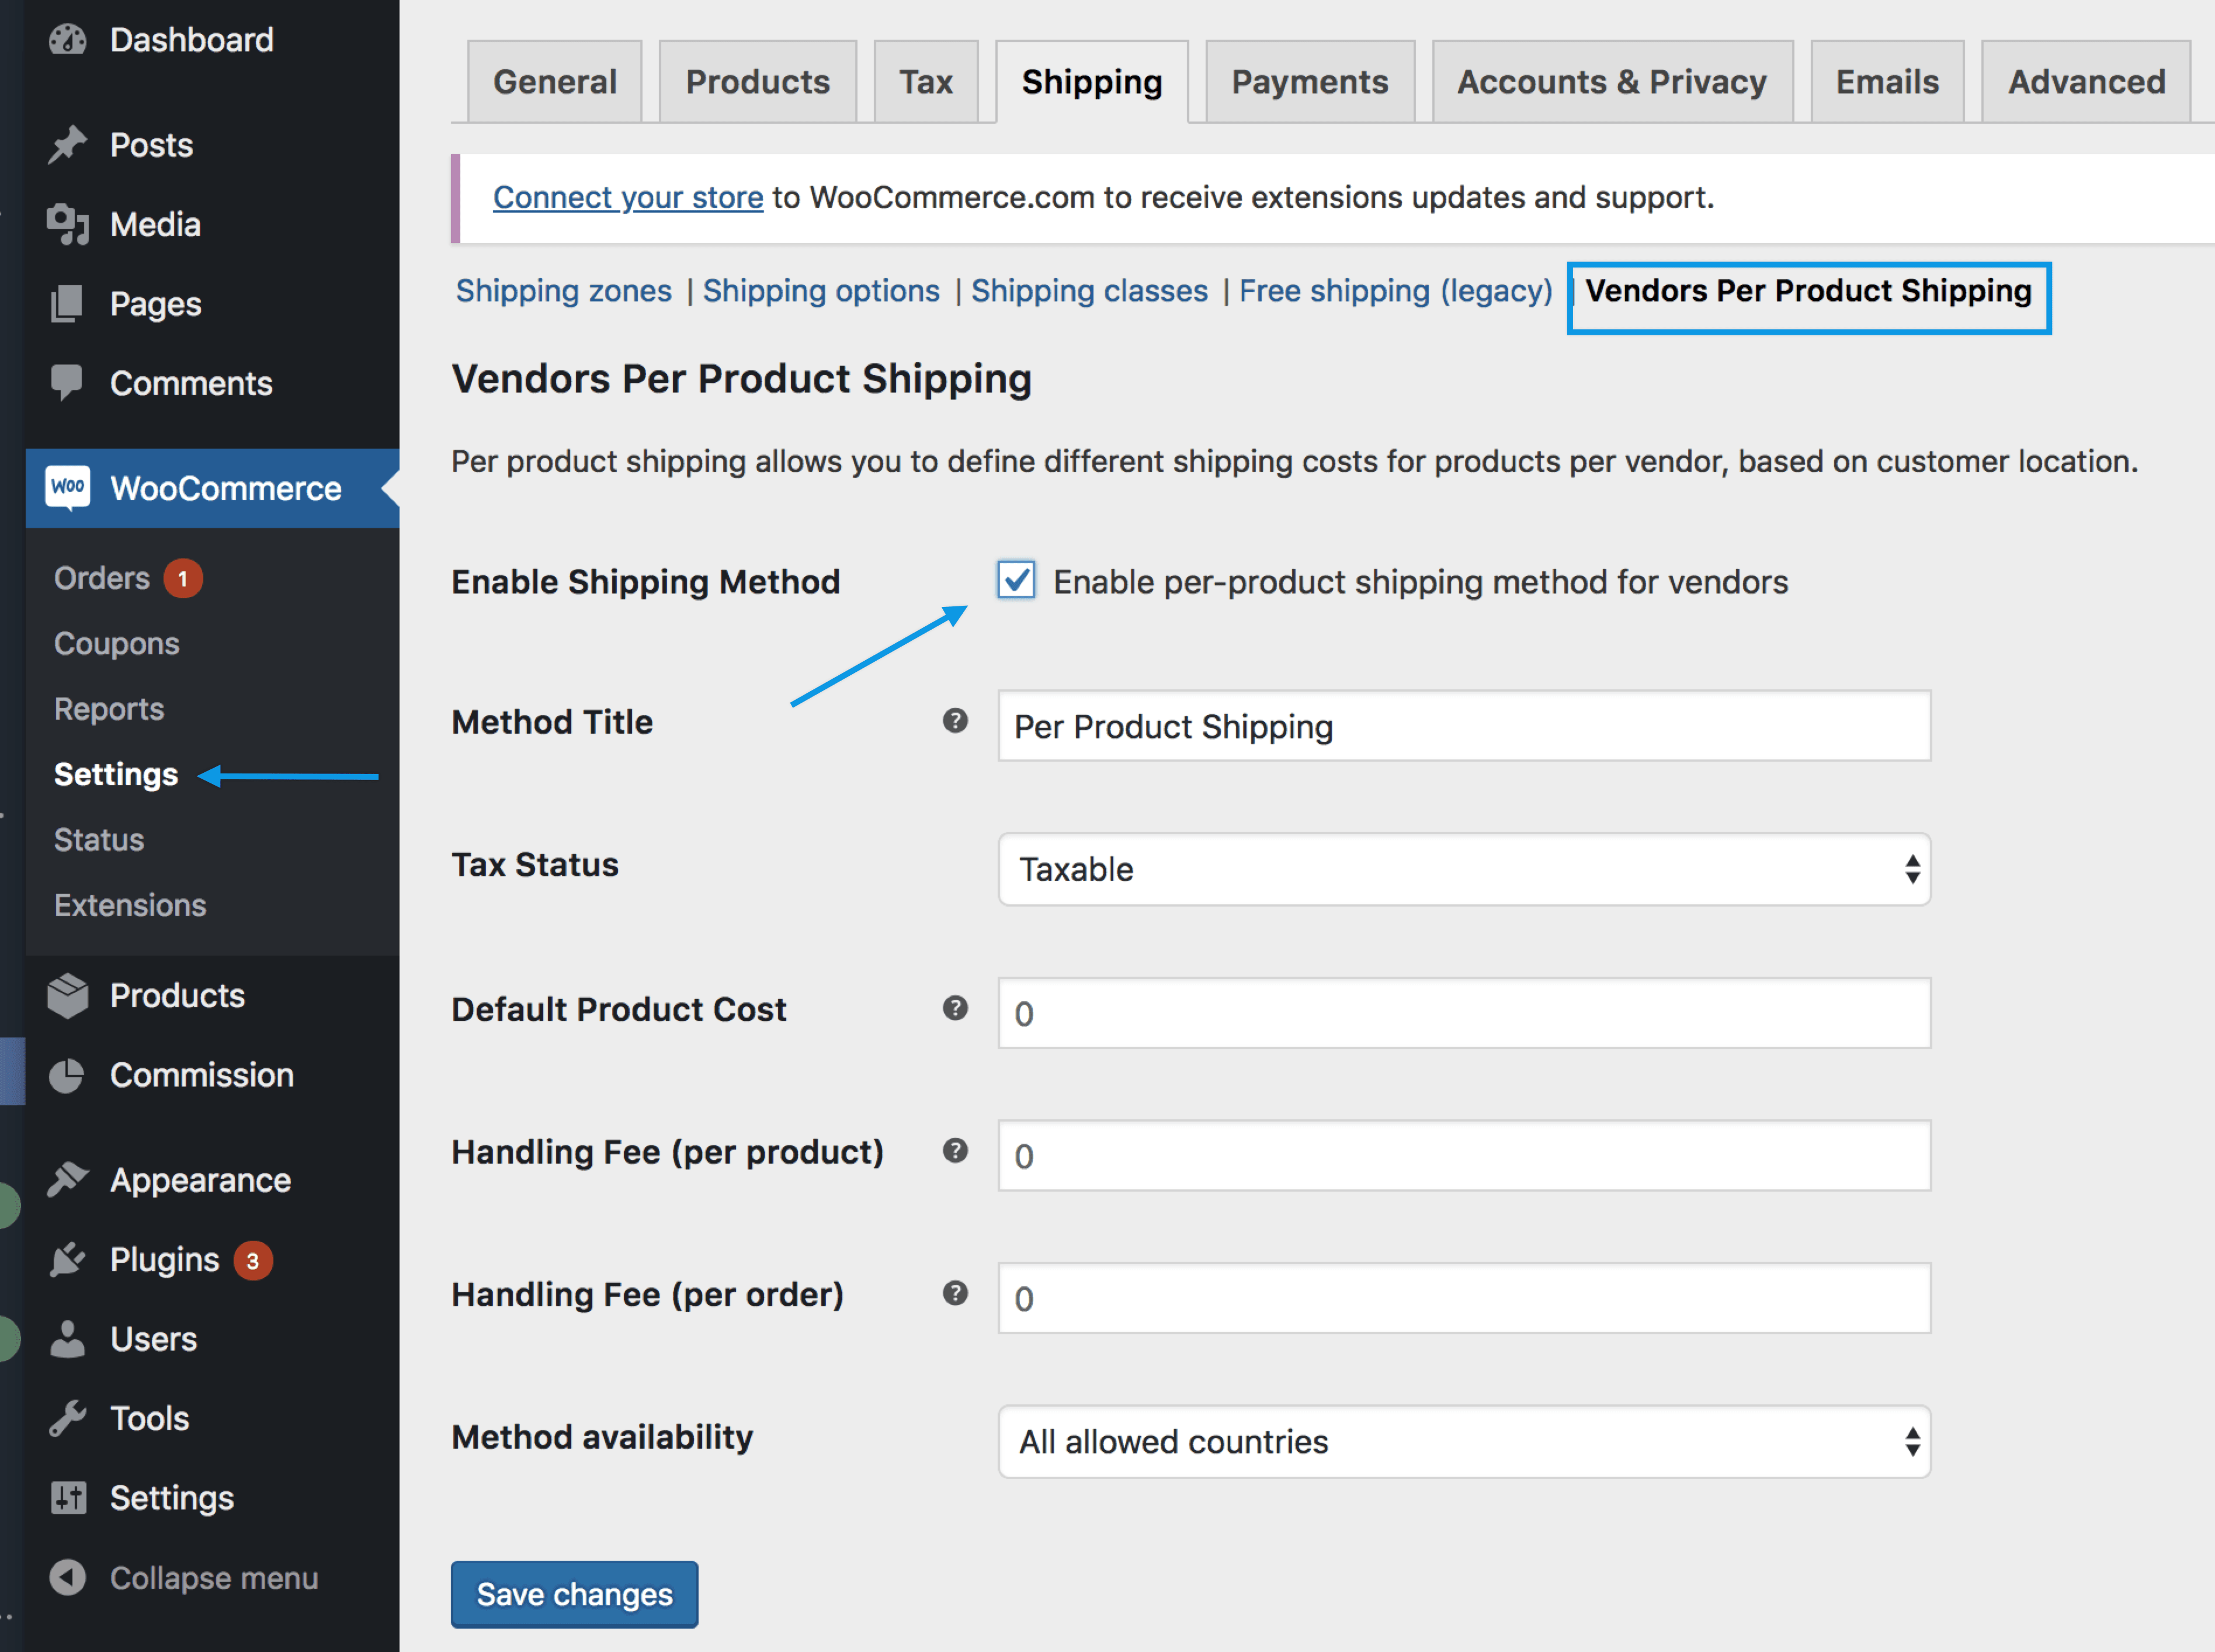
↑ Back to topPer Product Shipping is included and built into Product Vendors. This is the only shipping method that can pass the collected shipping amount along to Vendors (added to the commission), but that shipping cost must be set up on each product, under the Shipping tab. All other shipping methods from WooCommerce core or third-party developers will charge the customer shipping but will not pass the amount collected to vendors.
If Per Product Shipping is enabled for the vendor, they will have the ability to add their own shipping costs per product. If disabled for the vendor, the store owner can add per product shipping costs for them. This is set in Product Data under Shipping > Shipping Rules.
Be sure to also enable the global per product shipping settings where you will also find extra global options.

Tax
↑ Back to topStore Owners set up new tax classes for vendors or add them to an existing tax class.
New tax class
↑ Back to top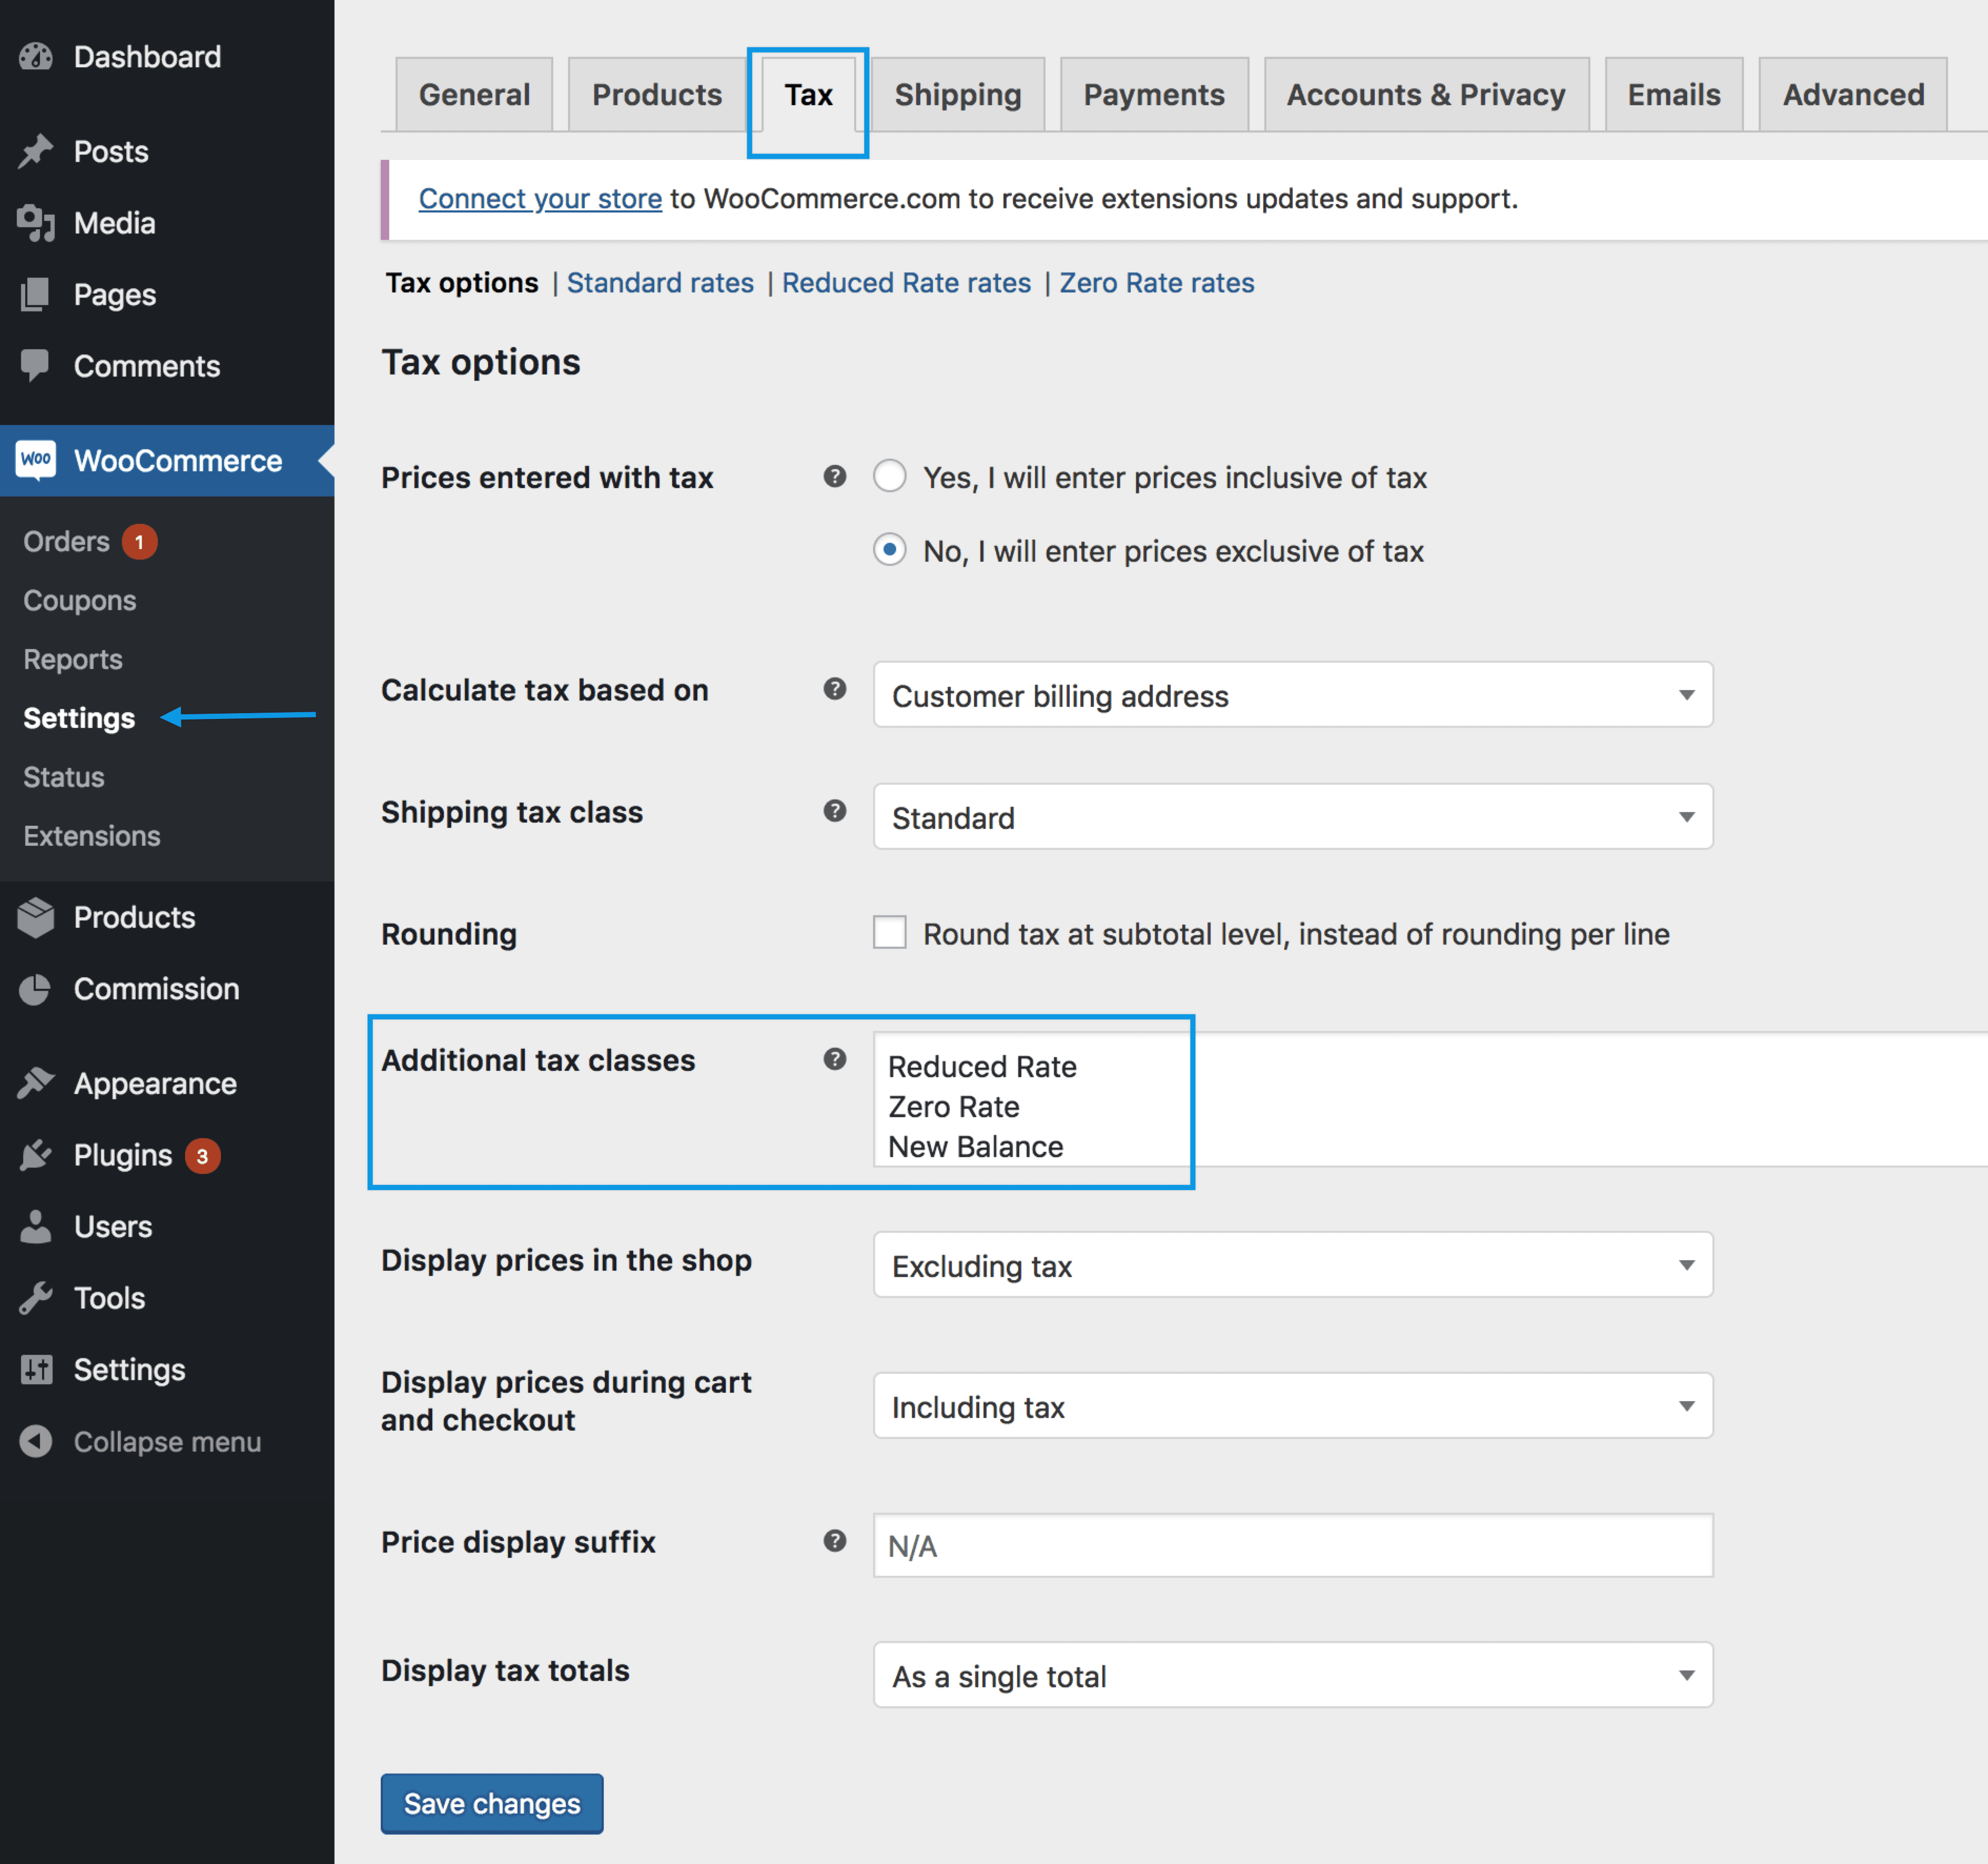
To create a new tax class for a vendor:
1/ Go to: WooCommerce > Settings > Tax.
2/ Add and name the Additional Tax Class.
3/ Edit the tax and set tax rules.

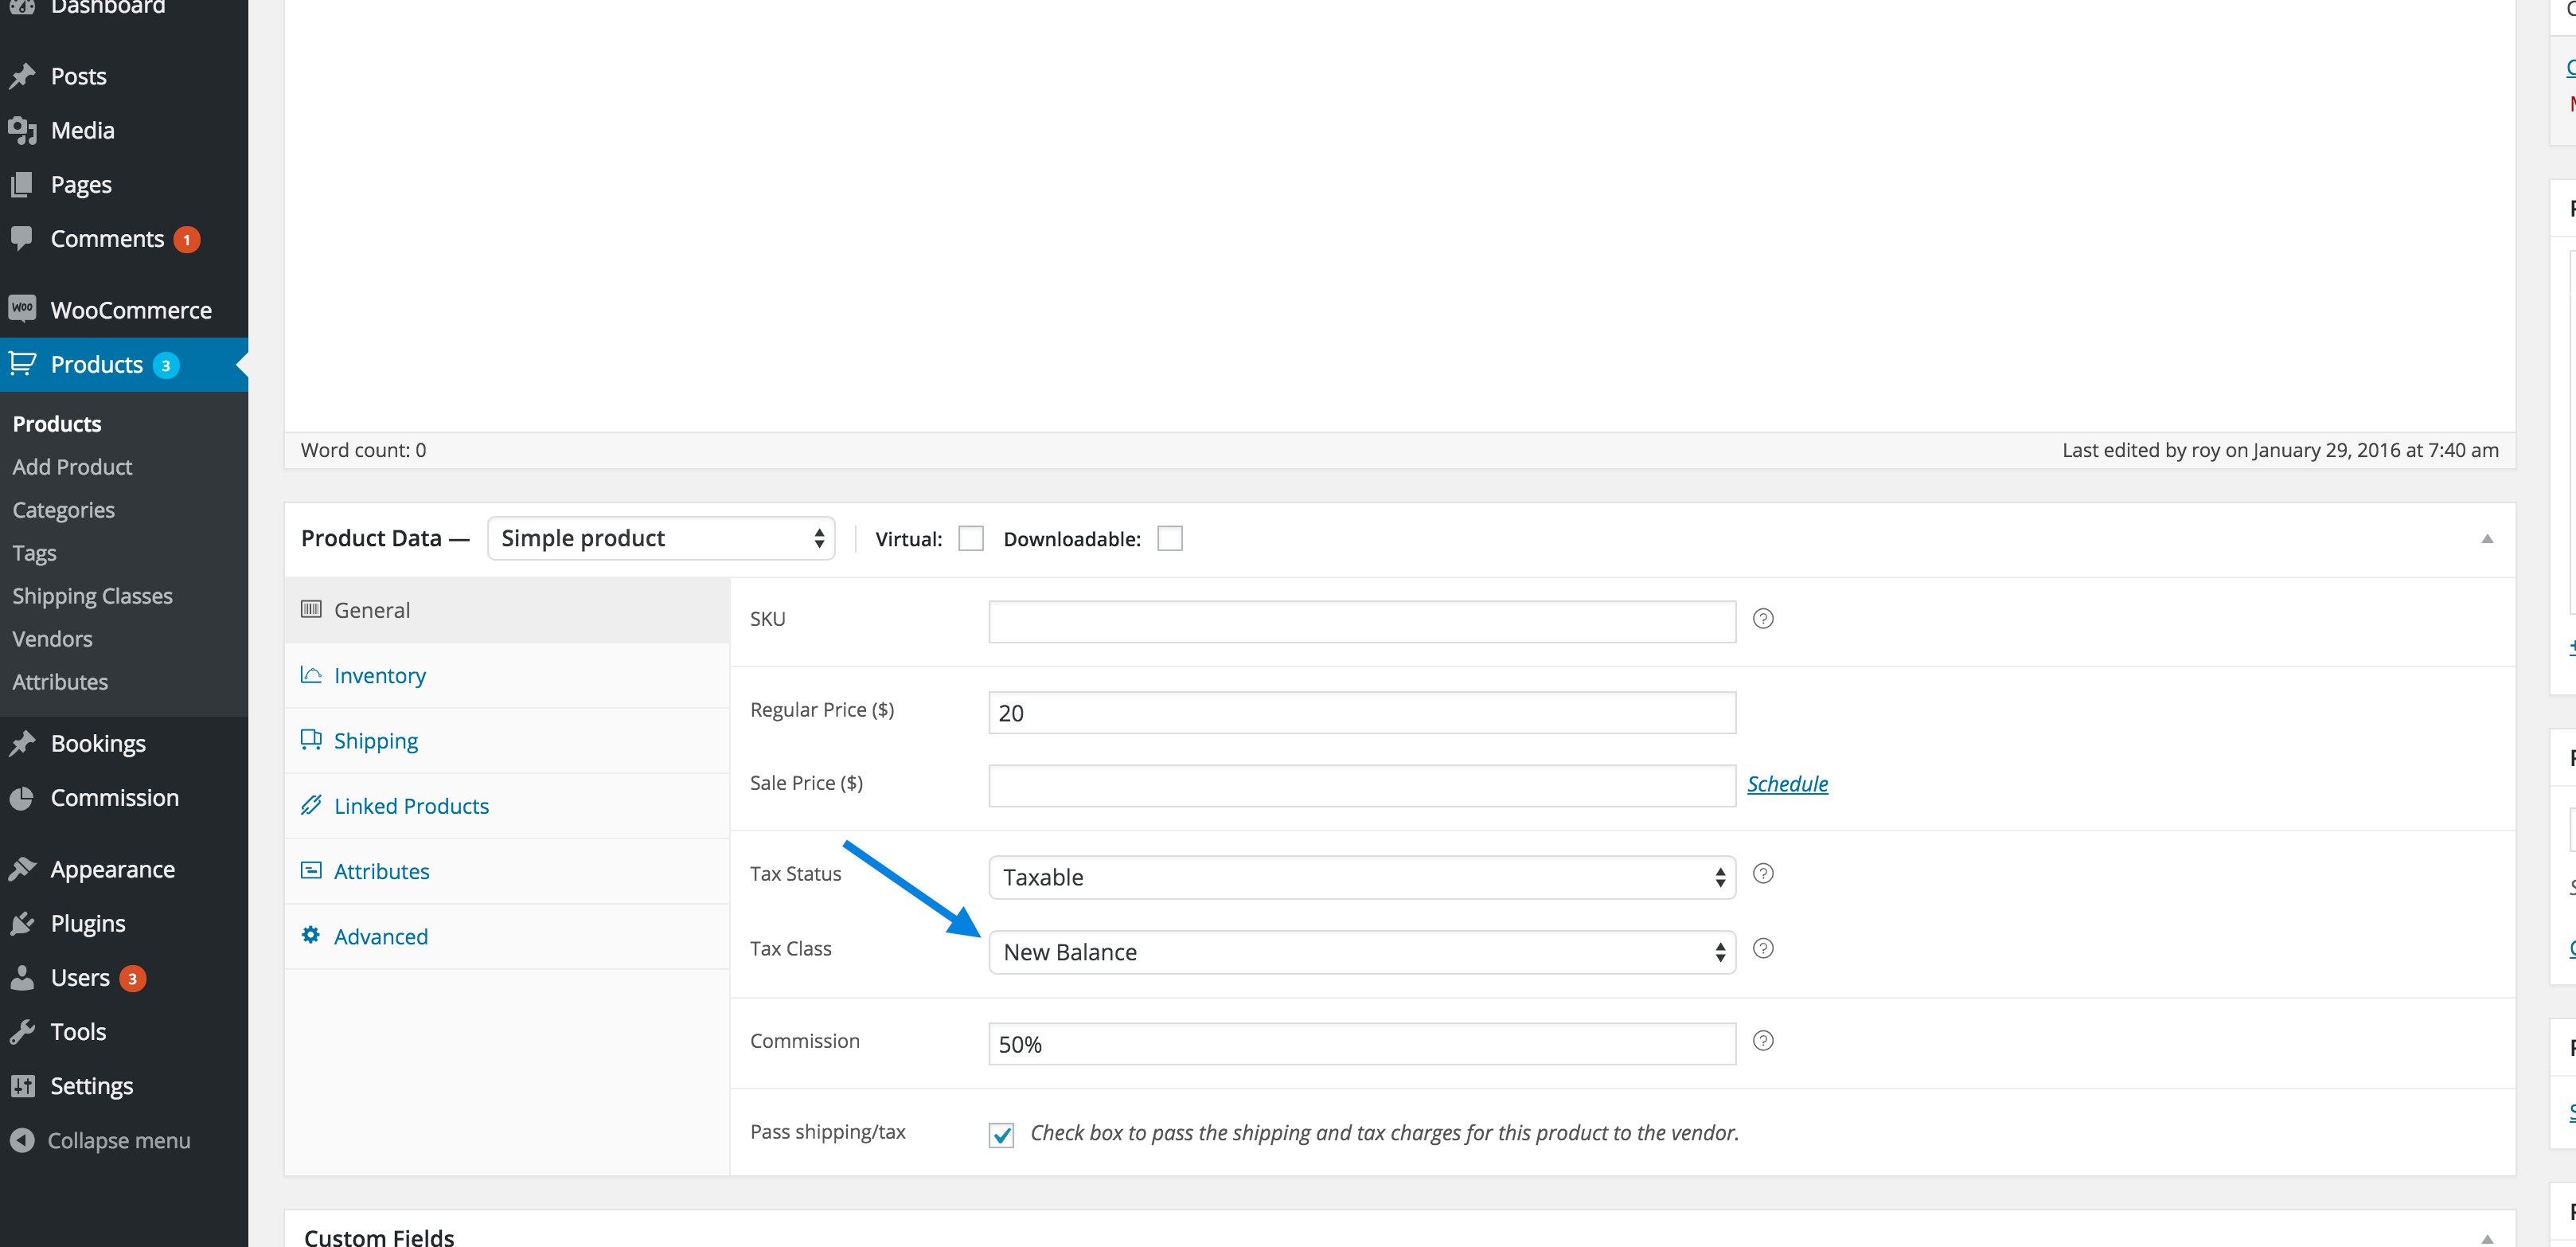
4/ Go to Products > Products, and find the vendor’s product(s).
5/ Edit the vendor’s product, and set the tax class for them.
Add to existing tax class
↑ Back to topVendors can be added to an existing tax class, if you already have a tax class set up on your store that applies to the vendor, e.g., Vendors in California can use the same tax class. Use steps 4 and 5 in the previous section.
More information at: Setting Up Taxes in WooCommerce.
Email Notifications
↑ Back to topSeveral emails are set up in Product Vendors for Vendors and the Store Owner.
- Vendor Registration (Store Owner) – Sent when vendor submits registration form.
- Vendor Registration (Vendor) – Sent to confirm registration form was submitted to store owner with a link to set a new password.
- Order Email (Vendor) – Notifies vendor of a new order.
- Canceled Order Email (Vendor) – Sent to notify vendor that customer canceled.
- Vendor Approval – Sent to vendors with a link to login when registration is approved.
- Product Added Notice – Sent to store owner to review when product is added by a vendor.
- Order Note to Customer – Sent to customer when vendor adds a note, e.g., Tracking number, personal thank you.
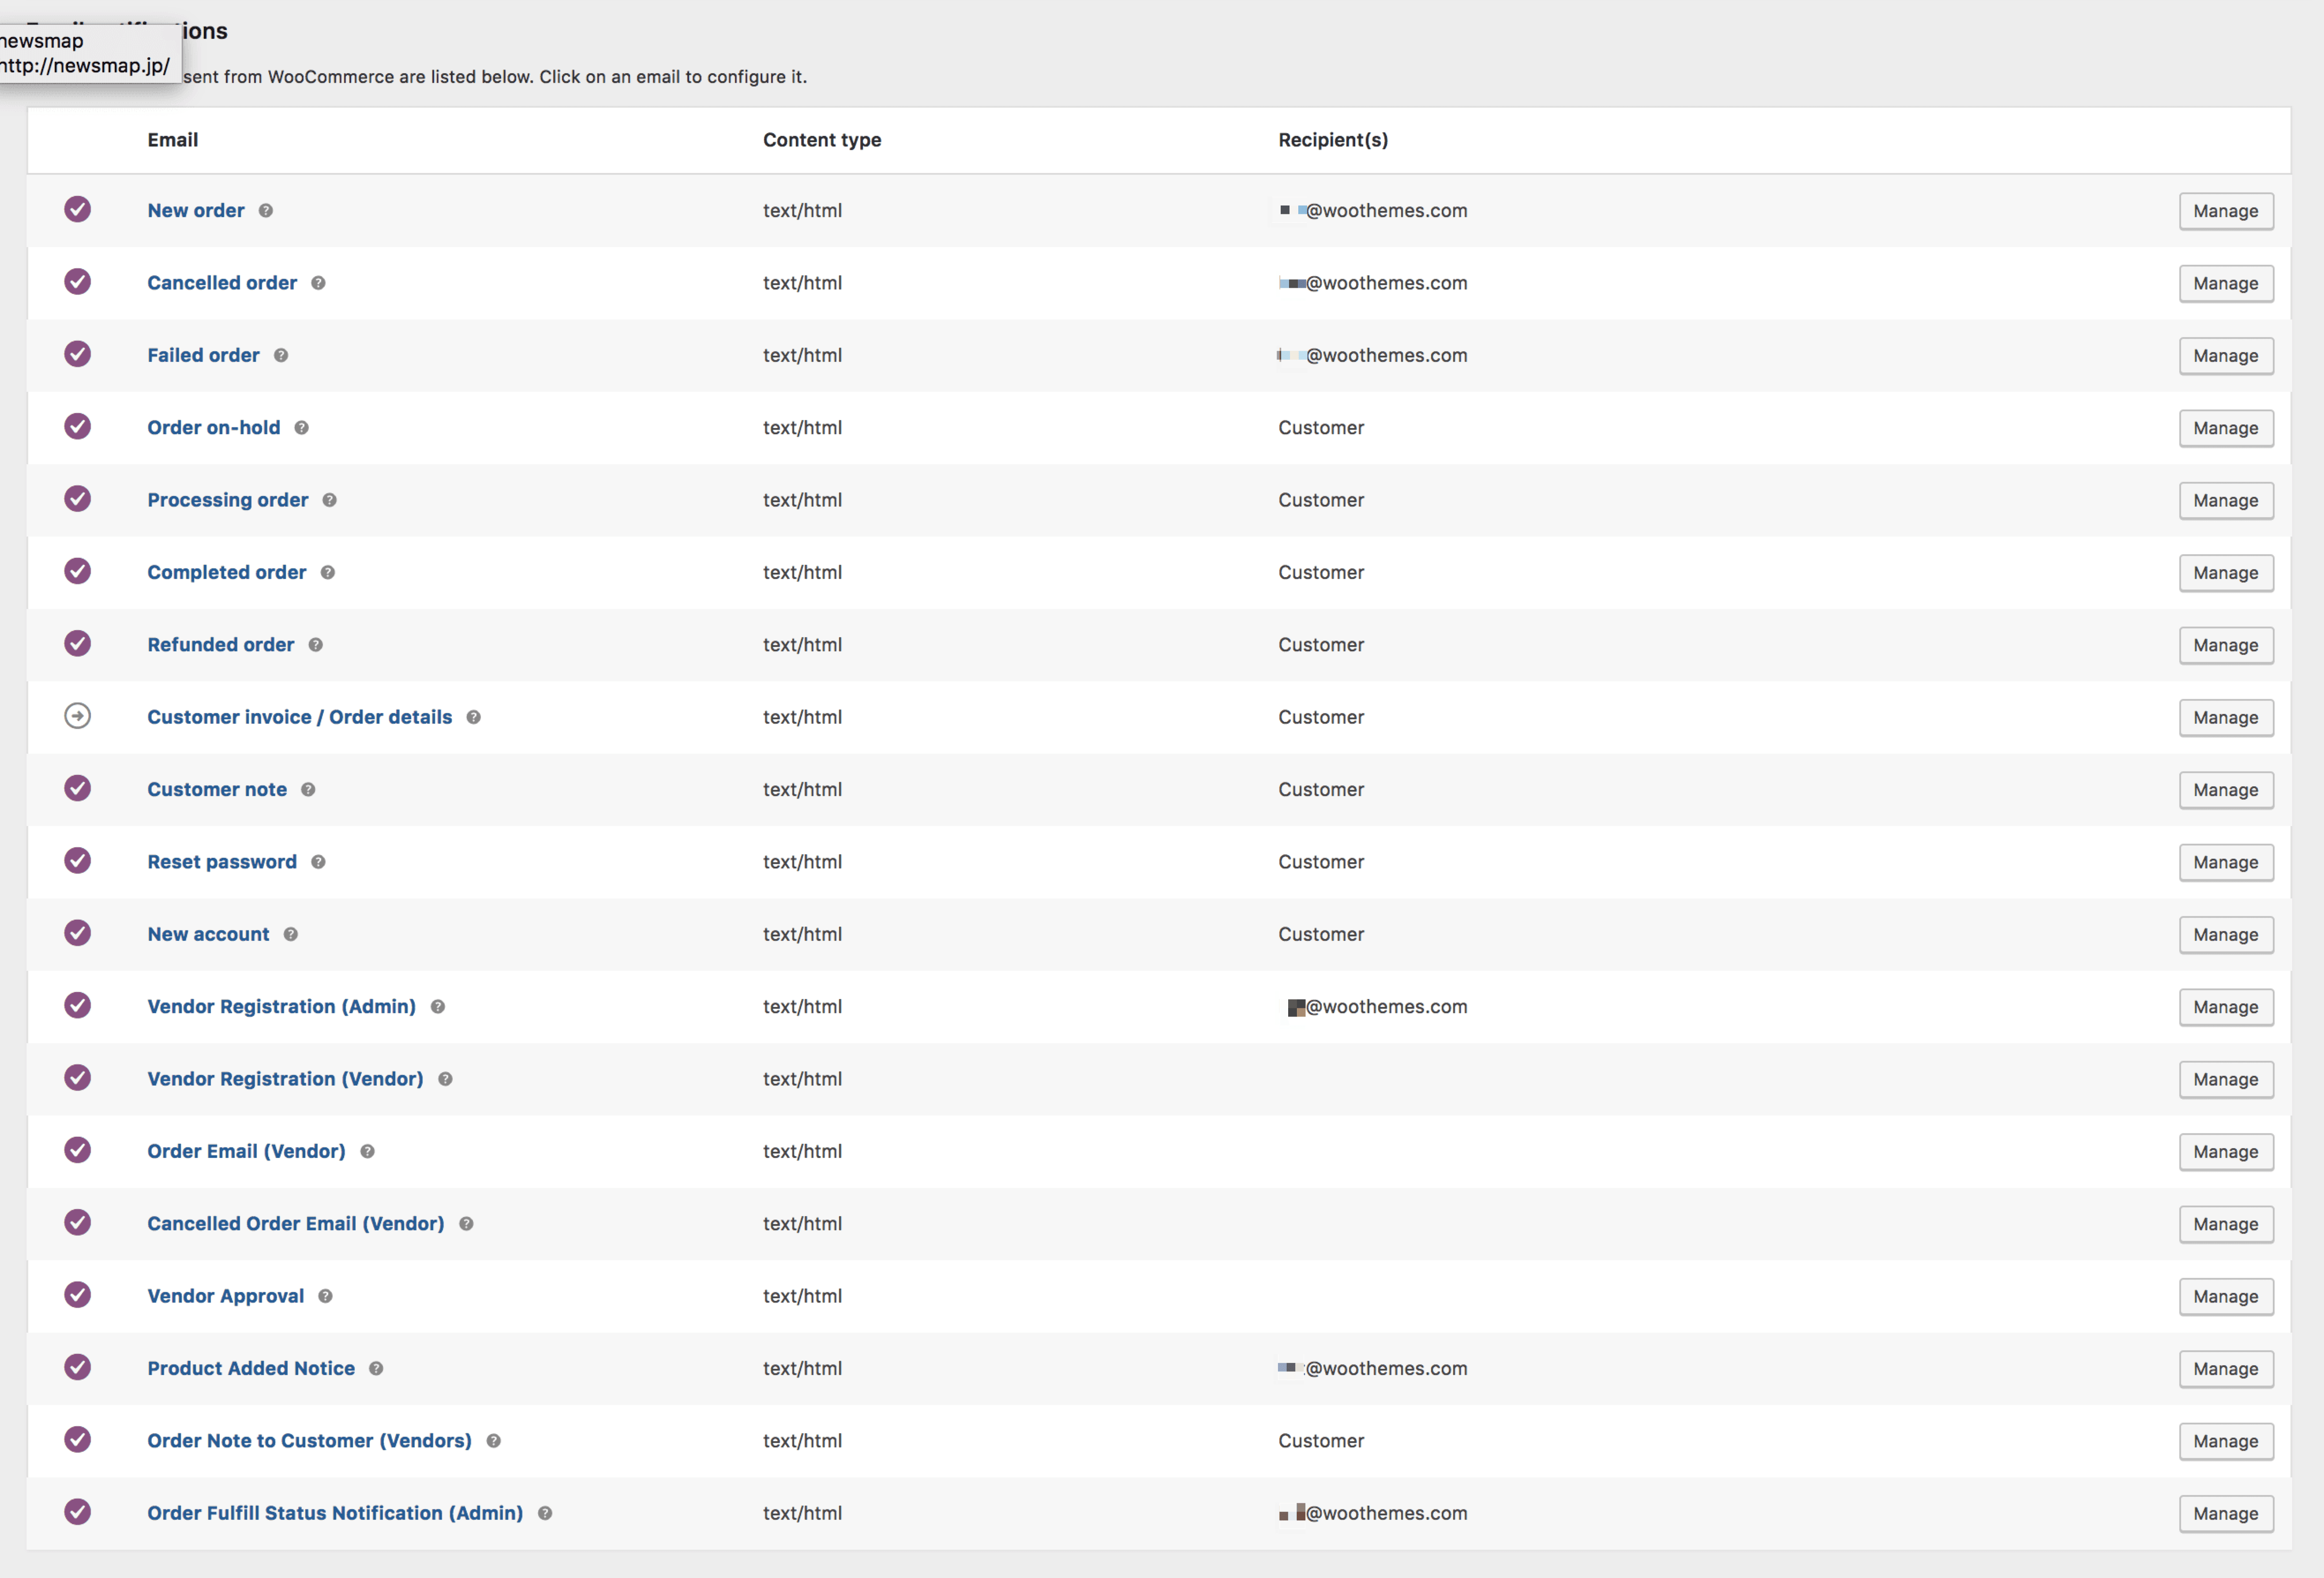
Emails settings can be changed at WooCommerce > Settings > Emails.
Vendor List
↑ Back to topTo display a list of all vendors, you can use the shortcode [wcpv_vendor_list]. Available attributes are “show_name” and “show_logo”. So you can say [wcpv_vendor_list show_name=true] and that would display the vendor list with names.
Widget
↑ Back to topProduct Vendors comes with one widget to display vendor information. It can be set to be:
- Context sensitive, showing the vendor being displayed on that page
- General, showing a specific vendor no matter what page is being visited

The Widget populates with information from the vendor profile. It will display the name, the logo and text. It will not display any clickable links or images that are visible in the profile page only.
Plugin Compatibility
↑ Back to topSome known compatibilities with other plugins.
- WooCommerce Bookings – Fully compatible with a limitation (vendors can’t access or manage resources), and also please make sure that the booking feature is enabled on the vendor setting under WP Admin > Products > Vendors for the vendor whom you want to allow to create bookable products:

- WooCommerce Order Customer CSV Export – Use this custom code Add Vendor Column
FAQ
↑ Back to topCan each vendor add their own payment gateway?
↑ Back to topNo, all sales (and refunds) are processed via the Store Owner’s payment gateway(s). A Vendor’s revenue is paid out to them, from the funds collected by the Store Owner, as commission. This process can be automated if the Store Owner sets up PayPal Payments and the Vendor adds their PayPal address.
Why does the Vendor Admin role grant the Vendor Admin to delete posts, and delete others’ posts, yet deny the Vendor Admin the capability to create posts, publish posts, or edit published posts?
Attachment/Product images are stored on disk and recorded as attachment post type in the database. The product can be added by the Vendor admin or Administrator. The vendor has the capability to upload_files. To delete these files vendor needs delete_posts and delete_others_posts (uploaded by Administrator ) capability. That’s why the Vendor Admin has the capability to delete posts and delete others’ posts.
What data is shared with the vendors?
↑ Back to topWhen a customer completes a purchase for a vendor product, the order details become available to the respective vendor. This information includes the customer’s shipping and billing address, along with the items ordered enabling the vendor to fulfill the order effectively.
You may explicitly mention this process in your privacy policy page, ensuring transparency to your customers regarding the data shared with the vendor. This disclosure helps build trust with your customers by keeping them informed about the handling of their information in the order fulfillment process.
Depending on the settings enabled and additional plugins, the specific information shared by your store will vary. We recommend consulting with a lawyer when deciding what information to disclose on your privacy policy.
Why does the Vendor Admin role not have the capability to delete a product or to delete products, yet have the capability to delete others’ products, and to edit others’ products?
An administrator can create a product for Vendor Admin. Vendor needs edit_others_products, delete_others_products, and delete_published_products capability to edit/delete products created by the Administrator on their behalf. Thus, the Vendor Admin needs manage_product capability to edit/delete own product.
Is WooCommerce Bookings compatible with Product Vendors? Can Vendors create and manage bookable products?
↑ Back to topYes, WooCommerce Bookings is compatible with Product Vendors.
A Vendor can create and manage bookable products only if the Booking feature is enabled for the Vendor by the Administrator. An admin can enable the booking feature for a Vendor from Products > Vendors > Click on a specific vendor > Scroll to the bottom under “Extra details” > Enable Bookings Feature.
Compatibility
↑ Back to topWooCommerce Subscriptions
- Vendors are assigned commissions based on both the initial sale and each recurring payment.
Questions and Support
↑ Back to topSomething missing from this documentation? Do you still have questions and need assistance?
- Have a question before you buy this extension? Please fill out this pre-sales form – please include the name of this extension in your query.
- Already purchased and need some assistance? Get in touch with a Happiness Engineer via the WooCommerce.com Support page and choose this extension name from the “I need help with” dropdown